android绘制多个黑竖线条
本文实例为大家分享了android绘制多个黑竖线条展示的具体代码,供大家参考,具体内容如下
1.写一个LinearLayout的布局,将宽度写成5dp将高度写成match_parent.
2.在写一个类继承LinearLayout,用LayoutInflater实现子布局的在这个LinearLayout类中显示。
3.直接在需要使用的xml文件中调用我们写的这个class,注意路径要写全。
1.xml代码
<?xml version="1.0" encoding="utf-8"?>
<LinearLayout xmlns:android="http://schemas.android.com/apk/res/android"
android:layout_width="5dp"
android:layout_height="match_parent"
android:background="#000000"
>
</LinearLayout>
2.java代码
package com.example.lenovo.myfragmentdemo3;
import android.content.Context;
import android.support.annotation.Nullable;
import android.util.AttributeSet;
import android.view.LayoutInflater;
import android.widget.LinearLayout;
import com.example.lenovo.myfragmentdemo3.R;
/**
* Created by lenovo on 2018/5/7.
*/
public class Linedemo extends LinearLayout {
public Linedemo(Context context, @Nullable AttributeSet attrs) {
super(context, attrs);
LayoutInflater.from(context).inflate(R.layout.line,this);
}
}
3.布局代码
<?xml version="1.0" encoding="utf-8"?>
<LinearLayout xmlns:android="http://schemas.android.com/apk/res/android"
android:orientation="horizontal"
android:layout_width="match_parent"
android:layout_height="match_parent"
android:padding="10dp"
>
<com.example.lenovo.myfragmentdemo3.Linedemo
android:layout_width="20dp"
android:layout_height="match_parent"
android:layout_marginRight="100dp"/>
<com.example.lenovo.myfragmentdemo3.Linedemo
android:layout_width="20dp"
android:layout_height="match_parent"
android:layout_marginRight="100dp"/>
<com.example.lenovo.myfragmentdemo3.Linedemo
android:layout_width="20dp"
android:layout_height="match_parent"
android:layout_marginRight="100dp"/>
<com.example.lenovo.myfragmentdemo3.Linedemo
android:layout_width="20dp"
android:layout_height="match_parent"
android:layout_marginRight="100dp"/>
</LinearLayout>
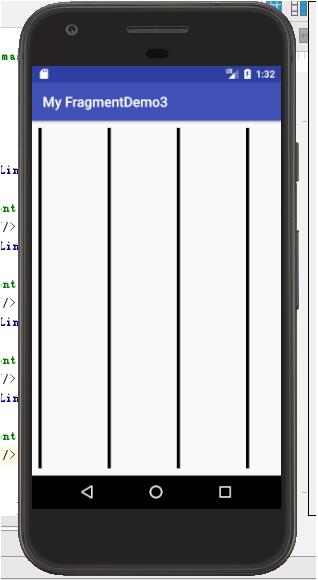
运行效果:
以上就是本文的全部内容,希望对大家的学习有所帮助,也希望大家多多支持。
以上是 android绘制多个黑竖线条 的全部内容, 来源链接: utcz.com/p/240500.html