Vue页面内公共的多类型附件图片上传区域并适用折叠面板(示例代码)
在前端项目中,附件上传是很常用的功能,几乎所有的app相关项目中都会使用到,一般在选择使用某个前端UI框架时,可以查找其内封装好的图片上传组件,但某些情况下可能并不适用于自身的项目需求,本文中实现的附件上传区域支持超多类型附件分类型上传,并且可根据特定条件具体展示某些类型的附件上传,本文中是直接摘自具体的页面,后面会抽时间单独封装出来一个附件上传的组件。
一、Vue页面内附件展示区域代码
<div class="retuinfo">
<div class="theadInfo-headline">
<span></span>
{{FileDivName}}
</div>
<Collapse v-model="defaultCollapse">
<Panel v-for="(item,pngIndex) in pngFileArray" v-bind:key="pngIndex" :name="item.num" v-show="item.isshow">
{{item.name}}
<div class="obsfilesdiv" slot="content">
<div v-for="(obs,index) in item.files" v-bind:key="index" class="obsfileslist">
<input ref="fileImg" type="file" accept="image/*;capture=camera" style="display: none;"
@change="setObsFile(item.num,1,obs.FileType,obs.Num,obs.Code)">
<label style="color:#6d7180; font-size: 20px;">{{obs.FileType}}<span style="color:red;"
v-show="obs.FileType!='其他'">*</span></label>
<ul class="obsfilesul">
<li v-for="(objitem,objindex) in obs.FileObj" v-bind:key="objindex">
<img :src="objitem.imgurl ? objitem.imgurl : fileUrl"
@click="showObsFiles(obs.FileFlag,objitem.imgurl)" />
<img src="../../../img/other/wrong.png" v-show="objitem.IsCanEdit" class="wrong_class"
@click="deleteObsFlie(item.num,index,objindex,objitem.imgid,objitem.imgurl)" />
</li>
<li style="border: 4px solid #f3f3f3;" @click="PlusClick(obs.FileType,obs.FileFlag,obs.Num)">
<img src="../../../img/icon-adds.png" alt="" />
</li>
<div style="clear:both;"></div>
</ul>
</div>
</div>
</Panel>
</Collapse>
</div>
<div class="modal" v-show="viewBigImg">
<div class="img-view-modal" style="text-align: right;">
<img :src="viewImgURL" style="width: 100%;" @click="hideShow(0)">
<Icon type="md-close" style="margin-right: 20px;" size='20' @click="hideShow(0)" />
</div>
</div>
</div>
Vue项目引入了以下UI框架:(若想拿来即用 需要先在main.js中引入)IView、MintUI、Vant 此段代码只要确保引入IView即可正常使用
二、数据绑定设计
具体的不详细展开说,数组与通过属性控制,很好理解。
pngFileArray: [{
num: '0',
name: '整车',
isshow: localStorage.getItem("RoleName").indexOf('铭牌质检员') != -1 ? true : false,
files: [ //FileFlag://1:图片;2:视频 3.其他
{
FileType: '整车铭牌图片',
Code: '201',
Num: 0,
FileFlag: 1,
FileObj: [],
IsNoFile: true
},
{
FileType: '车架VIN图片',
Code: '207',
Num: 1,
FileFlag: 1,
FileObj: [],
IsNoFile: true
},
{
FileType: '终端图片',
Code: '301',
Num: 2,
FileFlag: 1,
FileObj: [],
IsNoFile: true
}
]
},
{
num: '1',
name: '里程',
isshow: localStorage.getItem("RoleName").indexOf('客户经理') != -1 ? true : false,
files: [{
FileType: '里程表照片',
Code: '701',
Num: 3,
FileFlag: 1,
FileObj: [],
IsNoFile: true
}
]
}
],
三、绑定的方法
1.图片加载方法:
//获取图片列表
getImageList() {
this.$indicator.open({
text: '图片加载中...',
spinnerType: 'snake'
});
let _this = this;
let downRequest ={
'crm_vin': this.parms.crm_vin,
'crm_vehiclenumber': this.parms.crm_vehiclenumber
};
let imgListParams = {
"ImageDownRequest": JSON.stringify(downRequest),
"username": localStorage.getItem("usernameone"),
"password": localStorage.getItem("password")
};
console.log("获取图片列表参数:", imgListParams);
_this.$ajax.defaults.headers['Content-Type'] = 'application/x-www-form-urlencoded;'; //配置请求头
this.$ajax.post(this.imageListUrl, this.$qs.stringify(imgListParams)).then(resdata => {
_this.$indicator.close();
console.log("获取到的图片列表数据:", resdata);
let data = resdata.data;
console.log("转换后的图片列表数据:", data);
if (resdata.status != 200) {
_this.$toast({
message: '获取图片列表失败!',
duration: 3000
});
return;
}
//先清空原有的图片列表
_this.pngFileArray.forEach((rr,index,array) =>{
for(var file=0;file<rr.files.length;file++){
_this.pngFileArray[index].files[file].FileObj = [];
_this.pngFileArray[index].files[file].IsNoFile = true;
}
});
//将图片列表写入页面各图片分类区域
for(var i=0;i<data.length;i++){
_this.pngFileArray.forEach((rr,index,array) =>{
for(var file=0;file<rr.files.length;file++){
if(data[i].crm_imagetypeno==rr.files[file].Code){
let putparm = {
"IsCanEdit":false,
"imgid": data[i].crm_careimageId,
"imgurl": data[i].ImageUrl
};
_this.pngFileArray[index].files[file].FileObj.push(putparm);
_this.pngFileArray[index].files[file].IsNoFile = false;
}
}
});
}
}).catch(function(error) {
_this.$indicator.close();
_this.$toast({
message: error,
duration: 3000
});
});
},
2.图片展示方法
showObsFiles(type, url) { //展示图片或视频
console.log("展示附件:" + type);
if (type == 1) { //图片
this.viewBigImg = true;
this.viewImgURL = url;
} else { //文件
this.$messagebox.alert("不支持查看文件,请到PC端操作!", "提示");
return;
}
},
3.上传图片相关方法
(最开始设计的是支持图片、视频和其他类型文件等上传,项目中已实现,本文中不做拓展)
PlusClick(type, flag, num) {
console.log("当前附件类型:" + type);
console.log("当前附件序号:" + num);
this.currentFileType = type;
if (flag == 1) { // 图片上传
this.$refs.fileImg[num].dispatchEvent(new MouseEvent('click'));
} else if (flag == 2) { // 视频上传
this.$refs.fileVideo[num].dispatchEvent(new MouseEvent('click'));
} else { // 其他类型文件
this.$refs.filElem[num].dispatchEvent(new MouseEvent('click'));
}
},
setObsFile(classify, type, obsFileType, num, code) { //保存图片到crm中
var _this = this;
var inputFile; //文件流
console.log("图片大分类:" + classify + " " + obsFileType + " " + num) + " 图片编码:" + code;
if (type == 1) {
inputFile = this.$refs.fileImg[num].files[0];
this.$refs.fileImg[num].value = '';
}
var fileName = inputFile.name;
if (!inputFile) {
return;
}
if (inputFile.type == 'image/jpg' || inputFile.type == 'image/jpeg' || inputFile.type == 'image/png' ||
inputFile.type ==
'image/gif') {} else {
this.$messagebox.alert("请上传图片", "提示");
return;
}
_this.$indicator.open({
text: '文件上传中,请稍候...',
spinnerType: 'snake'
});
//图片压缩与转换成base64文件流
var reader = new FileReader();
reader.readAsDataURL(inputFile);
reader.onloadend = function(e) {
let result = this.result;
console.log('********未压缩前的图片大小******** :' + result.length / 1024)
_this.pulic.dealImage(result, {}, function(base64) {
console.log('********压缩后的图片大小******** :' + base64.length / 1024)
_this.putObsFile(classify, fileName, base64, obsFileType, code);
});
//reader.result.substring(this.result.indexOf(',')+1);
// 'data:image/png;base64,'+reader.result
}
},
putObsFile(classify, fileName, base64, obsFileType, code) { //抽出公共上传图片文件方法
var _this = this;
let usernameone = this.$Base64.encode("administrator");
let password = this.$Base64.encode("pass@word1");
let parmsImages = {
crm_newenergyid: localStorage.getItem("crm_newenergyid"),
vin: _this.parms.crm_vin,
crm_vehiclenumber: _this.parms.crm_vehiclenumber,
CareType: code,
CreateBy: localStorage.getItem("SystemUserId"),
ImageStr: base64.split(",")[1],
username: usernameone,
password: password
}
let parms = {
ImageMessage: JSON.stringify(parmsImages)
}
console.log(JSON.stringify(parmsImages));
console.log(JSON.stringify(parms));
_this.$ajax.defaults.headers['Content-Type'] = 'application/x-www-form-urlencoded;'; //配置请求头
_this.$ajax.post(_this.imageSaveUrl, _this.$qs.stringify(parms))
.then(resdata => {
_this.$indicator.close();
console.log("接口响应数据:", resdata);
let data = resdata.data;
console.log("转换后的响应数据:", data);
if (resdata.status != 200) {
_this.$toast({
message: '保存失败!接口调用异常',
duration: 3000
});
return;
}
//将上传成功后的图片url回写到页面的图片分类url中
console.log("当前分类下的所有图片类型:" + JSON.stringify(_this.pngFileArray[parseInt(classify)].files));
for (var i = 0; i < _this.pngFileArray[parseInt(classify)].files.length; i++) { //遍历当前分类下的图片类型数组 并赋值后台返回的数据
if (obsFileType == _this.pngFileArray[parseInt(classify)].files[i].FileType) {
//设置图片文件路径等 putparm
let putparm = {
"IsCanEdit":true,
"imgid": data.crm_careimageId,
"imgurl": data.ImageUrl
};
_this.pngFileArray[parseInt(classify)].files[i].FileObj.push(putparm);
_this.pngFileArray[parseInt(classify)].files[i].IsNoFile = false;
}
}
_this.$messagebox.alert("附件上传成功", "提示");
}).catch(err => {
console.log(JSON.stringify(err));
_this.$toast({
message: '上传失败',
duration: 1500
});
_this.$indicator.close();
});
},
4.删除图片方法
(本文中是只有未提交的图片可删除,若已提交过的图片即页面初始加载获取到的图片不可以删除)
deleteObsFlie(classify,num,index,id,url) { //删除附件
var _this = this;
this.$messagebox.confirm('确定删除该图片吗?', "确认").then(action => {
var del_param = {
"id": id,
"url": url
};
_this.$indicator.open({
text: '删除图片中,请稍候...',
spinnerType: 'snake'
});
_this.$ajax.defaults.headers['Content-Type'] = 'application/x-www-form-urlencoded;'; //配置请求头
_this.PromiseCall(_this.DelImgFilesURL, _this.$qs.stringify(del_param))
.then(data => {
_this.$indicator.close();
console.log(JSON.stringify(data));
if (data.status != 200) {
_this.$messagebox.alert("删除图片失败", "提示");
return;
}
_this.pngFileArray[parseInt(classify)].files[num].FileObj.splice(index, 1);
_this.$toast({
message: '删除图片成功',
duration: 1500
});
}).catch(err => {
_this.doCatch(err);
_this.$toast({
message: '删除图片失败'+err,
duration: 1500
});
_this.$indicator.close();
});
});
},
四、CSS样式
.retuinfo {
width: 96%;
height: auto;
margin-top: 20px;
margin-left: 2%;
background-color: #F5F7FA;
border-radius: 15px;
}
.theadInfo-headline {
width: 100%;
height: 80px;
background: #F3F3F3;
display: flex;
padding-left: 30px;
align-items: center;
font-size: 28px;
color: #666666;
border-radius: 15px;
}
.theadInfo-headline span {
width: 6px;
height: 32px;
background: #5576AB;
border-radius: 3px;
margin-right: 10px;
}
.ivu-collapse-header {
height: 40px;
align-items: center;
display: flex;
}
.obsfilesdiv {
width: 100%;
height: auto;
margin-top: .5rem;
margin-bottom: 50px;
}
.obsfileslist {
width: 100%;
height: auto;
padding: 0.5rem 0.5rem;
background: #fff;
}
.obsfilesul {
width: 100%;
height: auto;
padding-bottom: 8px;
}
.obsfilesul li {
width: 120px;
height: 120px;
float: left;
margin-top: .3rem;
overflow: hidden;
margin-right: .3rem;
border: none;
}
.obsfilesul li img {
width: 100%;
height: 100%;
}
.imglist {
width: 100%;
margin-top: .5rem;
margin-bottom: 6rem;
}
.modal {
background-color: #A9A9A9;
position: fixed;
z-index: 99;
left: 0;
top: 0;
width: 100%;
height: 100%;
padding-top: 4rem;
/*opacity: 0.5;*/
align-items: center;
/*定义body的元素垂直居中*/
justify-content: center;
/*定义body的里的元素水平居中*/
}
.modal img {
animation-name: zoom;
animation-duration: 0.6s;
display: block;
padding: 10px;
margin: auto;
max-width: 100%;
max-height: 100%;
box-shadow: 0 2px 6px rgb(0, 0, 0, 0), 0 10px 20px rgb(0, 0, 0, 0);
border-radius: 12px;
border: 1px solid white;
position: absolute;
top: 50%;
transform: translateY(-50%);
}
.showname {
width: 100px;
height: 60px;
position: relative;
top: -4.5rem;
white-space: normal;
word-break: break-all;
word-wrap: break-word;
}
.wrong_class {
width: 30% !important;
height: 30% !important;
position: relative;
top: -3.8rem;
left: 2.6rem;
}
.wrongs_class {
width: 4% !important;
height: 4% !important;
position: relative;
/*top: -5.2em;*/
left: 0.5rem;
}
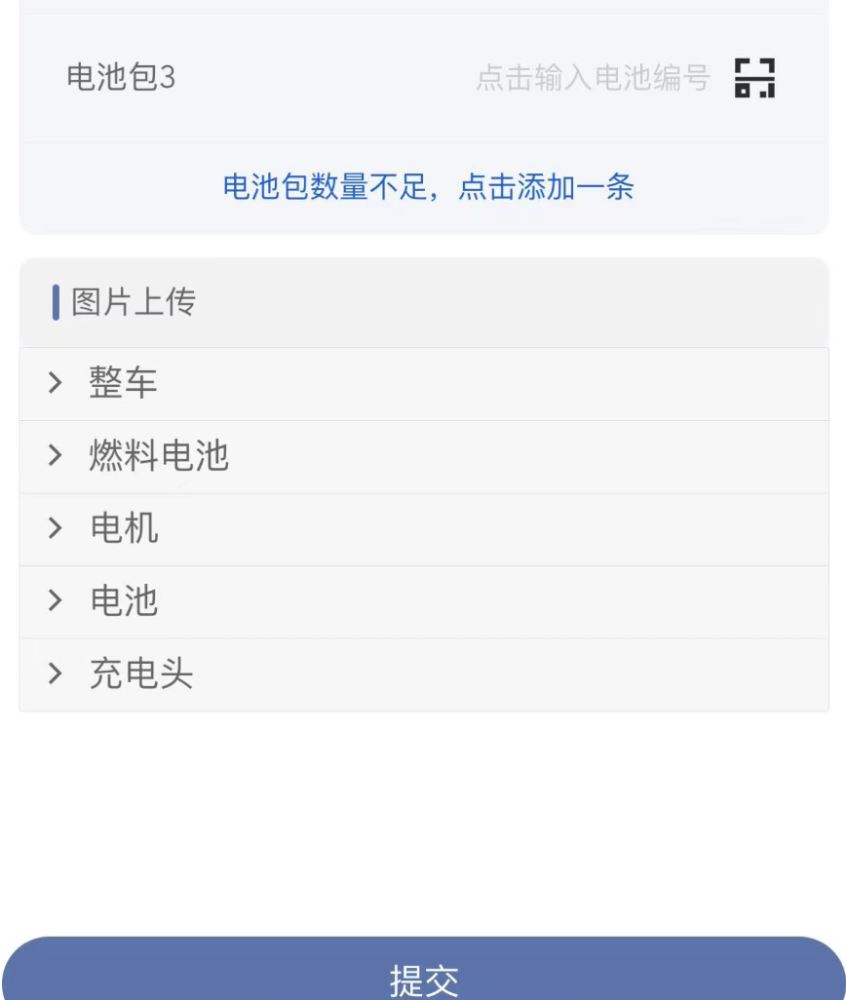
最后附上实际效果图:

到此这篇关于Vue页面内公共的多类型附件图片上传区域并适用折叠面板的文章就介绍到这了,更多相关Vue多类型附件图片上传内容请搜索以前的文章或继续浏览下面的相关文章希望大家以后多多支持!
以上是 Vue页面内公共的多类型附件图片上传区域并适用折叠面板(示例代码) 的全部内容, 来源链接: utcz.com/p/240326.html