基于elementUI竖向表格、和并列的案例
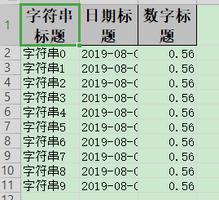
效果图如下

代码
<template>
<div>
<section>
<el-table
:show-header="false"
:data="tableData"
:span-method="objectSpanMethod"
border
:cell-style="columnStyle"
style="width: 100%; margin-top: 20px"
>
<el-table-column prop="id" label="ID" width="240">
<template slot-scope="scope">
<div>
<img :src="scope.row.id|setPicUrl" />
</div>
</template>
</el-table-column>
<el-table-column width="180" prop="name"></el-table-column>
<el-table-column prop="amount1"></el-table-column>
<el-table-column width="180" prop="amount2"></el-table-column>
<el-table-column prop="amount3"></el-table-column>
</el-table>
</section>
</div>
</template>
<script>
export default {
name: "mallMember-detail",
data() {
return {
//请求回来的数据
dataForm: {},
};
},
computed: {
//因为数据用到了dataform中的数据,所以写在了computed中
tableData() {
return [
{
id: this.dataForm.headImg,
name: "用户ID",
amount1: this.dataForm.id,
amount2: "注册时间",
amount3: this.dataForm.createDate
},
{
id: this.dataForm.headImg,
name: "微信昵称",
amount1: this.dataForm.nickName,
amount2: "手机号码",
amount3: this.dataForm.phone
},
{
id: this.dataForm.headImg,
name: "会员名称",
amount1: this.dataForm.gradeName,
amount2: "会员等级",
amount3: this.dataForm.gradeCode
},
{
id: this.dataForm.headImg,
name: "用户来源",
amount1: this.dataForm.channel,
amount2: "常住地",
amount3:
this.dataForm.provinceName +
this.dataForm.cityName +
this.dataForm.districtName
}
];
}
},
methods: {
// 自定义列背景色
columnStyle({ row, column, rowIndex, columnIndex }) {
if (columnIndex == 0 || columnIndex == 1 || columnIndex == 3) {
//第三第四列的背景色就改变了2和3都是列数的下标
return "background:#f3f6fc;";
}else{
return "background:#ffffff;";
}
},
// 和并列
objectSpanMethod({ row, column, rowIndex, columnIndex }) {
if (columnIndex === 0) {
if (rowIndex % 4 === 0) {
return {
rowspan: 4,
colspan: 1
};
} else {
return {
rowspan: 0,
colspan: 0
};
}
}
},
}
};
</script>
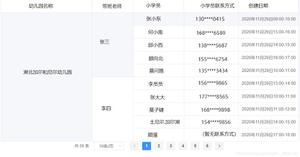
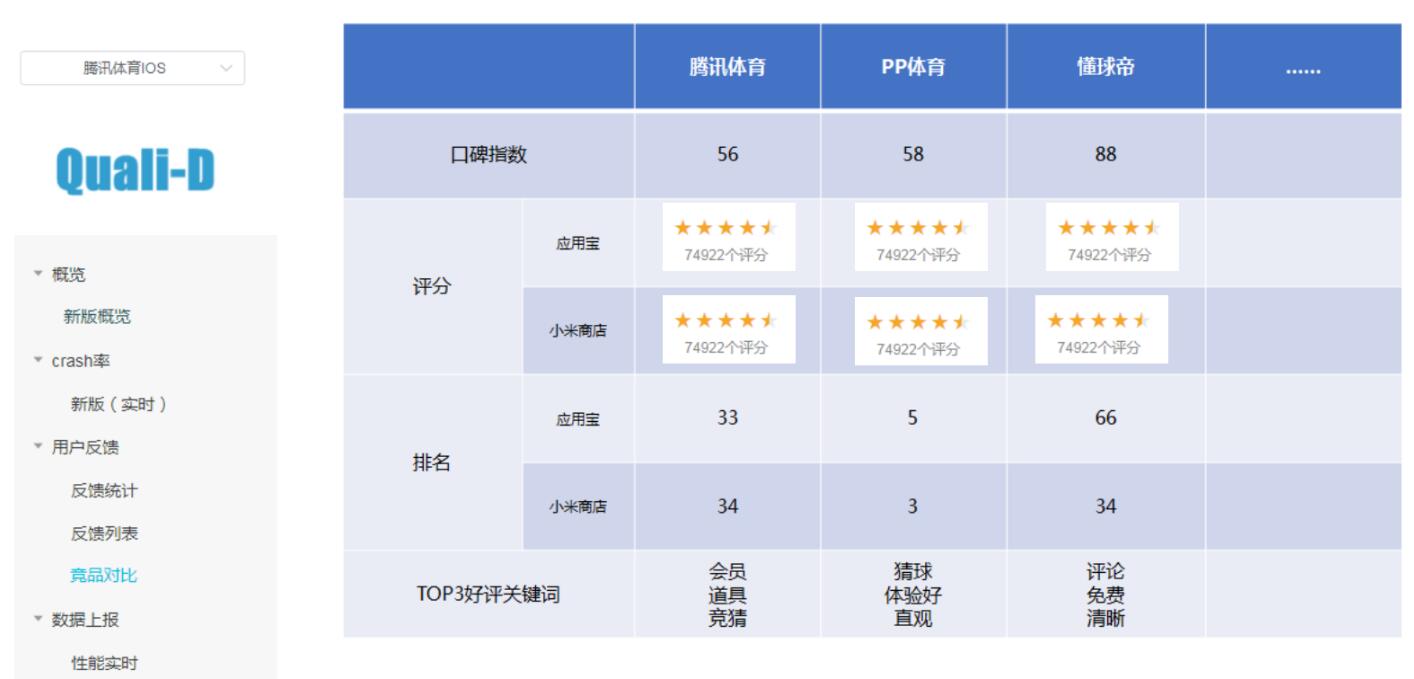
补充知识:基于Vue element-ui实现支持多级纵向动态表头的仿表格布局
需求图示如下,多级纵向动态表头表格:
我的思路是用element-ui的layout实现,做出一个仿造表格,能够支持动态的、多级的、纵向的表头:
<template>
<div>
<!--按设备系统统计-->
<div style="text-align:left">
<h1>{{tableName}}</h1>
</div>
<!--纵向表格设计-->
<el-row>
<!--纵向表头设计-->
<el-col :span="6">
<el-row>
<div :style="projectDivStyle">
<p>项目名</p>
</div>
</el-row>
<el-row v-if="ifAndroid">
<el-col :span="12">
<div :style="wordOfMouthAndroidDivStyle">
<p>Android口碑指数</p>
</div>
</el-col>
<el-col :span="12">
<el-row v-for="(chl, i) in tableData.ratingChls"
:key="i">
<div :style="ratingSubDivStyle">
<p>{{chl}}</p>
</div>
</el-row>
</el-col>
</el-row>
<el-row v-else>
<div :style="wordOfMouthIOSDivStyle">
<p>AppStore口碑指数</p>
</div>
</el-row>
<el-row>
<el-col :span="12">
<div :style="ratingDivStyle">
<p>评分</p>
</div>
</el-col>
<el-col :span="12">
<el-row v-for="(chl, i) in tableData.ratingChls"
:key="i">
<div :style="ratingSubDivStyle">
<p>{{chl}}</p>
</div>
</el-row>
</el-col>
</el-row>
<el-row>
<el-col :span="12">
<div :style="rankDivStyle">
<p>排名</p>
</div>
</el-col>
<el-col :span="12">
<el-row v-for="(chl,i) in tableData.rankChls"
:key="i">
<div :style="rankSubDivStyle">
<p>{{chl}}</p>
</div>
</el-row>
</el-col>
</el-row>
<el-row>
<div :style="topModuleDivStyle">
<p>TOP3好评关键词</p>
</div>
</el-row>
<el-row>
<div :style="topModuleDivStyle">
<p>TOP3差评关键词</p>
</div>
</el-row>
</el-col>
<!--纵列数据遍历-->
<el-col :span="colSpan"
v-for="(col,i) in tableData.cols"
:key="i">
<!--项目名数据-->
<el-row>
<div :style="projectDivStyle">
<p>{{col.name}}</p>
</div>
</el-row>
<!--口碑数据 区分Android和iOS视图显示逻辑-->
<el-row v-if="ifAndroid">
<el-col :span="24">
<el-row v-for="(each, i) in col.wordOfMouth"
:key="i">
<div :style="ratingSubDivStyle">
<p>
{{each}}
</p>
</div>
</el-row>
</el-col>
</el-row>
<el-row v-else>
<div :style="wordOfMouthIOSDivStyle">
<p>{{col.wordOfMouth[0]}}</p>
</div>
</el-row>
<!--评分数据-->
<el-row>
<el-col :span="24">
<el-row v-for="(each, i) in col.ratingInfo"
:key="i">
<div :style="ratingSubDivStyle">
<p>
{{each.info}}
</p>
<el-rate :value='Number(each.rating)'
disabled
show-score
text-color="#ff9900"
score-template="{value}">
</el-rate>
</div>
</el-row>
</el-col>
</el-row>
<!--排名数据-->
<el-row>
<el-col :span="24">
<el-row v-for="(each,i) in col.rankInfo"
:key="i">
<div :style="rankSubDivStyle">
<p>{{each.rank}} {{each.info}}</p>
</div>
</el-row>
</el-col>
</el-row>
<el-row>
<div :style="topModuleDivStyle">
<p v-for="(_module,i) in modules(col.topGoodModule)"
:key="i">
{{_module}}
</p>
</div>
</el-row>
<el-row>
<div :style="topModuleDivStyle">
<p v-for="(_module,i) in modules(col.topBadModule)"
:key="i">
{{_module}}
</p>
</div>
</el-row>
</el-col>
</el-row>
</div>
</template>
<style scoped>
/*
通过布局el-row来完成表格边界样式替代式设计
*/
.el-row {
margin-bottom: 0px; /*去除el-row之间的间距*/
border: 1px solid #e6e6e6;
margin: -1px -1px -1px -1px; /*解决相邻边框重叠问题就靠这行代码*/
&:last-child {
margin-bottom: 0px;
}
}
.bg-purple {
}
.bg-purple-light {
background: #121927;
}
.grid-content {
border: 0px solid rgb(0, 0, 0);
min-height: 50px;
}
.grid-content-sub {
border: 0px solid rgb(0, 0, 0);
padding: 20px;
}
.grid-content-large {
border: 0px solid rgb(0, 0, 0);
padding: 70px;
height: 60px;
}
.grid-content-large-sub {
border: 0px solid rgb(0, 0, 0);
padding: 20px;
height: 57.5px;
}
</style>
<script>
import { getFeedbackCompetitorData } from '@/api/feedbacks'
import { EventBus } from '@/bus.js'
export default {
data () {
return {
myProjectId: this.$route.query.feedbackProject,
largeDivHeight: 120,
smallDivHeight: 80,
miniDivHeight: 50,
ratingSubDivHeight: 80,
rankSubDivHeight: 80,
tableName: '',
tableData: [],
shadowCss: 'border-radius: 15px;box-shadow: 5px 5px 2px #888888',
borderStyle: ''
}
},
methods: {
getFbCompetitorData () {
getFeedbackCompetitorData(this.myProjectId).then(fbCpInfo => {
this.tableName = fbCpInfo.competitorTable.tableName
this.tableData = fbCpInfo.competitorTable.tableData
})
},
modules (someArray) {
var newArray = []
for (var i = 0; i < someArray.length; i++) {
var count = someArray[i]['cou']
var word = someArray[i]['word']
newArray.push(word + ':' + count)
}
return newArray
}
},
computed: {
ifAndroid: function () {
if (this.tableData.wordOfMouthChls[0] === 'AppStore') {
return false
} else {
return true
}
},
colSpan: function () {
var count = this.tableData.cols.length
if (count > 5) {
return 18 / count
} else if (count < 4) {
return 6
}
},
commonDivStyle: function () {
var height = this.smallDivHeight
return `padding: 20px;height: ${height}px`
},
projectDivStyle: function () {
var height = this.miniDivHeight
return `background: #E8F8F5;padding: 20px;height: ${height}px`
},
wordOfMouthAndroidDivStyle: function () {
var height = this.miniDivHeight
return `margin-top:50%;padding: 20px;height: ${height}px`
},
wordOfMouthIOSDivStyle: function () {
var height = this.miniDivHeight
return `padding: 20px;height: ${height}px`
},
topModuleDivStyle: function () {
var height = this.largeDivHeight
return `padding: 20px;height: ${height}px`
},
ratingDivStyle: function () {
var height = this.ratingSubDivHeight
// 区分Android和iOS样式
if (this.ifAndroid) {
var margin = 'margin-top:50%'
}
return `${margin};padding: 20px;height: ${height}px`
},
ratingSubDivStyle: function () {
var height = this.ratingSubDivHeight
return `padding: 20px;height: ${height}px`
},
rankDivStyle: function () {
var height = this.rankSubDivHeight
return `margin-top:30%;padding: 20px;height: ${height}px`
},
rankSubDivStyle: function () {
var height = this.rankSubDivHeight
return `padding: 20px;height: ${height}px`
}
},
created () {
let _this = this
EventBus.$on('projectId', projectId => {
_this.myProjectId = projectId
})
},
mounted () {
this.getFbCompetitorData()
},
watch: {
myProjectId: {
immediate: false,
handler: function (val) {
this.getFbCompetitorData()
}
}
}
}
</script>
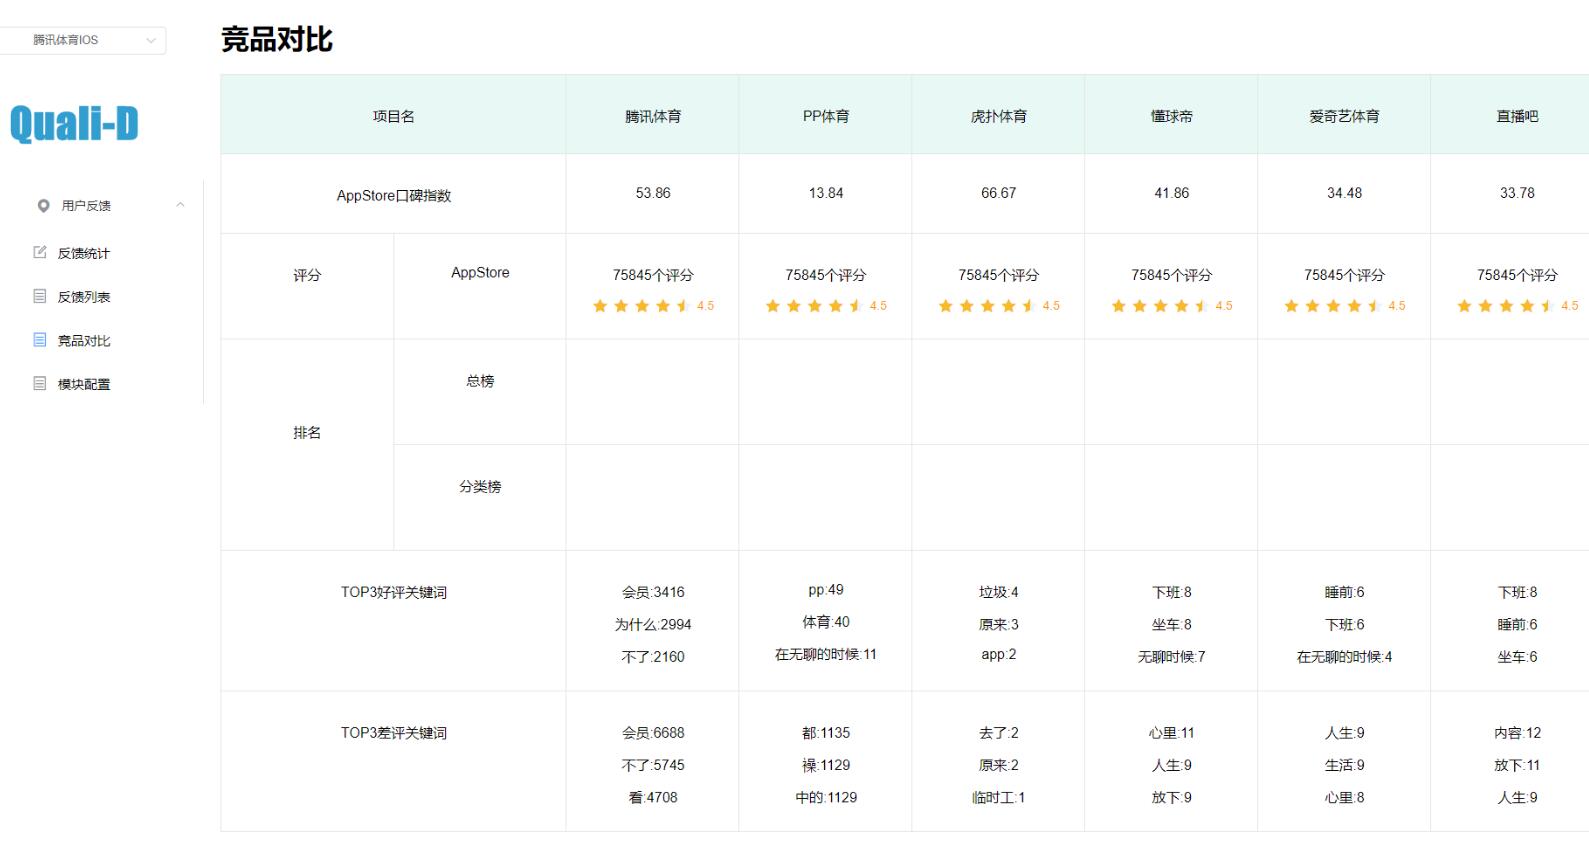
实现图如下
以上这篇基于elementUI竖向表格、和并列的案例就是小编分享给大家的全部内容了,希望能给大家一个参考,也希望大家多多支持。
以上是 基于elementUI竖向表格、和并列的案例 的全部内容, 来源链接: utcz.com/p/238281.html