15分钟上手vue3.0(小结)
Vue 3 还没有正式发布,但是 Alpha 版本已经发布了。
虽然官方还不推荐在生产环境中直接使用 Vue 3 ,但是提前学习总归是有好处的。
嘴上喊着老子学不动了,双手还是很诚实的打开了 Vue 3 文档
创建项目
Vue 官方很贴心的提供了一个 github 仓库,让我们能快速体验Vue 3的新特性:
git clone https://github.com/vuejs/vue-next-webpack-preview.git vue3-start
cd vue3-start
npm install or yarn intall
开发环境准备就绪后,启动命令:
npm run dev
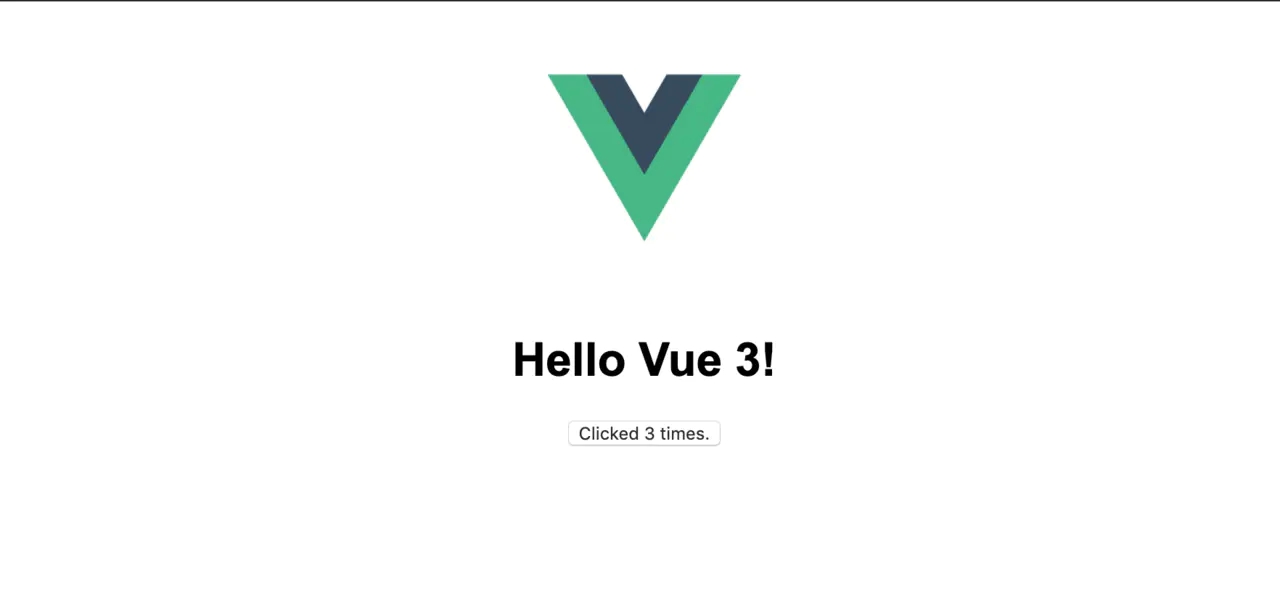
在浏览器中打开 http://127.0.0.1:8080 ,您可以看到一个简单的计数器页面:
打开 package.json,当前使用的 vue 版本是:3.0.0-beta.2
Vue 3 新特性
Vue 3 的设计目标是更快,更小,并更好的支持 TypeScript 。
一些新特性包括:
1、Composition API
2、Multiple root elements
3、Suspense
4、Multiple V-models
5、Reactivity
6、Teleport
7、Transition
8、Remove Filter
9、App configuration
1、Composition API
Vue 官方发布了 Composition API 的官方插件,使广大用户可以在 Vue2.x 中享受 Function Base 带来的新体验。
而在 vue 3 中无需单独安装插件,开箱即用。
打开 App.vue,你会看到 setup()方法:
<template>
<img src="./logo.png">
<h1>Hello Vue 3!</h1>
<button @click="inc">Clicked {{ count }} times.</button>
</template>
<script>
import { ref } from 'vue'
export default {
setup() {
const count = ref(0)
const inc = () => {
count.value++
}
return {
count,
inc
}
}
}
</script>
<style scoped>
img {
width: 200px;
}
h1 {
font-family: Arial, Helvetica, sans-serif;
}
</style>
Composition API 主要提供两大好处:
1、清晰的代码结构
2、消除重复逻辑
<template>
<div class="counter">
<p>count: {{ count }}</p>
<p>NewVal (count + 2): {{ countDouble }}</p>
<button @click="inc">Increment</button>
<button @click="dec">Decrement</button>
<p> Message: {{ msg }} </p>
<button @click="changeMessage()">Change Message</button>
</div>
</template>
<script>
import { ref, computed, watch } from 'vue'
export default {
setup() {
/* ---------------------------------------------------- */
let count = ref(0)
const countDouble = computed(() => count.value * 2)
watch(count, newVal => {
console.log('count changed', newVal)
})
const inc = () => {
count.value += 1
}
const dec = () => {
if (count.value !== 0) {
count.value -= 1
}
}
/* ---------------------------------------------------- */
let msg= ref('some text')
watch(msg, newVal => {
console.log('msg changed', newVal)
})
const changeMessage = () => {
msg.value = "new Message"
}
/* ---------------------------------------------------- */
return {
count,
inc,
dec,
countDouble,
msg,
changeMessage
}
}
}
</script>
如果你不喜欢使用 Composition API, 也可以继续使用 2.x 的传统方法:
<template>
<div class="counter">
<p>count: {{ count }}</p>
<p>NewVal (count + 2): {{ countDouble }}</p>
<button @click="inc">Increment</button>
<button @click="dec">Decrement</button>
<p> Message: {{ msg }} </p>
<button @click="changeMessage()">Change Message</button>
</div>
</template>
<script>
export default {
data() {
return {
count: 0,
msg: 'some message'
}
},
computed: {
countDouble() {
return this.count*2
}
},
watch: {
count(newVal) {
console.log('count changed', newVal)
},
msg(newVal) {
console.log('msg changed', newVal)
}
},
methods: {
inc() {
this.count += 1
},
dec() {
if (this.count !== 0) {
this.count -= 1
}
},
changeMessage() {
msg = "new Message"
}
}
}
</script>
上面两段代码在效果上市完全等价的
使用 Composition API 的好处:可以让我们更好地组织代码(state, methods, computed properties, watcher 等)。
随着组件规模的增长,如何组织我们的业务代码逐渐变成一个重要的问题,确保新进的开发人员都可以轻松地理解代码,而不需要花太多时间。
以前我们会使用 mixin 来复用代码。然而,mixin 最大的痛点是,需要我们跟踪不同组件中的状态和方法,这往往会给开发带来一定的心智负担,一不小心,mixin 可能会覆盖组件中的现有状态或方法。
使用 Composition API 让代码复用更加容易。
我们同样可以抽取出重复功能的代码:
// message.js
import { ref, watch } from "vue";
export function message() {
let msg = ref(123);
watch(msg, (newVal) => {
console.log("msg changed", newVal);
});
const changeMessage = () => {
msg.value = "new Message";
};
return { msg, changeMessage };
}
在其他组件中使用上面组件:
<template>
<div class="counter">
<p>count: {{ count }}</p>
<p>NewVal (count + 2): {{ countDouble }}</p>
<button @click="inc">Increment</button>
<button @click="dec">Decrement</button>
<p>Message: {{ msg }}</p>
<button @click="changeMessage()">change message</button>
</div>
</template>
<script>
import { ref, computed, watch } from 'vue'
import { message } from './common/message'
export default {
setup() {
let count = ref(0)
const countDouble = computed(() => count.value * 2)
watch(count, newVal => {
console.log('count changed', newVal)
})
const inc = () => {
count.value += 1
}
const dec = () => {
if (count.value !== 0) {
count.value -= 1
}
}
let { msg, changeMessage } = message()
return {
count,
msg,
changeMessage,
inc,
dec,
countDouble
}
}
}
</script>
2、Multiple root elements
在 Vue 2 中,tempalte 只能取一个根元素。即使我们只有两个 <p> 标记,我们也必须将它们包含在一个 <div> 标记中:
<template>
<div class="counter">
<p> Count: {{ count }} </p>
<button @click="increment"> Increment </button>
<button @click="decrement"> Decrement</button>
</div>
</template>
为了能编译通过,我们通常会增加一个根节点。
这个设计确实很糟糕,我曾经无数次吐槽过这个设计。因为会带来不必要的代码嵌套和缩进。
幸好在 Vue 3 中取消了这一限制:
可以直接在<template></template>中使用任意数量的标签:
<template>
<p> Count: {{ count }} </p>
<button @click="increment"> Increment </button>
<button @click="decrement"> Decrement </button>
</template>
用 VScode 打开模板时,看到一些 lint 错误,这是因为官方插件 eslint-plugin-vue 还没有支持新的模板语法。
3、Suspense
Suspense 是一个 Vue 3 新特性。
通常前后端交互是一个异步的过程: 默认我们提供一个加载中的动画,当数据返回时配合使用 v-if 来控制数据显示。
Suspense 的出现大大简化了这个过程:它提供了 default 和 fallback 两种状态:
<template>
<Suspense>
<template #default>
<div v-for="item in articleList" :key="item.id">
<article>
<h2>{{ item.title }}</h2>
<p>{{ item.body }}</p>
</article>
</div>
</template>
<template #fallback>
Articles loading...
</template>
</Suspense>
</template>
<script>
import axios from 'axios'
export default {
async setup() {
let articleList = await axios
.get('https://jsonplaceholder.typicode.com/posts')
.then(response => {
console.log(response)
return response.data
})
return {
articleList
}
}
}
</script>
4、Multiple v-models
我们都知道 v-models 用于双向数据绑定。一般用于与表单元素一起使用。有时我们会在自定义组件中使用它。
Vue 2 只允许在一个组件上使用一个 v-models。在 Vue 3 中,我们可以将任意数量的 v-model 绑定到我们的定制组件上:
<template>
<survey-form v-model:name="name" v-model:age="age">
{" "}
</survey-form>
</template>
SurveyForm.vue:
<template>
<div>
<label>Name: </label>
<input :value="name" @input="updateName($event.target.value)" />
<label>Age: </label>
<input :value="age" @input="updateAge($event.target.value)" />
</div>
</template>
<script>
export default {
props: {
name: String,
age: Number
},
setup(props, { emit }) {
const updateName = value => {
emit('update:name', value)
}
const updateAge = value => {
emit('update:age', +value)
}
return { updateName, updateAge }
}
}
</script>
5、Reactivity
Vue 2 的响应式已经非常棒了,但在少数情况下会存在一些问题:
<template>
<div class="hello" @click="test">test {{list }} {{ myObj }}</div>
</template>
<script>
export default {
name: "HelloWorld",
data() {
return {
list: [1, 2],
myObj: { name: "Preetish" }
};
},
watch: {
list: {
handler: () => {
console.log("watcher triggered");
},
deep: true
}
},
methods: {
test() {
this.list[2] = 4;
this.myObj.last = "HS";
delete this.myObj.name;
}
}
};
</script>
我们发现通过this.list下标来修改元素,并不会触发 wacher 监听函数,为了达到目的,我们不得不使用 vue.set() 或 vue.delete() 这些方法。
而在 vue 3 中,我们不需要借助其他 API:
export default {
setup() {
let list = ref([1, 2]);
let myObj = ref({ name: "Preetish" });
function myFun() {
list.value[3] = 3;
myObj.value.last = "HS";
delete myObj.value.name;
}
return { myFun, list, myObj };
},
};
6、Portals
Portals 提供了一种将组件中渲染到页面任意一个 DOM 节点中的能力。在 Vue 2 中,利用一个 portal-vue 的第三方插件来做到这一点。
在 vue 3 中直接使用:
<Teleport to="#modal-layer">
<div class="modal">hello</div>
</Teleport>
<Teleport> 是 vue3 中提供特定的标签用于创建一个 Portals。
<Teleport> </Teleport>中间出现的内容会出现在 to 指定的节点中:
<div id="modal-target"></div>
目前为止,<Teleport>在 Alpha 版本中并不能使用
7、Transition
之前我在使用 v-enter-active, v-enter, v-enter-to 这些个状态时搞的晕头转向。
现在 Vue 3 从命名上更直观了: v-enter 变成了 v-enter-from,v-leave 变成 v-leave-from。
8、Remove Filter
Vue 3 抛弃了 Filter 的用法,更推荐使用计算属性或方法来实现:
<!-- vue 2.x -->
{{ date | format }}
<!-- vue 3.0 -->
{{ format(date) }}
9、App configration
在 Vue 2 中,如果想使用 use(), mixin() , directive() 等方法需要配合全局 Vue 对象:
import Vue from "vue";
import App from "./App";
Vue.use(/* ... */);
Vue.mixin(/* ... */);
Vue.component(/* ... */);
Vue.directive(/* ... */);
new Vue({
el: "#app",
template: "<App/>",
components: {
App,
},
});
在 Vue 3 中, 改成了 createApp 返回的 Vue 实例:
import { createApp } from "vue";
import App from "./App.vue";
const app = createApp(App);
app.use(/* ... */);
app.mixin(/* ... */);
app.component(/* ... */);
app.directive(/* ... */);
app.mount("#app");
结束语
总之Vue 3 通过提供一种简单的方式来组织和共享代码,并提供强大的 TypeScript 支持,新的代码组织方式会对未来的应用开发产生重大影响。
同时一些其它的特性,如 Suspense,多个 v-models 等也会给开发带来巨大的便利。
同时性能更快,体积更小。它是如何做到的请参考我写的另一篇文章:Vue.js 作者:关于 Vue3.0 背后的故事
到此这篇关于15分钟上手vue3.0(小结)的文章就介绍到这了,更多相关vue3.0入门内容请搜索以前的文章或继续浏览下面的相关文章希望大家以后多多支持!
以上是 15分钟上手vue3.0(小结) 的全部内容, 来源链接: utcz.com/p/237293.html