Vue中插槽和过滤器的深入讲解
插槽
什么是插槽?
概念
Vue 实现了一套内容分发的 API,为组件提供了一个 <slot> 元素作为承载分发内容的出口。
简单来说就是<slot> 元素作为组件模板之中的内容分发插槽。<slot> 元素自身将被替换。
插槽内容
语法
首先先新建一个文件来书写我们的slot
// slot.vue
<template>
<div>
<div>
<!--分发内容的内容会被承载到这个slot标签位置 -->
<slot></slot>
</div>
<p>账号: <input /></p>
<p>密码: <input type="password" /></p>
<button>登录</button>
</div>
</template>
<script>
export default {};
</script>
<style>
</style>
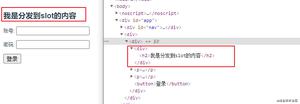
然后我们在另一个组件中(SlotTest)使用
// SlotTest.vue
<template>
<div>
<slotCom>
<h2>我是分发到slot的内容</h2>
</slotCom>
</div>
</template>
<script>
// 引入
import slotCom from "../views/slot";
export default {
components: {
slotCom
},
}
</script>
<style>
</style>
从效果图(下图)中我们可以看到h2标签的那句话已经被渲染在了页面上,标签位置也对应上了slot.vue文件中的标签

注意
如果 <SlotTest> 的 template 中没有包含一个 <slot> 元素,则该组件对称标签内部的任何内容都会被抛弃。
编译作用域
当你想在一个插槽中使用数据时,例如:
<navigation-link url="/profile">
Logged in as {{ user.name }}
</navigation-link>
该插槽跟模板的其它地方一样可以访问相同的实例 property (也就是相同的“作用域”),而不能访问 <navigation-link> 的作用域。例如 url 是访问不到的:
<navigation-link url="/profile">
Clicking here will send you to: {{ url }}
/* 这里的 `url` 会是 undefined,因为其 (指该插槽的) 内容是
_传递给_ <navigation-link> 的而不是
在 <navigation-link> 组件*内部*定义的。
*/
</navigation-link>
作为一条规则,请记住:
父级模板里的所有内容都是在父级作用域中编译的;子模板里的所有内容都是在子作用域中编译的。
后备内容
<slot> 元素内部可以设置后备内容,如果当前组件对称标签内部没有插入任何内容的话,组件最终会渲染后备内容。简单来说就是相当于插槽的默认值。
举例
// 一个按钮组件,设置后备内容为文字Submit
<button type="submit">
<slot>Submit</slot>
</button>
// 当我在一个父级组件中使用 <submit-button> 并且不提供任何插槽内容时:
<submit-button></submit-button>
// 后备内容“Submit”将会被渲染:
<button type="submit">
Submit
</button>
// 但是如果我们提供内容:
<submit-button>
Save
</submit-button>
// 则这个提供的内容将会被渲染从而取代后备内容:
<button type="submit">
Save
</button>
具名插槽
概念有时我们组件需要多个插槽。可以将不同的组件插入到不同插槽内部,实现方法是使用具名插槽,给组件中的<slot> 元素设置一个name属性。在向具名插槽提供内容的时候,我们可以在一个 <template> 元素上使用 v-slot 指令将对应的内容插入到指定的<slot> 元素上
语法
// login-component.vue
<template>
<div>
<div>
<slot>后备内容</slot>
</div>
<p>
账号: <slot name="user"></slot>
</p>
<p>
密码: <slot name="psd"></slot>
</p>
<button>登录</button>
<slot></slot>
</div>
</template>
// 使用
<login-component>
<h2>我是分发到slot的内容</h2>
<template v-slot:user>
<!-- 这里所有的内容都会被插入到name="user" 插槽中 -->
<div>
123
</div>
</template>
<input slot="psd" type="password" placeholder="这个元素会被插入到name=psd 插槽中">
<component-a slot="psd"></component-a>
</login-component>
注意
跟 v-on 和 v-bind 一样,v-slot 也有缩写,即把参数之前的所有内容 (v-slot:) 替换为字符 #。例如 v-slot:header 可以被重写为 #header
<login-component>
<h2>我是分发到slot的内容</h2>
<template #user>
这里所有的内容都会被插入到name="user" 插槽中
<div>
123
</div>
</template>
<template #psd>
<input type="password" placeholder="这个元素会被插入到name=psd 插槽中">
</template>
</login-component>
我个人觉得插槽在项目开发中不太常用,常用于一些UI库的开发。如果想对插槽有更深的了解可以查阅官方文档cn.vuejs.org/v2/guide/co…
过滤器
概念
Vue.js 允许你自定义过滤器,可被用于一些常见的文本格式化。过滤器可以用在两个地方:双花括号插值和 v-bind 表达式 (后者从 2.1.0+ 开始支持)。过滤器应该被添加在 JavaScript 表达式的尾部,由“|”符号指示:
语法
filter支持全局过滤器或者局部过滤器
全局过滤器
<div id="app">
{{str | capitalize}} // Hello
</div>
// 单词首字母大写
Vue.filter('capitalize', function (value) {
if (!value) return ''
value = value.toString()
return value.charAt(0).toUpperCase() + value.slice(1)
})
new Vue({
el: '#app',
data: {
str: 'hello'
}
})
局部过滤器
<div id="app">
<div v-for="(f,i) in friends" :key="i">
<h3>姓名: {{f.name}} </h2>
<p>年龄: {{f.age}}</p>
<p>性别: {{f.sex|getSex}}</p>
</div>
</div>
<script>
new Vue({
el: '#app',
data: {
friends: [{
name: 'Max',
sex: 0,
age: 19
},
{
name: 'Jack',
sex: 1,
age: 22
},
{
name: 'Jacose',
sex: 1,
age: 19
},
{
name: 'Tim',
sex: 1,
age: 18
},
{
name: 'Jimmy',
sex: 0,
age: 20
},
{
name: 'Tom',
sex: 0,
age: 19
},
]
},
filters: {
getSex(type) {
if (type === 0) {
return '男'
}
return '女'
}
}
})
</script>
注意: filter支持传递多个参数,直接向substr传递的参数会依次作为filter方法的第二第三....个参数
<div>{{'hello' | substr(3,4)}}</div>
<script>
{
filters: {
substr(str,start,end) {
return str.substr(start,end)
}
}
}
</script>
练习
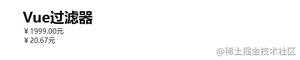
实现一个过滤器,能够将时间戳字符串按照指定的模板返回对应结构的时间
// 例
<p>{1599639292100 | getTemplateTimeByDate('YYYY-MM-dd hh:mm:ss')}</p> -> 2020-09-09 15:04:56
<p>{1599639292100 | getTemplateTimeByDate('YYYY-M-d h:m:s')}</p> -> 2020-9-9 15:4:6
<p>{1599639292100 | getTemplateTimeByDate('YYYY年M月d日 hh:mm')}</p> -> 2020年9年9 15:04
new Vue({
el: '#app',
data: {
date: new Date().getTime()
},
filters: {
getTemplateTimeByDate(date, template) {
date = new Date(date)
let TimeObj = {
'Y+': date.getFullYear(),
'(M+)': date.getMonth() + 1,
'(d+)': date.getDate(),
'(h+)': date.getHours(),
'(m+)': date.getMinutes(),
'(s+)': date.getSeconds()
}
for (key in TimeObj) {
let reg = new RegExp(key)
if (reg.test(template)) {
console.log(RegExp.$1)
let time = TimeObj[key]
// 判断当前模板时间是 两位 还是 一位的
// 如果是两位 个位数时间需要前面加零, 1 -> 01
// 如果是一位 不用加零操作
if (RegExp.$1.length > 1) {
time = time >= 10 ? time : '0' + time
}
template = template.replace(reg, time)
}
}
return template
}
}
})
</script>
总结
到此这篇关于Vue中插槽和过滤器的文章就介绍到这了,更多相关Vue插槽和过滤器内容请搜索以前的文章或继续浏览下面的相关文章希望大家以后多多支持!
以上是 Vue中插槽和过滤器的深入讲解 的全部内容, 来源链接: utcz.com/p/221017.html