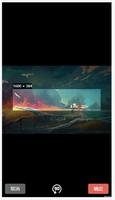
Vue图片裁剪组件实例代码
示例:

tip: 该组件基于vue-cropper二次封装
安装插件
npm install vue-cropper
yarn add vue-cropper
写入封装的组件
<!-- 简易图片裁剪组件 --- 二次封装 -->
<!-- 更多api https://github.com/xyxiao001/vue-cropper -->
<!-- 使用:传入图片 比例 显示隐藏。方法:监听底部按钮点击即可 ---更多props查询文档自行添加 -->
<template>
<div v-if="value" :value="value" @input="val => $emit('input', val)" class="conbox">
<div class="info">
<vueCropper
ref="cropper"
:img="img"
:outputSize="outputSize"
:outputType="outputType"
:info="info"
:canScale="canScale"
:autoCrop="autoCrop"
:fixed="fixed"
:fixedNumber="fixedNumber"
:full="full"
:fixedBox="fixedBox"
:canMove="canMove"
:canMoveBox="canMoveBox"
:original="original"
:centerBox="centerBox"
:infoTrue="infoTrue"
:mode="mode"
></vueCropper>
</div>
<div class="btns">
<div @click="clickCancelCut" class="cancel">取消</div>
<img @click="clickRotate" src="../../assets/paradise/rotate.png" alt="" />
<div @click="clickOk" class="okey">确定</div>
</div>
</div>
</template>
<script>
import { VueCropper } from 'vue-cropper';
export default {
name: 'PictureCropping',
components: { VueCropper },
props: {
value: {
type: Boolean,
default: false,
},
//裁剪图片的地址
img: {
type: String,
default: '',
},
//截图框的宽高比例
fixedNumber: {
type: Array,
default: () => {
return [1, 1];
},
},
},
data() {
return {
// 裁剪组件的基础配置option
// img: this.img, // 裁剪图片的地址
outputSize: 1, // 裁剪生成图片的质量
outputType: 'jpeg', // 裁剪生成图片的格式
info: true, // 裁剪框的大小信息
canScale: true, // 图片是否允许滚轮缩放
autoCrop: true, // 是否默认生成截图框
// autoCropWidth: 300, // 默认生成截图框宽度
// autoCropHeight: 200, // 默认生成截图框高度
fixed: true, // 是否开启截图框宽高固定比例
// fixedNumber: this.fixedNumber, // 截图框的宽高比例
full: true, // 是否输出原图比例的截图
fixedBox: true, // 固定截图框大小 不允许改变
canMove: true, //上传图片是否可以移动
canMoveBox: true, // 截图框能否拖动
original: false, // 上传图片按照原始比例渲染
centerBox: true, // 截图框是否被限制在图片里面
// high:true,// 是否按照设备的dpr 输出等比例图片
infoTrue: true, // true 为展示真实输出图片宽高 false 展示看到的截图框宽高
// maxImgSize: 2000, //限制图片最大宽度和高度
// enlarge: 1, //图片根据截图框输出比例倍数
mode: 'contain', //图片默认渲染方式
};
},
computed: {},
watch: {},
//生命周期 - 创建完成(访问当前this实例)
created() {},
//生命周期 - 挂载完成(访问DOM元素)
mounted() {},
methods: {
clickCancelCut() {
this.$emit('clickCancelCut', '点击取消');
this.$refs.cropper.stopCrop();
this.$refs.cropper.clearCrop();
},
clickRotate() {
this.$refs.cropper.rotateRight();
this.$emit('clickRotate', '点击旋转');
},
clickOk() {
//输出裁剪的base64
this.$refs.cropper.getCropData(data => {
this.$emit('clickOk', data);
this.$refs.cropper.stopCrop();
this.$refs.cropper.clearCrop();
});
},
},
};
</script>
<style lang='less' scoped>
/* @import url(); 引入css类 */
.conbox {
position: fixed;
top: 0;
right: 0;
bottom: 0;
left: 0;
box-sizing: border-box;
height: 100vh;
width: 100%;
background-color: #000;
display: flex;
flex-direction: column;
justify-content: center;
.info {
width: auto;
height: 800px;
.vue-cropper {
background-image: none;
background-color: #000;
}
}
.btns {
padding: 0 20px;
color: #fff;
text-align: center;
display: flex;
justify-content: space-between;
align-items: center;
position: absolute;
left: 0;
right: 0;
bottom: 15px;
img {
width: 85px;
height: 85px;
}
.cancel {
background-color: #606465;
padding: 15px 20px;
width: 100px;
border-radius: 10px;
}
.okey {
background-color: #df6457;
padding: 15px 20px;
width: 100px;
border-radius: 10px;
}
}
}
</style>
总结
到此这篇关于Vue图片裁剪组件的文章就介绍到这了,更多相关Vue图片裁剪组件内容请搜索以前的文章或继续浏览下面的相关文章希望大家以后多多支持!
以上是 Vue图片裁剪组件实例代码 的全部内容, 来源链接: utcz.com/p/220954.html