js面向对象方式实现拖拽效果
本文实例为大家分享了js面向对象方式实现拖拽的具体代码,供大家参考,具体内容如下
拖拽功能的实现原理:(直接拿走!)
<!DOCTYPE html>
<html lang="en">
<head>
<meta charset="UTF-8">
<meta name="viewport" content="width=device-width, initial-scale=1.0">
<meta http-equiv="X-UA-Compatible" content="ie=edge">
<title>Document</title>
<style>
#box {
position: absolute;
left: 100px;
top: 100px;
width: 100px;
height: 100px;
background: red;
}
#box2 {
position: absolute;
left: 200px;
top: 200px;
width: 100px;
height: 100px;
background: green;
}
</style>
</head>
<body>
<div id="box">文字</div>
<div id="box2">文字</div>
</body>
<script>
class Drag {
startMouse = {};
startEl = {};
#el = null;
constructor(el, option) {
this.#el = el;
this.option = option;
this.start();
}
start() {
let move = (e) => {
this.move(e)
}
this.#el.addEventListener('mousedown', (e) => {
this.startMouse = {
x: e.clientX,
y: e.clientY,
}
this.ondragstart && this.ondragstart(e)
this.startEl = this.getOffset();
document.addEventListener('mousemove', move);
document.addEventListener('mouseup', (e) => {
document.removeEventListener('mousemove', move);
this.end(e);
}, {
once: true
})
e.preventDefault();
})
}
move(e) {
let nowMouse = {
x: e.clientX,
y: e.clientY,
}
let disMouse = {
x: nowMouse.x - this.startMouse.x,
y: nowMouse.y - this.startMouse.y
}
this.ondrag && this.ondrag(e)
this.setOffset(disMouse)
}
end(e) {
this.ondragend && this.ondragend(e)
}
getOffset() {
return {
x: parseFloat(getComputedStyle(this.#el)["left"]),
y: parseFloat(getComputedStyle(this.#el)["top"])
}
}
setOffset(dis) {
this.#el.style.left = this.startEl.x + dis.x + 'px'
this.#el.style.top = this.startEl.y + dis.y + 'px'
}
}
let box = document.querySelector("#box");
let box2 = document.querySelector("#box2");
let d = new Drag(box);
let d2 = new Drag(box2);
let clonex = null;
d2.ondragstart = (e) => {
clonex = box2.cloneNode(true);
document.body.appendChild(clonex)
box2.style.opacity = 0.5
}
d2.ondragend = () => {
document.body.removeChild(clonex);
box2.style.opacity = 1
}
</script>
</html>
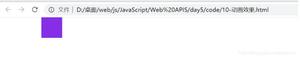
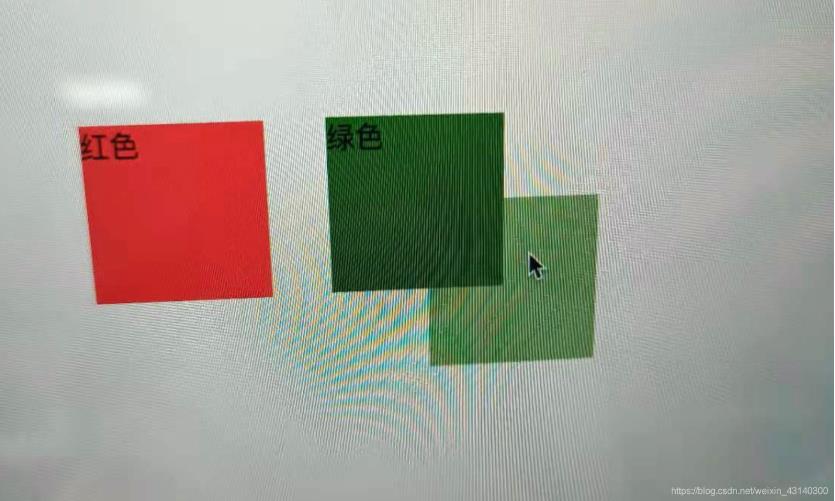
最终效果(拖动的为绿色块)
以上就是本文的全部内容,希望对大家的学习有所帮助,也希望大家多多支持。
以上是 js面向对象方式实现拖拽效果 的全部内容, 来源链接: utcz.com/p/219664.html