JavaScript Dom实现轮播图原理和实例
想要制作一个轮播图我们要先弄清楚他的原理,如何能让图片自右向左滑动?
让我们想一想生活中有没有类似的东西,比如电影胶片。
我们可以创建一个块作为投影区,创建一个列表作为底片并使其向左移动,达到轮播图效果。
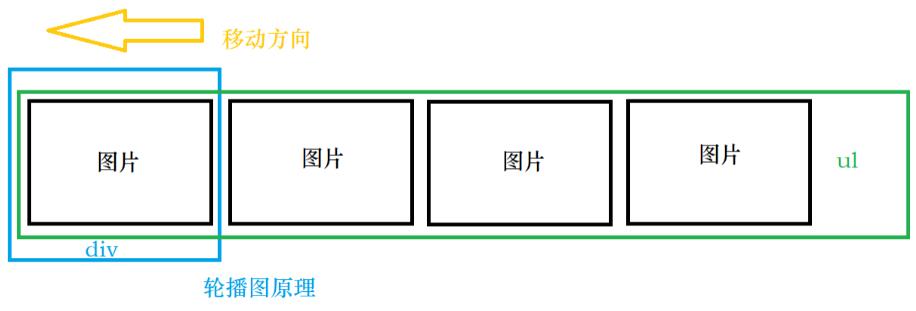
创建一个块和列表
创建一个块作为总的容器和显示区域。
<div id="out">
<ul id="imgList">
<li><img src="pto/many.jpg" ></li>
<li><img src="pto/hello.jpg" ></li>
<li><img src="pto/timg.jpg" ></li>
<li><img src="pto/zhenjing.jpg"></li>
</ul>
</div>
现在图片竖着堆在一列,块也不知道在哪里,那添加一点样式
开启定位并令其居中,并且让块大一点并添加背景好确定位置(本实验图片统一宽高比500*431,所以div宽高比520*451)
去掉列表默认样式让列表横着显示
*{
margin: 0;
padding: 0;
}
#out{
width:520px;
height:451px ;
background-color: #00bcd4;
position: relative;
margin: 50px auto;
/*overflow: hidden;*/
/*剪掉我们不需要的部分,为了方便调试注掉了*/
}
#imgList{
list-style: none;
position: absolute;
/* left: -520px; */
}
#imgList li{
float:left;
margin: 10px;
}
在尝试浮动后图片依旧是一列,是因为lu的宽度太小放不下,所以我们要扩大,但是我们不能直接决定他的宽度因为随着图片的增加,宽度应不断变大,于是我们用JavaScript来解决宽度
每增加一张图片扩大520px宽度
window.onload=function () {
// 动态的ul长度
var imgList = document.getElementById("imgList");
var imgArr = document.getElementsByTagName("img");
imgList.style.width=520*imgArr.length+"px";
}//onload
现在,装载图片的胶片ul每向左偏移-520px就会更换一个图片
导航栏
轮播图会定时更换,但是有可能你的客户刚刚被吸引就已经更换图片了,如果你想让你的客户干巴巴的瞪着图片回来,你很可能失去她。
所以一个完整的轮播图还需要一个能手动切换前后的按钮或一个导航条。
我们这里用几个超链接完成任务
<div id="navDiv">
<a href="javascript:;"></a>
<a href="javascript:;"></a>
<a href="javascript:;"></a>
<a href="javascript:;"></a>
</div>
ul在开启绝对定位后脱离文档流,现在我们的导航因为没有内容缩成一团挤在左上角
我们要让每一个超联接彼此分开,手动撑开空间,调整到靠下的位置,下方正中或靠右是比较好的选择.
调整透明度降低导航对于人的吸引力,毕竟图片才是主题。
而位置的调整为了便于扩充我们还是要用js来解决。
}
#navDiv{
position: absolute;
bottom: 15px;
}
#navDiv a{
float: left;
width: 15px;
height: 15px;
background-color: #89ff00;
margin: 0 5px;
opacity: 0.5;
}
//动态导航居中
var navDiv = document.getElementById("navDiv");
var out = document.getElementById("out");
//将纵向剩余距离分到导航左右达到居中效果
//不除以二就会变成右对齐
//不要忘了单位,嗯。。可能只有我会忘吧
navDiv.style.left = (out.clientWidth - navDiv.clientWidth)/2+"px";
导航功能完善
一仅仅个15px大的方块要给用户怎样的反馈?
当前图片所处位置,当鼠标移动到导航是时要反馈信息告诉用户我是可以点击的,点击导航能切换图片。
#navDiv a:hover{
background-color: red;
/* 鼠标移入效果*/
/* 内联样式的优先级很高注意不要被覆盖失效*/
}
//定位效果
var allA = document.getElementsByTagName("a");
var index = 0;
allA[index].style.backgroundColor="black";
//点击导航效果
//使用块级作用域let,不然i会是同一个数
for(let i=0;i<allA.length;i++){
allA[i].onclick=function () {
imgList.style.left=-520*i+"px";
//清除内联样式,使得css文件能生效
allA[index].style.backgroundColor="";
index=i;
allA[index].style.backgroundColor="black";
}
}
动画效果
为什么要做动画? (因为很酷(≧ω≦*)♪ )
因为没有轮播效果不叫轮播图,明明更改地址就能完成,忙活半天不就是为了这个,用最大的标题告诉你动画才是轮播图的精髓所在
主要思路是利用定时器让本来一部完成的效果多次完成,到达指定位置关闭定时器。
要注意的问题
每次移动距离与图片大小可能除余,导致停止位置不准确(大于或小于)或无法停止(不能刚好到达停止位置),小的误差会逐渐积累。
在定时器打开前关闭上一个计时器,否则在一个动画未完成前点击另一个会发生鬼畜现象
//点击导航效果
for(let i=0;i<allA.length;i++){
allA[i].onclick=function () {
move(imgList,-520*i,10);
// imgList.style.left=-520*i+"px";
//换掉这个很low的过场
allA[index].style.backgroundColor="";
index=i;
allA[index].style.backgroundColor="black";
}
}
function move(obj,target,speed) {//元素;目标位置;速度
//每次触发事件关闭上一个定时器
//这里是重点,你可以去掉这一句后随意点一下关差效果
clearInterval(obj.timer);
var current = parseInt(window.getComputedStyle(obj,null).left);
//获得当前位置
//判断运动方向
if(target<current){
speed = -speed;
}
//定时器标识
obj.timer = window.setInterval(function () {
//m每次开始获取一下当前位置
var oldValue = parseInt(window.getComputedStyle(obj,null).left);
//移动并在指定位置停下
var newValue = oldValue + speed;
//调整一下停止位置,小的误差会随时间无限放大
if((speed < 0 && newValue < target)||(speed > 0 && newValue > target)){
newValue = target;
}
imgList.style.left =newValue+"px";
if(newValue == target){
clearInterval(obj.timer);
}
},30);
}
change();
//自动轮播
//一个定时器用于定时调用
function change() {
setInterval(function () {
index++;
index=index % imgArr.length ;
console.log(imgArr.length);
console.log(index);
move(imgList,-520*index,20);
for(let i=0;i<allA.length;i++){
allA[i].style.backgroundColor="";
allA[index].style.backgroundColor="black";
}
},3000);
}
这样已经能做到轮播的基本功能,但在最后一张图片切换第一张图片时会向左拉过全部图片,这非常的不酷,我们要让轮播图持续向左循环怎么办?
假设我们要对图a和图b两个图轮播
我们可以结尾插入一个与图a一样的图
在两张图轮播完后转入第三张图让人误认为是第一张图片
在第三张图完成轮播后瞬间跳转至第一张继续轮播,此为瞒天过海之计

对于轮播图我们其实只需要知道原理,且不说框架,jquery完成轮播图都不要单纯手撸的十分之一的精力。
完整代码
<!DOCTYPE html>
<html lang="en">
<head>
<meta charset="UTF-8">
<title>Title</title>
<style>
*{
margin: 0;
padding: 0;
}
#out{
width:520px;
height:451px ;
margin: 50px auto;
background-color: #00bcd4;
position: relative;
overflow: hidden;
}
#imgList{
list-style: none;
position: absolute;
}
#imgList li{
float:left;
margin: 10px;
}
#navDiv{
position: absolute;
bottom: 15px;
}
#navDiv a{
float: left;
width: 15px;
height: 15px;
background-color: #89ff00;
margin: 0 5px;
opacity: 0.5;
}
#navDiv a:hover{
background-color: red;
/* 内联样式的优先级很高在触发一次后覆盖失效*/
}
</style>
</head>
<body>
<div id="out">
<ul id="imgList">
<li><img src="pto/many.jpg" ></li>
<li><img src="pto/hello.jpg" ></li>
<li><img src="pto/timg.jpg" ></li>
<li><img src="pto/zhenjing.jpg"></li>
<li><img src="pto/many.jpg" ></li>
</ul>
<div id="navDiv">
<a href="javascript:;" ></a>
<a href="javascript:;" ></a>
<a href="javascript:;" ></a>
<a href="javascript:;" ></a>
</div>
</div>
<script>
window.onload=function () {
// 动态的ul长度
var imgList = document.getElementById("imgList");
var imgArr = document.getElementsByTagName("img");
imgList.style.width=520*imgArr.length+"px";
//动态导航居中
var navDiv = document.getElementById("navDiv");
var out = document.getElementById("out");
navDiv.style.left = (out.clientWidth - navDiv.clientWidth)/2+"px";
//定位效果
var allA = document.getElementsByTagName("a");
var index = 0;
allA[index].style.backgroundColor="black";
//点击导航效果
for(let i=0;i<allA.length;i++){
allA[i].onclick=function () {
move(imgList,-520*i,20);
setA();
// imgList.style.left=-520*i+"px";
// allA[index].style.backgroundColor="";
// index=i;
// allA[index].style.backgroundColor="black";
}
}
// 动画效果
function move(obj,target,speed,callback) {//元素;目标位置;速度;回调函数
clearInterval(obj.timer);
var current = parseInt(window.getComputedStyle(obj,null).left);
//获得当前位置
//判断运动方向
if(target<current){
speed = -speed;
}
//定时器标识
obj.timer = window.setInterval(function () {
//m每次开始获取一下位置
var oldValue = parseInt(window.getComputedStyle(obj,null).left);
//移动并在指定位置停下
var newValue = oldValue + speed;
//调整一下停止位置,小的误差会随时间无限放大
if((speed < 0 && newValue < target)||(speed > 0 && newValue > target)){
newValue = target;
}
imgList.style.left =newValue+"px";
if(newValue == target){
clearInterval(obj.timer);
callback();
}
},30);
}
change();
//自动轮播
//一个定时器用于定时调用
function change() {
setInterval(function () {
index++;
index=index % imgArr.length ;
move(imgList,-520*index,20,function () {
if(index>=imgArr.length-1 ){
imgList.style.left =0;
}
setA();
});
},3000);
}
function setA() {
for(let i=0;i<allA.length;i++){
allA[i].style.backgroundColor="";
allA[index].style.backgroundColor="black";
}
}
}//onload
</script>
</body>
</html>
以上就是本文的全部内容,希望对大家的学习有所帮助,也希望大家多多支持。
以上是 JavaScript Dom实现轮播图原理和实例 的全部内容, 来源链接: utcz.com/p/219601.html