Spring MVC 文件上传的示例代码
一如既往记录下常用而又容易忘记的东西,本篇博文主要针对Spring MVC是如何上传文件的。以下记录两种上传方法并针对案例进行记录。(有关spring mvc其他配置省略)
1、使用Spring MVC 上传文件必须配置文件解析器,如下:
<!-- 上传文件拦截,设置最大上传文件大小 10M=10*1024*1024(B)=10485760 bytes -->
<bean id="multipartResolver" class="org.springframework.web.multipart.commons.CommonsMultipartResolver">
<property name="maxUploadSize" value="10485760" />
<property name="maxInMemorySize" value="10240000" />
<property name="defaultEncoding" value="UTF-8" />
</bean>
2、建立上传文件表单代码,其中要注意form表单中的enctype 属性,必须存在且必须为multipart/form-data。还有当form中存在button标签时,用ajax异步提交表单后,也面会被刷新。原因:button 存在时会再次提交一下表单,所以页面被刷新了。
<!--
enctype 属性值:
1、application/x-www-form-urlencoded 在发送前编码所有字符(默认)
2、multipart/form-data 不对字符编码。 在使用包含文件上传控件的表单时,必须使用该值。
3、text/plain 空格转换为 "+" 加号,但不对特殊字符编码。
-->
<div class="row">
<form method="post" enctype="multipart/form-data" id="form1">
<div><label>1、采用流的方式</label></div>
<div class="col-sm-7" style="padding-left:0px">
<div class="input-group">
<input type="text" class="form-control" id="showFileInput1">
<input type="file" style="display:none" name="txtFile" id="uploadFileInput1" accept="text/plain">
<span class="input-group-addon" id="uploadFileButton1">
<span class="glyphicon glyphicon-folder-open"></span>
<label>浏览</label>
</span>
</div>
</div>
<div class="col-sm-5">
<!--
当form中存在button标签时,用ajax异步提交表单后,也面会被刷新。(感觉很诡异)
原因:button 存在时会再次提交一下表单,所以页面被刷新了。(之前认为button type='submit' 时)button才有提交表单的功能。
-->
<a class="btn btn-default" id="submit1">上传</a>
</div>
</form>
</div>
3.1、使用CommonsMultipartFile接收上传文件,其中要注意的是:方法中CommonsMultipartFile对应的变量名如果不是对应表单中文件输入框<input type="file" style="display:none" name="txtFile" id="uploadFileInput1" accept="text/plain">的名称就必须加上@RequestParam("txtFile") 强制注入。
/**
* @Description: 通过文件流的形式上传
* @param file @RequestParam("txtFile") 将name=txtFile控件得到的文件封装成CommonsMultipartFile对象,
* 如果不这样做会报CommonsMultipartFile没有初始化的错误
* java.lang.NoSuchMethodException: org.springframework.web.multipart.commons.CommonsMultipartFile.<init>()
* @return
* @author yuanfy
* @date 2017年9月15日 下午4:36:11
* @version 6.5
*/
@RequestMapping(value="test/upload1")
@ResponseBody
public String testUpload1(@RequestParam("txtFile")CommonsMultipartFile file){
Long times = System.currentTimeMillis();
if (file == null) {
return null;
}
StringBuilder fileContent = new StringBuilder();
//1、获取文件信息
FileUtils.getFileInfo(file, fileContent);
//2、上传文件并获取文件内容
try {
file.transferTo(new File("F:\\text.log"));//另存文件
fileContent.append(FileUtils.getFileContentByLine(file.getInputStream()));
}
catch (IOException e) {
return "获取文件内容失败";
}
//3、返回文件信息和内容
String content = fileContent.toString();
content = content.replace("times", (System.currentTimeMillis()-times) + "ms");
return content;
}
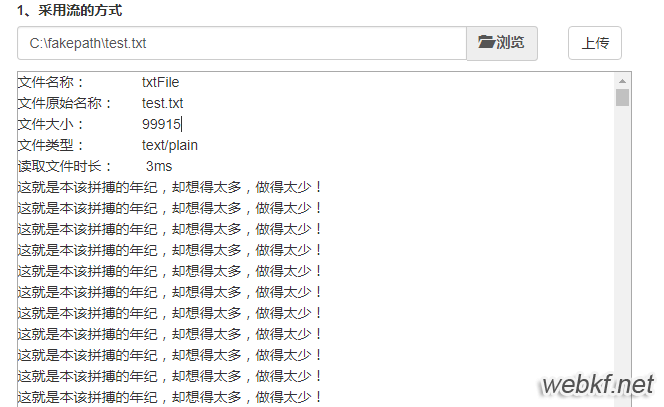
界面效果图如下:
3.2、使用CommonsMultipartResolver获取存放文件对象,拿到文件对象后遍历每个文件上传及获取相关的内容。
@RequestMapping(value="test/upload2")
@ResponseBody
public String testUpload2(HttpServletRequest request){
Long times = System.currentTimeMillis();
StringBuilder fileContent = new StringBuilder();
//1.根据servletContext获取多文件上传解析组件
CommonsMultipartResolver multipartResolver = new CommonsMultipartResolver(request.getSession().getServletContext());
if (!multipartResolver.isMultipart(request)) {
return "不是上传文件表单,请检查表单属性";
}
//2.将请求对象转换为多文件请求对象。
MultipartHttpServletRequest multipartHttpServletRequest = (MultipartHttpServletRequest) request;
//3、根据多文件请求对象获取文件存放Map
Map<String, MultipartFile> fileMap = multipartHttpServletRequest.getFileMap();
Iterator<Entry<String, MultipartFile>> iterator = fileMap.entrySet().iterator();
//4、迭代文件Map,获取具体的MultipartFile
while (iterator.hasNext()) {
Entry<String, MultipartFile> entry = iterator.next();
MultipartFile multipartFile = entry.getValue();
//获取文件头信息
FileUtils.getFileInfo(multipartFile, fileContent);
try {
//上传文件
multipartFile.transferTo(new File("F:\\text.log"));
//获取文件内容
fileContent.append(FileUtils.getFileContentByLine(multipartFile.getInputStream()));
}catch (Exception e) {
// TODO Auto-generated catch block
e.printStackTrace();
}
}
//5、返回文件信息和内容
String content = fileContent.toString();
content = content.replace("times", (System.currentTimeMillis()-times) + "ms");
return content;
}
其中第一步获取文件解析器对象应该都清楚只要在容器中配置了对应的对象我们就可以获取到它,而它有根据上下文获取的构造函数就方便多了。
/**
* Constructor for standalone usage. Determines the servlet container's
* temporary directory via the given ServletContext.
* @param servletContext the ServletContext to use
*/
public CommonsMultipartResolver(ServletContext servletContext) {
this();
setServletContext(servletContext);
}
然后根据request判断是否还有上传文件的表单,如果不是肯定直接返回,我们看看源码中是怎么判断的。
//CommonsMultipartResolver.class 主要判断request是否为空
@Override
public boolean isMultipart(HttpServletRequest request) {
return (request != null && ServletFileUpload.isMultipartContent(request));
}
//ServletFileUpload 主要判断是否是post方法,因为上传文件必须是post提交,其实我们可以在我们自定义controller中的方法指定访问
public static final boolean isMultipartContent(HttpServletRequest request) {
if (!POST_METHOD.equalsIgnoreCase(request.getMethod())) {
return false;
}
return FileUploadBase.isMultipartContent(new ServletRequestContext(request));
}
//FileUploadBase.class 如果请求是MULTIPART 则返回true
public static final boolean isMultipartContent(RequestContext ctx) {
String contentType = ctx.getContentType();//类似:multipart/form-data; boundary=----WebKitFormBoundaryLF3eM94lDB0ocQxT
if (contentType == null) {
return false;
}
if (contentType.toLowerCase(Locale.ENGLISH).startsWith(MULTIPART)) {
return true;
}
return false;
}
所以如果request是上传文件的请求对象,则进行第二步。将request转换成多文件请求对象,然后获取存放文件的map。
可想而知这种方法效率是比第一种要低的,因为他要遍历文件map,但是在Spring MVC常用的却是这种方法。
效果图如下:
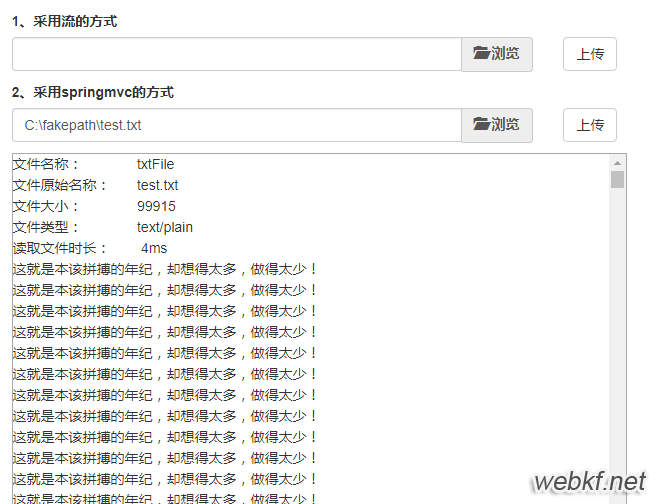
其中FileUtils.java代码如下:
package com.yuanfy.monitorsite.common.util;
import java.io.File;
import java.io.FileInputStream;
import java.io.FileNotFoundException;
import java.io.IOException;
import java.io.InputStream;
import org.springframework.web.multipart.MultipartFile;
/**
* @Description: 文件工具类方法
* @author yuanfy
* @date 2017年9月15日 下午2:45:40
* @version 1.0
*/
public class FileUtils {
/**
* @Description: 获取文件信息
* @param file CommonsMultipartFile类型的文件
* @param fileContent StringBuilder,封装文件信息
* @author yuanfy
* @date 2017年9月15日 下午2:51:34
* @version 1.0
*/
public static void getFileInfo(MultipartFile file, StringBuilder fileContent) {
fileContent.append("文件名称:\t\t").append(file.getName()).append("\n")
.append("文件原始名称:\t").append(file.getOriginalFilename()).append("\n")
.append("文件大小:\t\t").append(file.getSize()).append("\n")
.append("文件类型:\t\t").append(file.getContentType()).append("\n")
.append("读取文件时长:\t times").append("\n");
}
/**
* @Description: 根据文件对象获取文件内容
* @param file
* @author yuanfy
* @date 2017年9月15日 下午5:01:57
* @version 1.0
* @throws IOException
* @throws FileNotFoundException
*/
public static String getFileContentByLine(File file) throws FileNotFoundException, IOException {
return getFileContentByLine(new FileInputStream(file));
}
/**
* @Description: 根据文件输入流对象获取文件内容
* @param in 文件输入流对象
* @author yuanfy
* @date 2017年9月15日 下午5:01:57
* @version 1.0
* @throws IOException
*/
public static String getFileContentByLine(InputStream in) throws IOException {
StringBuilder fileContent = new StringBuilder();
byte[] bytes = new byte[1024];
int len = 0;
while ((len = in.read(bytes)) != -1) {
String content = new String(bytes, 0, len, "UTF-8");
fileContent.append(content);
}
StreamUtils.close(in);
return fileContent.toString();
}
}
当然要想查看整个代码,可以访问我项目的整个代码:https://github.com/YuanFY/blog_demo。
以上是 Spring MVC 文件上传的示例代码 的全部内容, 来源链接: utcz.com/p/215831.html

