三步轻松搭建springMVC框架
一、搭建步骤
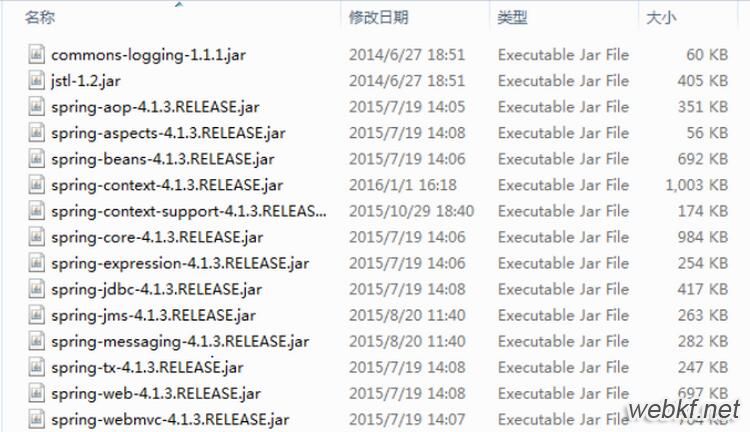
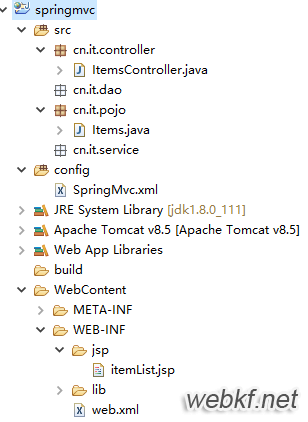
1、导入jar包、创建项目包结构
2、在web.xml中配置前端控制器
3、编写springMvc核心配置文件
4、编写pojo类和Controller类测试
二、实现
1、导入jar包、创建项目包结构
2、在web.xml中配置前端控制器
<!-- springMvc前端控制器 -->
<servlet>
<servlet-name>springMvc</servlet-name>
<servlet-class>org.springframework.web.servlet.DispatcherServlet</servlet-class>
<!-- 指定springMvc核心配置文件位置
如果没有指定那么默认就会去"/WEB-INF/+ <servlet-name>标签中内容 + -servlet.xml"中找
例如:"/WEB-INF/springMvc-servlet.xml"
-->
<init-param>
<param-name>contextConfigLocation</param-name>
<param-value>classpath:SpringMvc.xml</param-value>
</init-param>
<load-on-startup>2</load-on-startup>
</servlet>
<servlet-mapping>
<servlet-name>springMvc</servlet-name>
<url-pattern>*.action</url-pattern>
</servlet-mapping>
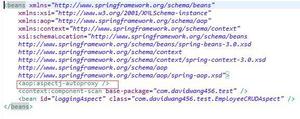
3、编写springMvc核心配置文件
<?xml version="1.0" encoding="UTF-8"?>
<beans xmlns="http://www.springframework.org/schema/beans"
xmlns:xsi="http://www.w3.org/2001/XMLSchema-instance" xmlns:p="http://www.springframework.org/schema/p"
xmlns:context="http://www.springframework.org/schema/context"
xmlns:dubbo="http://code.alibabatech.com/schema/dubbo" xmlns:mvc="http://www.springframework.org/schema/mvc"
xsi:schemaLocation="http://www.springframework.org/schema/beans http://www.springframework.org/schema/beans/spring-beans-4.0.xsd
http://www.springframework.org/schema/mvc http://www.springframework.org/schema/mvc/spring-mvc-4.0.xsd
http://code.alibabatech.com/schema/dubbo http://code.alibabatech.com/schema/dubbo/dubbo.xsd
http://www.springframework.org/schema/context http://www.springframework.org/schema/context/spring-context-4.0.xsd">
<!-- 配置@Controller注解扫描 -->
<context:component-scan base-package="cn.it.controller"></context:component-scan>
</beans>
4、编写pojo类和Controller类测试
pojo类代码:
package cn.it.pojo;
import java.util.Date;
public class Items {
private Integer id;
private String name;
private Float price;
private String pic;
private Date createtime;
private String detail;
public Integer getId() {
return id;
}
public void setId(Integer id) {
this.id = id;
}
public String getName() {
return name;
}
public void setName(String name) {
this.name = name == null ? null : name.trim();
}
public Float getPrice() {
return price;
}
public void setPrice(Float price) {
this.price = price;
}
public String getPic() {
return pic;
}
public void setPic(String pic) {
this.pic = pic == null ? null : pic.trim();
}
public Date getCreatetime() {
return createtime;
}
public void setCreatetime(Date createtime) {
this.createtime = createtime;
}
public String getDetail() {
return detail;
}
public void setDetail(String detail) {
this.detail = detail == null ? null : detail.trim();
}
}
Controller类代码:
package cn.it.controller;
import java.util.ArrayList;
import java.util.List;
import org.springframework.stereotype.Controller;
import org.springframework.web.bind.annotation.RequestMapping;
import org.springframework.web.servlet.ModelAndView;
import cn.it.pojo.Items;
@Controller
public class ItemsController {
//@RequestMapping指定URL到请求方法的映射,例如:
@RequestMapping("/itemsList")
public ModelAndView itemsList(){
List<Items>itemList = new ArrayList<Items>();
//商品列表
Items items_1 = new Items();
items_1.setName("联想笔记本_3");
items_1.setPrice(6000f);
items_1.setDetail("ThinkPad T430 联想笔记本电脑!");
Items items_2 = new Items();
items_2.setName("苹果手机");
items_2.setPrice(5000f);
items_2.setDetail("iphone6苹果手机!");
itemList.add(items_1);
itemList.add(items_2);
/*
* 模型和视图:
* model模型:模型对象中存放了返回给页面的数据
* view视图:视图对象中指定了返回的页面的位置
*/
//创建ModelAndView对象
ModelAndView modelAndView = new ModelAndView();
modelAndView.addObject("itemList", itemList);
modelAndView.setViewName("/WEB-INF/jsp/itemList.jsp");
return modelAndView;
}
}
以上是 三步轻松搭建springMVC框架 的全部内容, 来源链接: utcz.com/p/214223.html