Spring向页面传值和接受页面传过来的参数详解
本文主要给大家介绍了关于Spring向页面传值和接受页面传过来的参数的相关内容,分享出来供大家参考学习,下面来一起看看详细的介绍:
一、从页面接收参数
spring MVC接收请求提交的参数值的几种方法:
1、使用HttpServletRequest获取。
@RequestMapping("/login.do")
public String login(HttpServletRequest request){
String name = request.getParameter("name")
String pass = request.getParameter("pass")
}
2、使用@RequestParam注解。
@RequestMapping("/login.do")
public String login(HttpServletRequest request,
String name,
@RequestParam("pass")String password) // 表单属性是pass,用变量password接收
{
syso(name);
syso(password)
}
3、使用自动机制封装成实体参数。
<form action="login.do">
用户名:<input name="name"/>
密码:<input name="pass"/>
<input type="submit" value="登陆">
</form>
//封装的User类
public class User{
private String name;
private String pass;
}
@RequestMapping("/login.do")
public String login(User user)
{
syso(user.getName());
syso(user.getPass());
}
二、向页面传值
当Controller组件处理后,需要向响应JSP传值时,可以使用的方法:
1),使用HttpServletRequest 和 Session 然后setAttribute() ,就和Servlet中一样
Model数据会利用HttpServletRequest的Attribute传值到success.jsp中
@RequestMapping("/login.do")
public ModelAndView login(String name,String pass){
User user = userService.login(name,pwd);
Map<String,Object> data = new HashMap<String,Object>();
data.put("user",user);
return new ModelAndView("success",data);
}
2),使用ModelAndView对象
3),使用ModelMap对象
使用ModelMap参数对象示例:
ModelMap数据会利用HttpServletRequest的Attribute传值到success.jsp中
@RequestMapping("/login.do")
public String login(String name,String pass ,ModelMap model){
User user = userService.login(name,pwd);
model.addAttribute("user",user);
model.put("name",name);
return "success";
}
4),使用@ModelAttribute注解
使用@ModelAttribute示例
在Controller方法的参数部分或Bean属性方法上使用@ModelAttribute数据会利用HttpServletRequest的Attribute传值到success.jsp中
@RequestMapping("/login.do")
public String login(@ModelAttribute("user") User user){
//TODO
return "success";
}
@ModelAttribute("name")
public String getName(){
return name;
}
5)Session存储:可以利用HttpServletReequest的getSession()方法
@RequestMapping("/login.do")
public String login(String name,String pwd
ModelMap model,HttpServletRequest request){
User user = serService.login(name,pwd);
HttpSession session = request.getSession();
session.setAttribute("user",user);
model.addAttribute("user",user);
return "success";
}
6)自定义Map
@ResponseBody
@RequestMapping(value = "/updatestatus", method = RequestMethod.POST)
public Map<String, Object> updateStatus(HttpServletRequest request) {
Map<String, Object> result = new HashMap<String, Object>();
String id = request.getParameter("id");
SystemAdministrator sysadmin=systemAdminBiz.get(Integer.valueOf(id));
sysadmin.setStatus(1);
boolean flag = systemAdminBiz.update(sysadmin);
result.put("status", flag);
return result;
}
@RequestMapping(value = "/list", method = {RequestMethod.POST,RequestMethod.GET})
public String queryAdministrator(HttpServletRequest request,ModelMap model) {
Integer roleId = request.getParameter("roleListById") == null ? 0 : Integer.parseInt(request.getParameter("roleListById"));
Map<String, Object> properties = new HashMap<String, Object>();
if(roleId.intValue() > 0) {
properties.put("role:=", roleId);
model.put("roleId", roleId);
}
List<SystemAdministrator> administrator = systemAdminBiz.find(properties);
List<SystemRole> systemRole = systemRoleBiz.getAll();
model.put("administratorList", administrator);
model.put("roleList", systemRole);
return "sys_admin_list";
}
7)Spring MVC 默认采用的是转发来定位视图,如果要使用重定向,可以如下操作
1,使用RedirectView
2,使用redirect:前缀
public ModelAndView login(){
RedirectView view = new RedirectView("regirst.do");
return new ModelAndView(view);
}
或者用如下方法,工作中常用的方法:
public String login(){
//TODO
return "redirect:regirst.do";
}
三、实例讲解:
步骤一:创建新Web项目,导入Spring MVC包和业务层UserService
1. 创建Web项目导入相关的jar包:
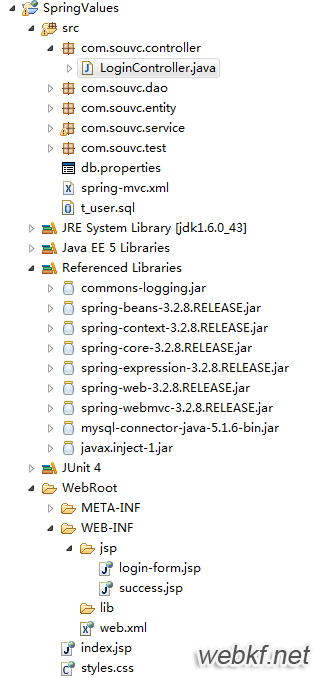
2. 导入前述业务层UserService类以及依赖的类,等。
User类代码如下:
package com.souvc.entity;
import java.io.Serializable;
public class User implements Serializable {
private static final long serialVersionUID = -603439325380668432L;
private int id;
private String name;
private String pwd;
private String phone;
public User() {
}
public User(int id, String name, String pwd, String phone) {
this.id = id;
this.name = name;
this.pwd = pwd;
this.phone = phone;
}
public User(String name, String pwd, String phone) {
super();
this.name = name;
this.pwd = pwd;
this.phone = phone;
}
public int getId() {
return id;
}
public void setId(int id) {
this.id = id;
}
public String getName() {
return name;
}
public void setName(String name) {
this.name = name;
}
public String getPwd() {
return pwd;
}
public void setPwd(String pwd) {
this.pwd = pwd;
}
public String getPhone() {
return phone;
}
public void setPhone(String phone) {
this.phone = phone;
}
@Override
public int hashCode() {
return id;
}
@Override
public boolean equals(Object obj) {
if (this == obj)
return true;
if (obj == null)
return false;
if (obj instanceof User) {
User o = (User) obj;
return this.id == o.id;
}
return true;
}
@Override
public String toString() {
return id + "," + name + "," + pwd + "," + phone;
}
}
UserDao接口代码如下:
package com.souvc.dao;
import com.souvc.entity.User;
/**
* 用户数据访问对象接口
*/
public interface UserDao {
/** 根据唯一用户名查询系统用户, 如果没有找到用户信息返回null */
public User findByName(String name);
// public User add(String name, String pwd, String phone);
// public User find(int id);
// public User delete(int id);
// public void update(User user);
}
UserService类代码如下:
package com.souvc.service;
import java.io.Serializable;
import javax.annotation.Resource;
import org.springframework.stereotype.Service;
import com.souvc.dao.UserDao;
import com.souvc.entity.User;
/** 业务层 注解 */
@Service
// 默认的Bean ID是 userService
public class UserService implements Serializable {
private static final long serialVersionUID = 7360372166489952236L;
private UserDao userDao;
// @Resource //自动匹配userDao对象并注入
@Resource(name = "userDao")
public void setUserDao(UserDao userDao) {
this.userDao = userDao;//
}
public UserDao getUserDao() {
return userDao;
}
/** 登录系统功能 */
public User login(String name, String pwd) throws NameOrPwdException,
NullParamException {
if (name == null || name.equals("") || pwd == null || pwd.equals("")) {
throw new NullParamException("登录参数不能为空!");
}
User user = userDao.findByName(name);
if (user != null && pwd.equals(user.getPwd())) {
return user;
}
throw new NameOrPwdException("用户名或者密码错误");
}
}
NameOrPwdException类代码如下:
package com.souvc.service;
/** 用户名或者密码错误 */
public class NameOrPwdException extends Exception {
public NameOrPwdException() {
}
public NameOrPwdException(String message) {
super(message);
}
public NameOrPwdException(Throwable cause) {
super(cause);
}
public NameOrPwdException(String message, Throwable cause) {
super(message, cause);
}
}
NullParamException类代码如下:
package com.souvc.service;
/** 参数为空 */
public class NullParamException extends Exception {
public NullParamException() {
}
public NullParamException(String message) {
super(message);
}
public NullParamException(Throwable cause) {
super(cause);
}
public NullParamException(String message, Throwable cause) {
super(message, cause);
}
}
JdbcDataSource类代码如下:
package com.souvc.dao;
import java.io.Serializable;
import java.sql.Connection;
import java.sql.DriverManager;
import java.sql.SQLException;
import org.springframework.beans.factory.annotation.Value;
import org.springframework.stereotype.Component;
/** 组件注解 */
@Component
public class JdbcDataSource implements Serializable {
private static final long serialVersionUID = -8925981939329398101L;
private String driver;
@Value("#{jdbcProps.url}")
private String url;
@Value("#{jdbcProps.user}")
private String user;
@Value("#{jdbcProps.pwd}")
private String pwd;
public String getDriver() {
return driver;
}
/** 必须使用Bean属性输入, 否则不能进行JDBC Driver注册 */
@Value("#{jdbcProps.driver}")
public void setDriver(String driver) {
try {
// 注册数据库驱动
Class.forName(driver);
this.driver = driver;
} catch (Exception e) {
throw new RuntimeException(e);
}
}
public String getUrl() {
return url;
}
public void setUrl(String url) {
this.url = url;
}
public String getUser() {
return user;
}
public void setUser(String user) {
this.user = user;
}
public String getPwd() {
return pwd;
}
public void setPwd(String pwd) {
this.pwd = pwd;
}
public Connection getConnection() throws SQLException {
Connection conn = DriverManager.getConnection(url, user, pwd);
return conn;
}
public void close(Connection conn) {
if (conn != null) {
try {
conn.close();
} catch (SQLException e) {
e.printStackTrace();
}
}
}
}
MysqlUserDao类代码如下:
package com.souvc.dao;
import java.io.Serializable;
import java.sql.Connection;
import java.sql.PreparedStatement;
import java.sql.ResultSet;
import java.sql.SQLException;
import org.springframework.beans.factory.annotation.Autowired;
import org.springframework.beans.factory.annotation.Qualifier;
import org.springframework.stereotype.Repository;
import com.souvc.entity.User;
/** 持久层 注解 */
@Repository("userDao")
// 指定特定的Bean ID 方便setUserDao注入
public class MysqlUserDao implements UserDao, Serializable {
private static final long serialVersionUID = 7385842613248394287L;
private JdbcDataSource dataSource;
public MysqlUserDao() {
}
/** 创建 MysqlUserDAO 对象必须依赖于JDBCDataSource实例 */
public MysqlUserDao(JdbcDataSource dataSource) {
this.dataSource = dataSource;
}
@Autowired
// 按照类型自动装配
public void setDataSource(@Qualifier("jdbcDataSource")
JdbcDataSource dataSource) {
this.dataSource = dataSource;
}
public JdbcDataSource getDataSource() {
return dataSource;
}
/** 根据唯一用户名查询系统用户, 如果没有找到用户信息返回null */
public User findByName(String name) {
System.out.println("利用JDBC技术查找User信息");
String sql = "select id, name, pwd, phone from users where name=?";
Connection conn = null;
try {
conn = dataSource.getConnection();
PreparedStatement ps = conn.prepareStatement(sql);
ps.setString(1, name);
ResultSet rs = ps.executeQuery();
User user = null;
while (rs.next()) {
user = new User();
user.setId(rs.getInt("id"));
user.setName(rs.getString("name"));
user.setPwd(rs.getString("pwd"));
user.setPhone(rs.getString("phone"));
}
rs.close();
ps.close();
return user;
} catch (SQLException e) {
e.printStackTrace();
throw new RuntimeException(e);
} finally {
dataSource.close(conn);
}
}
}
db.properties文件内容如下:
# config for Mysql
driver=com.mysql.jdbc.Driver
url=jdbc:mysql://localhost:3306/souvc
user=root
pwd=123456
spring-mvc.xml文件代码如下:
<?xml version="1.0" encoding="UTF-8"?>
<beans xmlns="http://www.springframework.org/schema/beans"
xmlns:xsi="http://www.w3.org/2001/XMLSchema-instance"
xmlns:context="http://www.springframework.org/schema/context"
xmlns:jdbc="http://www.springframework.org/schema/jdbc"
xmlns:jee="http://www.springframework.org/schema/jee"
xmlns:tx="http://www.springframework.org/schema/tx"
xmlns:jpa="http://www.springframework.org/schema/data/jpa"
xmlns:util="http://www.springframework.org/schema/util"
xmlns:mvc="http://www.springframework.org/schema/mvc"
xsi:schemaLocation="
http://www.springframework.org/schema/beans http://www.springframework.org/schema/beans/spring-beans-3.2.xsd
http://www.springframework.org/schema/context http://www.springframework.org/schema/context/spring-context-3.2.xsd
http://www.springframework.org/schema/jdbc http://www.springframework.org/schema/jdbc/spring-jdbc-3.2.xsd
http://www.springframework.org/schema/jee http://www.springframework.org/schema/jee/spring-jee-3.2.xsd
http://www.springframework.org/schema/tx http://www.springframework.org/schema/tx/spring-tx-3.2.xsd
http://www.springframework.org/schema/data/jpa http://www.springframework.org/schema/data/jpa/spring-jpa-1.3.xsd
http://www.springframework.org/schema/util http://www.springframework.org/schema/util/spring-util-3.2.xsd
http://www.springframework.org/schema/mvc http://www.springframework.org/schema/mvc/spring-mvc-3.2.xsd">
<util:properties id="jdbcProps" location="classpath:db.properties" />
<context:component-scan base-package="com.souvc" />
<!-- 视图处理 -->
<bean id="viewResolver" class="org.springframework.web.servlet.view.InternalResourceViewResolver">
<property name="prefix" value="/WEB-INF/jsp/"></property>
<property name="suffix" value=".jsp"></property>
</bean>
</beans>
MySQL数据库初始化SQL代码如下:
DROP TABLE users;
CREATE TABLE USERS
(
ID DOUBLE(7, 0) ,
NAME VARCHAR(50) ,
PWD VARCHAR(50),
PHONE VARCHAR(50) ,
PRIMARY KEY (id)
);
INSERT INTO Users (id, NAME, pwd, phone) VALUES (1, 'Tom', '123', '110');
INSERT INTO Users (id, NAME, pwd, phone) VALUES (2, 'Jerry', 'abc', '119');
INSERT INTO Users (id, NAME, pwd, phone) VALUES (3, 'Andy', '456', '112');
3. 为项目添加JUnit4 API,然后添加测试类TestCase和测试方法testUserService()用于测试上述配置是否正确。TestCase类代码如下:
package com.souvc.test;
import java.util.Properties;
import org.junit.Test;
import org.springframework.context.ApplicationContext;
import org.springframework.context.support.ClassPathXmlApplicationContext;
import com.souvc.dao.JdbcDataSource;
import com.souvc.entity.User;
import com.souvc.service.UserService;
public class TestCase {
@Test
public void testUserService() throws Exception {
String cfg = "spring-mvc.xml";
ApplicationContext ac = new ClassPathXmlApplicationContext(cfg);
Properties obj = ac.getBean("jdbcProps", Properties.class);
JdbcDataSource ds = ac.getBean("jdbcDataSource", JdbcDataSource.class);
System.out.println(obj);
System.out.println(ds);
System.out.println(ds.getConnection());
UserService service = ac.getBean("userService", UserService.class);
User user = service.login("Tom", "123");
System.out.println(user);
}
}
执行测试方法testUserService() ,在控制台输出的结果:
{user=root, url=jdbc:mysql://localhost:3306/souvc, driver=com.mysql.jdbc.Driver, pwd=123456}
com.souvc.dao.JdbcDataSource@1cb1a4e2
com.mysql.jdbc.JDBC4Connection@3d04fc23
利用JDBC技术查找User信息
1,Tom,123,110
这个结果说明业务层UserService工作正常。
4. 配置Spring MVC 核心控制器DispatcherServlet到web.xml。web.xml配置部分代码参考如下:
<?xml version="1.0" encoding="UTF-8"?>
<web-app version="2.5" xmlns="http://java.sun.com/xml/ns/javaee"
xmlns:xsi="http://www.w3.org/2001/XMLSchema-instance"
xsi:schemaLocation="http://java.sun.com/xml/ns/javaee
http://java.sun.com/xml/ns/javaee/web-app_2_5.xsd">
<welcome-file-list>
<welcome-file>index.jsp</welcome-file>
</welcome-file-list>
<servlet>
<servlet-name>springmvc</servlet-name>
<servlet-class>
org.springframework.web.servlet.DispatcherServlet
</servlet-class>
<init-param>
<param-name>contextConfigLocation</param-name>
<param-value>classpath:spring-mvc.xml</param-value>
</init-param>
<load-on-startup>1</load-on-startup>
</servlet>
<servlet-mapping>
<servlet-name>springmvc</servlet-name>
<url-pattern>*.form</url-pattern>
</servlet-mapping>
</web-app>
5. 部署项目到Tomcat并且启动,测试Spring MVC配置是否正常。
在输出结果中出现内容, 并且没有异常就会说明Spring MVC部署正常。
步骤二:实现login-action1.form登录流程,测试利用HttpServletRequrst传值方法
1. 在WEB-INF/jsp文件夹下添加login-form.jsp文件,代码如下所示:
<%@ page pageEncoding="utf-8" contentType="text/html; charset=utf-8"%>
<!DOCTYPE HTML>
<%@taglib prefix="c" uri="http://java.sun.com/jsp/jstl/core" %>
<c:url var="base" value="/"></c:url>
<html>
<head>
<title>Login Form</title>
<link rel="stylesheet" type="text/css" href="${base}styles.css" rel="external nofollow" rel="external nofollow" >
</head>
<body>
<h6>${message}</h6>
<form method="post" action="${base}login/login-action1.form">
<div>
<h2>登录 login-action1.form</h2>
<p><label>用户</label><input type="text" name="name"></p>
<p><label>密码</label><input type="password" name="pwd"></p>
<h3><input type="submit" value="登录"></h3>
</div>
</form>
<form method="post" action="${base}login/login-action2.form">
<div>
<h2>登录 login-action2.form</h2>
<p><label>用户</label><input type="text" name="name"></p>
<p><label>密码</label><input type="password" name="pwd"></p>
<h3><input type="submit" value="登录"></h3>
</div>
</form>
<form method="post" action="${base}login/login-action3.form">
<div>
<h2>登录 login-action3.form</h2>
<p><label>用户</label><input type="text" name="name"></p>
<p><label>密码</label><input type="password" name="pwd"></p>
<h3><input type="submit" value="登录"></h3>
</div>
</form>
<form method="post" action="${base}login/login-action4.form">
<div>
<h2>登录 login-action4.form</h2>
<p><label>用户</label><input type="text" name="name"></p>
<p><label>密码</label><input type="password" name="pwd"></p>
<h3><input type="submit" value="登录"></h3>
</div>
</form>
<form method="post" action="${base}login/login-action5.form">
<div>
<h2>登录 login-action5.form</h2>
<p><label>用户</label><input type="text" name="name"></p>
<p><label>密码</label><input type="password" name="pwd"></p>
<h3><input type="submit" value="登录"></h3>
</div>
</form>
<form method="post" action="${base}login/login-action6.form">
<div>
<h2>登录 login-action6.form</h2>
<p><label>用户</label><input type="text" name="name"></p>
<p><label>密码</label><input type="password" name="pwd"></p>
<h3><input type="submit" value="登录"></h3>
</div>
</form>
</body>
</html>
方法一解释:
利用HttpServletRequest对象进行浏览器页面到控制器传值。
方法二解释:
使用@RequestParam注解声明表单密码输入框pwd的值注入到password变量,表单中用户名输入框根据名字映自动射注入name变量。 @RequestMapping注解将login-action2.form映射到了checkLogin2()方法。这样就与login- form.jsp表单对应。
方法三解释:
这里采用user作为参数, Spring会自动的将页面表单参数name,pwd注入到user对象的相应属性name,pwd传递到方法中。@RequestMapping将请求login-action3.form映射到方法checkLogin3() 。
方法四解释:
在处理方法完成后返回一个ModelAndView对象。
方法五解释:
ModelMap属性值与页面login-form.jsp之间的数据对应。
方法六解释:
@ModelAttribute声明的属性与login-form.jsp页面的值关系。
用户名或者密码错误时候出现的时候,能够记住用户名。
在前述案例中,用户登录成功以后, 可以利用HttpServletRequest对象的getSession()方法访问Session对象, 这样就可以保持用户登录状态了。
2. 为页面添加样式文件styles.css,样式文件保存在WebRoot文件夹下,styles.css文件代码如下所示:
* {
margin: 0;
padding: 0;
}
h6 {
text-align: center;
color: red;
padding: 10px;
font-size: 14px;
}
form {
padding: 10px;
float: left;
}
form div {
border: 1px gray solid;
width: 320px;
padding: 8px;
}
form p input {
width: 180px
}
form h2 input {
text-align: center;
}
form h2 {
background: black;
color: white;
padding: 4px;
}
form p {
background: #ddd;
padding: 4px 8px 0 8px;
}
form h3 {
background: #ddd;
padding: 8px;
}
3. 在WEB-INF/jsp文件夹下添加success.jsp文件,这个文件是登录成功以后显示的界面,代码如下所示:
<%@ page pageEncoding="utf-8" contentType="text/html; charset=utf-8"%>
<!DOCTYPE HTML>
<%@taglib prefix="c" uri="http://java.sun.com/jsp/jstl/core"%>
<c:url var="base" value="/"></c:url>
<html>
<head>
<title>Success</title>
<link rel="stylesheet" type="text/css" href="${base}styles.css" rel="external nofollow" rel="external nofollow" >
</head>
<body>
<h6>
${user.name}登录成功!
</h6>
</body>
</html>
上述页面中,使用EL表达式和标准标签库配合显示界面数据, 其中<c:url var="base" value="/"></c:url>和${base}用于解决绝对路径问题。
4. 创建控制器类LoginController,在该类中使用注解@Controller的方式进行配置:
1)使用@Controller将LoginController声明为控制器Bean组件。
2)使用@RequestMapping("/login")声明对LoginController组件的请求在/login 路径下。
3)流程控制方法loginForm(),用于显示登录表单页面。使用@RequestMapping注解将映射请求/login-form.form到loginForm()方法。
4)增加userService属性,并且使用@Resource注解声明在运行期间注入userService对象。
5)增加控制流程方法checkLogin1() ,使用@RequestMapping注解将请求/login-action1.form映 射到checkLogin1()方法。checkLogin1()方法调用userService的login方法,实现登录流程。 checkLogin1()方法主要是测试JSP页面到控制器的数据传输方式。
LoginController类代码如下所示:
package com.souvc.controller;
import java.util.HashMap;
import java.util.Map;
import java.util.Random;
import javax.annotation.Resource;
import javax.servlet.http.HttpServletRequest;
import org.springframework.stereotype.Controller;
import org.springframework.ui.ModelMap;
import org.springframework.web.bind.annotation.ModelAttribute;
import org.springframework.web.bind.annotation.RequestMapping;
import org.springframework.web.bind.annotation.RequestParam;
import org.springframework.web.servlet.ModelAndView;
import com.souvc.entity.User;
import com.souvc.service.NameOrPwdException;
import com.souvc.service.NullParamException;
import com.souvc.service.UserService;
@Controller
//@SessionAttributes("user")
@RequestMapping("/login")
public class LoginController {
@Resource
// 请求Spring注入资源 userService
private UserService userService;
@RequestMapping("/login.form")
public String loginForm() {
// 可以向表单界面传递一些参数
return "login-form";
}
@RequestMapping("/login-action1.form")
// Spring MVC 自动参数注入HttpServletRequest
public String checkLogin1(HttpServletRequest req) {
System.out.println("---方法一---");
// 优点直接简洁,缺点需要自己处理数据类型转换, 不支持文件上传功能
String name = req.getParameter("name");
String pwd = req.getParameter("pwd");
System.out.println(name);
System.out.println(pwd);
try {
User user = userService.login(name, pwd);
// 登录成功将登录用户信息保存到当前会话中
req.getSession().setAttribute("user", user);
return "success";
} catch (NameOrPwdException e) {
e.printStackTrace();
req.setAttribute("message", e.getMessage());
return "login-form";
} catch (NullParamException e) {
e.printStackTrace();
req.setAttribute("message", e.getMessage());
return "redirect:login.form";
} catch (RuntimeException e) {
e.printStackTrace();
req.setAttribute("message", e.getMessage());
return "error";
}
}
@RequestMapping("/login-action2.form")
public String checkLogin2(String name, @RequestParam("pwd")
String password, // 映射表单属性不同的参数
HttpServletRequest req) {
System.out.println("---方法二---");
// 优点, 自动转换数据类型, 缺点可能出现数据类型转换异常
System.out.println(name);
System.out.println(password);
try {
User user = userService.login(name, password);
// 登录成功将登录用户信息保存到当前会话中
req.getSession().setAttribute("user", user);
return "success";
} catch (NameOrPwdException e) {
e.printStackTrace();
req.setAttribute("message", e.getMessage());
return "login-form";
} catch (NullParamException e) {
e.printStackTrace();
req.setAttribute("message", e.getMessage());
return "login-form";
} catch (RuntimeException e) {
e.printStackTrace();
req.setAttribute("message", e.getMessage());
return "error";
}
}
@RequestMapping("/login-action3.form")
public String checkLogin3(User user, HttpServletRequest req) {
System.out.println("---方法三---");
// 自动填充到bean对象
System.out.println(user);
try {
user = userService.login(user.getName(), user.getPwd());
// 登录成功将登录用户信息保存到当前会话中
req.getSession().setAttribute("user", user);
return "success";
} catch (NameOrPwdException e) {
e.printStackTrace();
req.setAttribute("message", e.getMessage());
return "login-form";
} catch (NullParamException e) {
e.printStackTrace();
req.setAttribute("message", e.getMessage());
return "login-form";
} catch (RuntimeException e) {
e.printStackTrace();
req.setAttribute("message", e.getMessage());
return "error";
}
}
@RequestMapping("/login-action4.form")
public ModelAndView checkLogin4(String name, String pwd,
HttpServletRequest req) {
System.out.println("---方法四---");
Map<String, Object> data = new HashMap<String, Object>();
try {
User user = userService.login(name, pwd);
// 登录成功将登录用户信息保存到当前会话中
req.getSession().setAttribute("user", user);
return new ModelAndView("success", data);
} catch (NameOrPwdException e) {
e.printStackTrace();
data.put("message", e.getMessage());
return new ModelAndView("login-form", data);
} catch (NullParamException e) {
e.printStackTrace();
data.put("message", e.getMessage());
return new ModelAndView("login-form", data);
} catch (RuntimeException e) {
e.printStackTrace();
data.put("message", e.getMessage());
return new ModelAndView("error", data);
}
}
@RequestMapping("/login-action5.form")
public String checkLogin5(String name, String pwd, ModelMap model,
HttpServletRequest req) {
System.out.println("---方法五---");
try {
User user = userService.login(name, pwd);
// 登录成功将登录用户信息保存到当前会话中
req.getSession().setAttribute("user", user);
return "success";
} catch (NameOrPwdException e) {
e.printStackTrace();
model.addAttribute("message", e.getMessage());
return "login-form";
} catch (NullParamException e) {
e.printStackTrace();
model.addAttribute("message", e.getMessage());
return "login-form";
} catch (RuntimeException e) {
e.printStackTrace();
model.addAttribute("message", e.getMessage());
return "error";
}
}
@RequestMapping("/login-action6.form")
public String checkLogin6(
@ModelAttribute("name") String name,
@ModelAttribute("password") String pwd,
ModelMap model, HttpServletRequest req){
System.out.println("---方法六---");
try {
User user = userService.login(name, pwd);
// 登录成功将登录用户信息保存到当前会话中
req.getSession().setAttribute("user", user);
return "success";
} catch (NameOrPwdException e) {
e.printStackTrace();
model.addAttribute("message", e.getMessage());
return "login-form";
} catch (NullParamException e) {
e.printStackTrace();
model.addAttribute("message", e.getMessage());
return "login-form";
} catch (RuntimeException e) {
e.printStackTrace();
model.addAttribute("message", e.getMessage());
return "error";
}
}
@RequestMapping("/login-action7.form")
public String checkLogin7(ModelMap model, HttpServletRequest req) {
System.out.println("---方法七---");
String name1=req.getParameter("name");
String pwd1=req.getParameter("pwd");
try {
User user = userService.login(name1, pwd1);
// 登录成功将登录用户信息保存到当前会话中
req.getSession().setAttribute("user", user);
return "success";
} catch (NameOrPwdException e) {
e.printStackTrace();
model.addAttribute("message", e.getMessage());
return "redirect:login";
} catch (NullParamException e) {
e.printStackTrace();
model.addAttribute("message", e.getMessage());
return "redirect:login";
} catch (RuntimeException e) {
e.printStackTrace();
model.addAttribute("message", e.getMessage());
return "error";
}
}
private String[] msg = { "再来一次", "下次就对了", "没关系还有机会" };
@ModelAttribute("next")
public String getNext() {
Random r = new Random();
return msg[r.nextInt(msg.length)];
}
}
5.测试login-action1.form登录流程
通过网址“http://localhost:8080/SpringValues/login/login.form”请求Tomcat服务器:
访问请求的信息打印在控制台:
---方法一---
Tom
123
利用JDBC技术查找User信息
---方法二---
Tom
123
利用JDBC技术查找User信息
---方法三---
0,Tom,123,null
利用JDBC技术查找User信息
---方法四---
利用JDBC技术查找User信息
---方法五---
利用JDBC技术查找User信息
总结
以上就是这篇文章的全部内容了,希望本文的内容对大家的学习或者工作能带来一定的帮助,如果有疑问大家可以留言交流,谢谢大家对的支持。
以上是 Spring向页面传值和接受页面传过来的参数详解 的全部内容, 来源链接: utcz.com/p/213007.html