MyBatis-Generator的配置说明和使用
关于MyBatis:
MyBatis Generator (MBG) 是一个Mybatis的代码生成器 MyBatis 和 iBATIS. 他可以生成Mybatis各个版本的代码,和iBATIS 2.2.0版本以后的代码。 他可以内省数据库的表(或多个表)然后生成可以用来访问(多个)表的基础对象。 这样和数据库表进行交互时不需要创建对象和配置文件。 MBG的解决了对数据库操作有最大影响的一些简单的CRUD(插入,查询,更新,删除)操作。
准备工作:
下载MyBatis-Generator 点击此处下载
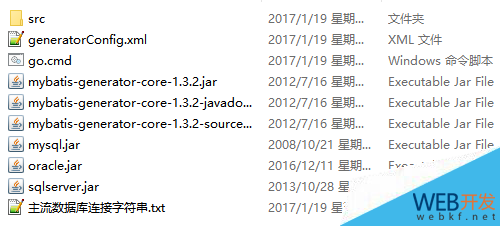
下载成功以后 如下图

generatorConfig.xml是核心配置文件,主要内容与解释如下
<?xml version="1.0" encoding="UTF-8"?>
<!DOCTYPE generatorConfiguration
PUBLIC "-//mybatis.org//DTD MyBatis Generator Configuration 1.0//EN"
"http://mybatis.org/dtd/mybatis-generator-config_1_0.dtd">
<generatorConfiguration>
<!--
在此处修改数据库的驱动包 必须提前将驱动包放到本配置文件的同级目录下 笔者已提前放好
如使用Oracle数据库时 <classPathEntry location="oracle.jar" />
-->
<classPathEntry location="mysql.jar" />
<context id="DB2Tables" targetRuntime="MyBatis3">
<commentGenerator>
<property name="suppressAllComments" value="true" /> <!-- 是否取消注释 -->
<property name="suppressDate" value="true" /> <!-- 是否生成注释代时间戳 -->
</commentGenerator>
<!-- 此处修改数据库的连接信息 -->
<jdbcConnection driverClass="com.mysql.jdbc.Driver" connectionURL="jdbc:mysql://localhost:3306/easybuy" userId="root"
password="pengxiongpengdi" />
<javaTypeResolver>
<property name="forceBigDecimals" value="false" />
</javaTypeResolver>
<!--
要生成的实体类
每个项目包的命名 都不一样 可以通过修改 该属性 实现
targetPackage="com.buy.entity"
-->
<javaModelGenerator targetPackage="com.buy.entity"
targetProject="src">
<property name="enableSubPackages" value="true" />
<property name="trimStrings" value="true" />
</javaModelGenerator>
<!-- 要生成的接口 -->
<sqlMapGenerator targetPackage="com.buy.dao"
targetProject="src">
<property name="enableSubPackages" value="true" />
</sqlMapGenerator>
<!-- 要生成的映射文件 -->
<javaClientGenerator type="XMLMAPPER"
targetPackage="com.buy.dao" targetProject="src">
<property name="enableSubPackages" value="true" />
</javaClientGenerator>
<!--
配置要映射的表
数据库中对应的表: tableName="EASYBUY_PRODUCT"
项目中实体类的名字: domainObjectName="ProductEntity"
其他属性默认即可
-->
<table tableName="EASYBUY_PRODUCT" domainObjectName="ProductEntity"
enableCountByExample="false" enableUpdateByExample="false"
enableDeleteByExample="false" enableSelectByExample="false"
selectByExampleQueryId="false"></table>
<table tableName="EASYBUY_PRODUCT_CATEGORY" domainObjectName="CategoryEntity"
enableCountByExample="false" enableUpdateByExample="false"
enableDeleteByExample="false" enableSelectByExample="false"
selectByExampleQueryId="false"></table>
<table tableName="EASYBUY_USER" domainObjectName="UserEntity"
enableCountByExample="false" enableUpdateByExample="false"
enableDeleteByExample="false" enableSelectByExample="false"
selectByExampleQueryId="false"></table>
</context>
</generatorConfiguration>
配置好以后运行go.cmd src目录下就会生成 对应的接口、映射文件和实体类

此时就生成完毕了可以在此基础上添加其他功能
以上就是本文的全部内容,希望本文的内容对大家的学习或者工作能带来一定的帮助,同时也希望多多支持!
以上是 MyBatis-Generator的配置说明和使用 的全部内容, 来源链接: utcz.com/p/211375.html


