浅谈SpringMVC+Spring3+Hibernate4开发环境搭建
早期的项目比较简单,多是用JSP 、Servlet + JDBC 直接搞定,后来使用 Struts1(Struts2)+Spring+Hibernate, 严格按照分层概念驱动项目开发,这次又使用 Spring MVC取代Struts来进行开发。
MVC已经是现代Web开发中的一个很重要的部分,下面介绍一下SpringMVC+Spring3+Hibernate4的开发环境搭建
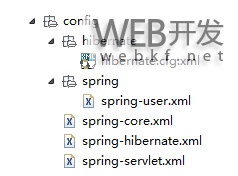
先大致看一下项目结构:
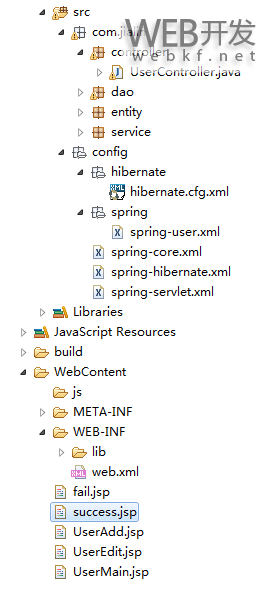
具体的代码不再演示,主要是走了一个很平常的路线,mvc-servcie-dao-hibernate的结构,源码可以下载,主要看一下配置文件。解释见注释
web.xml
<?xml version="1.0" encoding="UTF-8"?>
<web-app xmlns:xsi="http://www.w3.org/2001/XMLSchema-instance" xmlns="http://java.sun.com/xml/ns/javaee" xmlns:web="http://java.sun.com/xml/ns/javaee/web-app_2_5.xsd" xsi:schemaLocation="http://java.sun.com/xml/ns/javaee http://java.sun.com/xml/ns/javaee/web-app_2_5.xsd" id="WebApp_ID" version="2.5">
<display-name>SpringMVC</display-name>
<welcome-file-list>
<welcome-file>index.jsp</welcome-file>
</welcome-file-list>
<!-- 配置Spring -->
<context-param>
<param-name>contextConfigLocation</param-name>
<param-value>classpath*:config/spring-*.xml</param-value>
</context-param>
<listener>
<listener-class>org.springframework.web.context.ContextLoaderListener</listener-class>
</listener>
<!-- 配置SpringMVC -->
<servlet>
<servlet-name>springMVC</servlet-name>
<servlet-class>org.springframework.web.servlet.DispatcherServlet</servlet-class>
<init-param>
<param-name>contextConfigLocation</param-name>
<param-value>classpath*:config/spring-servlet.xml</param-value>
</init-param>
<load-on-startup>1</load-on-startup>
</servlet>
<servlet-mapping>
<servlet-name>springMVC</servlet-name>
<url-pattern>/</url-pattern>
</servlet-mapping>
<!-- 设置字符集 -->
<filter>
<filter-name>encodingFilter</filter-name>
<filter-class>org.springframework.web.filter.CharacterEncodingFilter</filter-class>
<init-param>
<param-name>encoding</param-name>
<param-value>UTF-8</param-value>
</init-param>
<init-param>
<param-name>forceEncoding</param-name>
<param-value>true</param-value>
</init-param>
</filter>
<filter-mapping>
<filter-name>encodingFilter</filter-name>
<url-pattern>/*</url-pattern>
</filter-mapping>
<!-- 控制Session的开关 -->
<filter>
<filter-name>openSession</filter-name>
<filter-class>org.springframework.orm.hibernate4.support.OpenSessionInViewFilter</filter-class>
</filter>
<filter-mapping>
<filter-name>openSession</filter-name>
<url-pattern>/*</url-pattern>
</filter-mapping>
</web-app>
spring-servlet.xml
<?xml version="1.0" encoding="UTF-8"?>
<beans xmlns="http://www.springframework.org/schema/beans"
xmlns:context="http://www.springframework.org/schema/context" xmlns:p="http://www.springframework.org/schema/p"
xmlns:mvc="http://www.springframework.org/schema/mvc" xmlns:xsi="http://www.w3.org/2001/XMLSchema-instance"
xsi:schemaLocation="http://www.springframework.org/schema/beans
http://www.springframework.org/schema/beans/spring-beans-3.0.xsd
http://www.springframework.org/schema/context
http://www.springframework.org/schema/context/spring-context.xsd
http://www.springframework.org/schema/mvc
http://www.springframework.org/schema/mvc/spring-mvc-3.0.xsd">
<!-- 注解扫描的包 -->
<context:component-scan base-package="com.jialin" />
<!-- 开启注解方案1 -->
<!-- 注解方法处理 -->
<!-- <bean class="org.springframework.web.servlet.mvc.annotation.AnnotationMethodHandlerAdapter"
/> -->
<!-- 注解类映射处理 -->
<!-- <bean class="org.springframework.web.servlet.mvc.annotation.DefaultAnnotationHandlerMapping"></bean> -->
<!-- 开启注解方案2 -->
<mvc:annotation-driven />
<!-- 静态资源访问,方案1 -->
<mvc:resources location="/img/" mapping="/img/**" />
<mvc:resources location="/js/" mapping="/js/**" />
<!-- 静态资源访问,方案2 -->
<!-- <mvc:default-servlet-handler/> -->
<!-- 视图解释类 -->
<bean id="viewResolver"
class="org.springframework.web.servlet.view.InternalResourceViewResolver">
<property name="prefix" value="/"></property>
<!--可为空,方便实现自已的依据扩展名来选择视图解释类的逻辑 -->
<property name="suffix" value=".jsp"></property>
</bean>
<!-- 上传文件bean -->
<!-- <bean id="multipartResolver" class="org.springframework.web.multipart.commons.CommonsMultipartResolver">
<property name="defaultEncoding" value="utf-8" /> <property name="maxUploadSize"
value="10485760000" /> <property name="maxInMemorySize" value="40960" />
</bean> -->
</beans>
spring-hibernate.xml
<?xml version="1.0" encoding="UTF-8"?>
<beans xmlns="http://www.springframework.org/schema/beans"
xmlns:context="http://www.springframework.org/schema/context" xmlns:p="http://www.springframework.org/schema/p"
xmlns:mvc="http://www.springframework.org/schema/mvc" xmlns:xsi="http://www.w3.org/2001/XMLSchema-instance"
xsi:schemaLocation="http://www.springframework.org/schema/beans
http://www.springframework.org/schema/beans/spring-beans-3.0.xsd
http://www.springframework.org/schema/context
http://www.springframework.org/schema/context/spring-context.xsd
http://www.springframework.org/schema/mvc
http://www.springframework.org/schema/mvc/spring-mvc-3.0.xsd">
<!-- 配置数据源 -->
<bean id="dataSource"
class="org.springframework.jdbc.datasource.DriverManagerDataSource">
<property name="driverClassName" value="com.mysql.jdbc.Driver" />
<property name="url" value="jdbc:mysql://127.0.0.1/springmvc" />
<property name="username" value="root" />
<property name="password" value="123456" />
</bean>
<!-- 配置hibernate SessionFactory-->
<bean id="sessionFactory"
class="org.springframework.orm.hibernate4.LocalSessionFactoryBean">
<property name="dataSource" ref="dataSource" />
<property name="hibernateProperties">
<props>
<prop key="hibernate.dialect">org.hibernate.dialect.MySQLDialect</prop>
<prop key="hibernate.hbm2ddl.auto">update</prop>
<prop key="hibernate.show_sql">true</prop>
<prop key="hiberante.format_sql">true</prop>
</props>
</property>
<property name="configLocations">
<list>
<value>
classpath*:config/hibernate/hibernate.cfg.xml
</value>
</list>
</property>
</bean>
<!-- 事务管理器 -->
<bean id="transactionManager"
class="org.springframework.orm.hibernate4.HibernateTransactionManager">
<property name="sessionFactory" ref="sessionFactory"></property>
</bean>
<!-- 事务代理类 -->
<bean id="transactionBese"
class="org.springframework.transaction.interceptor.TransactionProxyFactoryBean"
lazy-init="true" abstract="true">
<property name="transactionManager" ref="transactionManager"></property>
<property name="transactionAttributes">
<props>
<prop key="add*">PROPAGATION_REQUIRED,-Exception</prop>
<prop key="update*">PROPAGATION_REQUIRED,-Exception</prop>
<prop key="insert*">PROPAGATION_REQUIRED,-Exception</prop>
<prop key="modify*">PROPAGATION_REQUIRED,-Exception</prop>
<prop key="delete*">PROPAGATION_REQUIRED,-Exception</prop>
<prop key="del*">PROPAGATION_REQUIRED,-Exception</prop>
<prop key="get*">PROPAGATION_NEVER</prop>
</props>
</property>
</bean>
</beans>
spring-core.xml
<?xml version="1.0" encoding="UTF-8"?>
<beans xmlns="http://www.springframework.org/schema/beans"
xmlns:context="http://www.springframework.org/schema/context"
xmlns:p="http://www.springframework.org/schema/p"
xmlns:mvc="http://www.springframework.org/schema/mvc"
xmlns:xsi="http://www.w3.org/2001/XMLSchema-instance"
xsi:schemaLocation="http://www.springframework.org/schema/beans
http://www.springframework.org/schema/beans/spring-beans-3.0.xsd
http://www.springframework.org/schema/context
http://www.springframework.org/schema/context/spring-context.xsd
http://www.springframework.org/schema/mvc
http://www.springframework.org/schema/mvc/spring-mvc-3.0.xsd">
<!-- 引入其他配置文件,可以为多个 -->
<import resource="classpath*:config/spring/spring-user.xml"/>
</beans>
spring-user.xml
<?xml version="1.0" encoding="UTF-8"?>
<!DOCTYPE beans PUBLIC "-//SPRING//DTD BEAN 2.0//EN" "http://www.springframework.org/dtd/spring-beans-2.0.dtd" [
<!ENTITY contextInclude SYSTEM "org/springframework/web/context/WEB-INF/contextInclude.xml">
]>
<beans>
<!-- Spring Bean -->
<bean id="userDao" class="com.jialin.dao.UserDao">
<property name="sessionFactory" ref="sessionFactory"></property>
</bean>
<bean id="userManagerBase" class="com.jialin.service.UserManager">
<property name="userDao" ref="userDao"></property>
</bean>
<!-- parent为transactionBese,表示支持事务 -->
<bean id="userManager" parent="transactionBese">
<property name="target" ref="userManagerBase"></property>
</bean>
</beans>
hibernate.cfg.xml
<!DOCTYPE hibernate-configuration PUBLIC
"-//Hibernate/Hibernate Configuration DTD 3.0//EN"
"http://www.hibernate.org/dtd/hibernate-configuration-3.0.dtd">
<hibernate-configuration>
<session-factory>
<!-- 引入需要映射的类 -->
<mapping class="com.jialin.entity.User"/>
</session-factory>
</hibernate-configuration>
下面再来看看Controller
package com.jialin.controller;
import java.io.IOException;
import java.io.PrintWriter;
import java.util.List;
import javax.annotation.Resource;
import javax.servlet.http.HttpServletRequest;
import javax.servlet.http.HttpServletResponse;
import org.springframework.stereotype.Controller;
import org.springframework.web.bind.annotation.RequestMapping;
import com.jialin.entity.User;
import com.jialin.service.IUserManager;
@Controller //类似Struts的Action
@RequestMapping("/user")
public class UserController {
@Resource(name="userManager") // 获取spring配置文件中bean的id为userManager的,并注入
private IUserManager userManager;
@RequestMapping("/addUser") // 请求url地址映射,类似Struts的action-mapping
public String addUser(User user){
if(userManager.addUser(user))
{
// 重定向
return "redirect:/user/getAllUser";
}else
{
return "/fail";
}
}
@RequestMapping("/updateUser")
public String updateUser(User user,HttpServletRequest request){
if (userManager.updateUser(user))
{
user = userManager.getOneUser(user);
request.setAttribute("user", user);
return "/UserEdit";
}else
{
return "/fail";
}
}
@RequestMapping("/delUser")
public void delUser(User user,HttpServletResponse response){
String result = "{\"result\":\"error\"}";
if(userManager.delUser(user)){
result = "{\"result\":\"success\"}";
}
PrintWriter out = null;
response.setContentType("application/json");
try {
out = response.getWriter();
out.write(result);
} catch (IOException e) {
e.printStackTrace();
}
}
@RequestMapping("/toAddUser")
public String toAddUser(){
return "/UserAdd";
}
@RequestMapping("/toUpdateUser")
public String toUpdateUser(User user,HttpServletRequest request){
User user1=userManager.getOneUser(user);
request.setAttribute("user1", user1);
return "/UserEdit";
}
@RequestMapping("/getAllUser")
public String getAllUser(HttpServletRequest request){
List userList=userManager.getAllUser();
request.setAttribute("userlist", userList);
return "/UserMain";
}
}
源码下载……
以上就是本文的全部内容,希望对大家的学习有所帮助,也希望大家多多支持。
以上是 浅谈SpringMVC+Spring3+Hibernate4开发环境搭建 的全部内容, 来源链接: utcz.com/p/210707.html