java必学必会之线程(2)
一、线程的优先级别
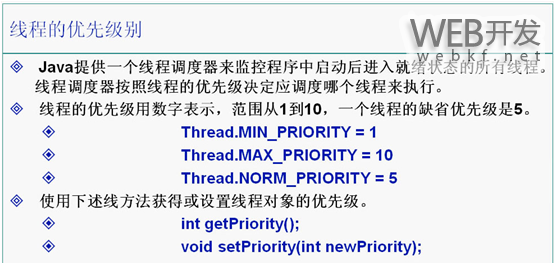
线程优先级别的使用范例:
package cn.galc.test;
public class TestThread6 {
public static void main(String args[]) {
MyThread4 t4 = new MyThread4();
MyThread5 t5 = new MyThread5();
Thread t1 = new Thread(t4);
Thread t2 = new Thread(t5);
t1.setPriority(Thread.NORM_PRIORITY + 3);// 使用setPriority()方法设置线程的优先级别,这里把t1线程的优先级别进行设置
/*
* 把线程t1的优先级(priority)在正常优先级(NORM_PRIORITY)的基础上再提高3级
* 这样t1的执行一次的时间就会比t2的多很多
* 默认情况下NORM_PRIORITY的值为5
*/
t1.start();
t2.start();
System.out.println("t1线程的优先级是:" + t1.getPriority());
// 使用getPriority()方法取得线程的优先级别,打印出t1的优先级别为8
}
}
class MyThread4 implements Runnable {
public void run() {
for (int i = 0; i <= 1000; i++) {
System.out.println("T1:" + i);
}
}
}
class MyThread5 implements Runnable {
public void run() {
for (int i = 0; i <= 1000; i++) {
System.out.println("===============T2:" + i);
}
}
}
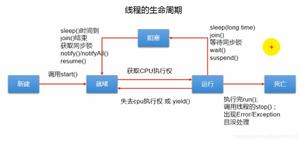
run()方法一结束,线程也就结束了。
二、线程同步
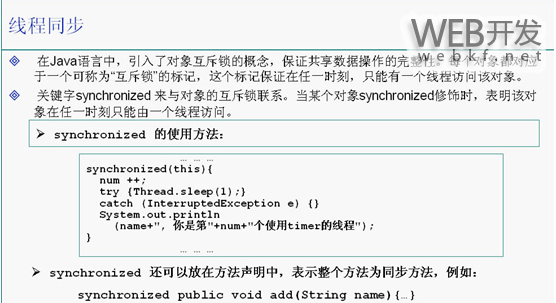
synchronized关键字的使用范例:
package cn.galc.test;
public class TestSync implements Runnable {
Timer timer = new Timer();
public static void main(String args[]) {
TestSync test = new TestSync();
Thread t1 = new Thread(test);
Thread t2 = new Thread(test);
t1.setName("t1");// 设置t1线程的名字
t2.setName("t2");// 设置t2线程的名字
t1.start();
t2.start();
}
public void run() {
timer.add(Thread.currentThread().getName());
}
}
class Timer {
private static int num = 0;
public/* synchronized */void add(String name) {// 在声明方法时加入synchronized时表示在执行这个方法的过程之中当前对象被锁定
synchronized (this) {
/*
* 使用synchronized(this)来锁定当前对象,这样就不会再出现两个不同的线程同时访问同一个对象资源的问题了 只有当一个线程访问结束后才会轮到下一个线程来访问
*/
num++;
try {
Thread.sleep(1);
} catch (InterruptedException e) {
e.printStackTrace();
}
System.out.println(name + ":你是第" + num + "个使用timer的线程");
}
}
}
线程死锁的问题:
package cn.galc.test;
/*这个小程序模拟的是线程死锁的问题*/
public class TestDeadLock implements Runnable {
public int flag = 1;
static Object o1 = new Object(), o2 = new Object();
public void run() {
System.out.println(Thread.currentThread().getName() + "的flag=" + flag);
/*
* 运行程序后发现程序执行到这里打印出flag以后就再也不往下执行后面的if语句了
* 程序也就死在了这里,既不往下执行也不退出
*/
/* 这是flag=1这个线程 */
if (flag == 1) {
synchronized (o1) {
/* 使用synchronized关键字把对象01锁定了 */
try {
Thread.sleep(500);
} catch (InterruptedException e) {
e.printStackTrace();
}
synchronized (o2) {
/*
* 前面已经锁住了对象o1,只要再能锁住o2,那么就能执行打印出1的操作了
* 可是这里无法锁定对象o2,因为在另外一个flag=0这个线程里面已经把对象o1给锁住了
* 尽管锁住o2这个对象的线程会每隔500毫秒睡眠一次,可是在睡眠的时候仍然是锁住o2不放的
*/
System.out.println("1");
}
}
}
/*
* 这里的两个if语句都将无法执行,因为已经造成了线程死锁的问题
* flag=1这个线程在等待flag=0这个线程把对象o2的锁解开,
* 而flag=0这个线程也在等待flag=1这个线程把对象o1的锁解开
* 然而这两个线程都不愿意解开锁住的对象,所以就造成了线程死锁的问题
*/
/* 这是flag=0这个线程 */
if (flag == 0) {
synchronized (o2) {
/* 这里先使用synchronized锁住对象o2 */
try {
Thread.sleep(500);
} catch (InterruptedException e) {
e.printStackTrace();
}
synchronized (o1) {
/*
* 前面已经锁住了对象o2,只要再能锁住o1,那么就能执行打印出0的操作了 可是这里无法锁定对象o1,因为在另外一个flag=1这个线程里面已经把对象o1给锁住了 尽管锁住o1这个对象的线程会每隔500毫秒睡眠一次,可是在睡眠的时候仍然是锁住o1不放的
*/
System.out.println("0");
}
}
}
}
public static void main(String args[]) {
TestDeadLock td1 = new TestDeadLock();
TestDeadLock td2 = new TestDeadLock();
td1.flag = 1;
td2.flag = 0;
Thread t1 = new Thread(td1);
Thread t2 = new Thread(td2);
t1.setName("线程td1");
t2.setName("线程td2");
t1.start();
t2.start();
}
}
解决线程死锁的问题最好只锁定一个对象,不要同时锁定两个对象
生产者消费者问题:
package cn.galc.test;
/* 范例名称:生产者--消费者问题
* 源文件名称:ProducerConsumer.java
* 要 点:
* 1. 共享数据的不一致性/临界资源的保护
* 2. Java对象锁的概念
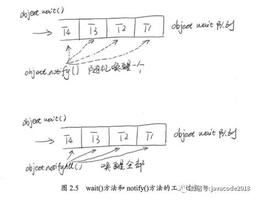
* 3. synchronized关键字/wait()及notify()方法
*/
public class ProducerConsumer {
public static void main(String args[]){
SyncStack stack = new SyncStack();
Runnable p=new Producer(stack);
Runnable c = new Consumer(stack);
Thread p1 = new Thread(p);
Thread c1 = new Thread(c);
p1.start();
c1.start();
}
}
class SyncStack{ //支持多线程同步操作的堆栈的实现
private int index = 0;
private char []data = new char[6];
public synchronized void push(char c){
if(index == data.length){
try{
this.wait();
}catch(InterruptedException e){}
}
this.notify();
data[index] = c;
index++;
}
public synchronized char pop(){
if(index ==0){
try{
this.wait();
}catch(InterruptedException e){}
}
this.notify();
index--;
return data[index];
}
}
class Producer implements Runnable{
SyncStack stack;
public Producer(SyncStack s){
stack = s;
}
public void run(){
for(int i=0; i<20; i++){
char c =(char)(Math.random()*26+'A');
stack.push(c);
System.out.println("produced:"+c);
try{
Thread.sleep((int)(Math.random()*1000));
}catch(InterruptedException e){
}
}
}
}
class Consumer implements Runnable{
SyncStack stack;
public Consumer(SyncStack s){
stack = s;
}
public void run(){
for(int i=0;i<20;i++){
char c = stack.pop();
System.out.println("消费:"+c);
try{
Thread.sleep((int)(Math.random()*1000));
}catch(InterruptedException e){
}
}
}
}
以上就是关于java线程的全部内容介绍,大家可以结合第一篇《java必学必会之线程(1)》进行学习,希望可以帮助到大家。
以上是 java必学必会之线程(2) 的全部内容, 来源链接: utcz.com/p/208637.html