求解释一段代码,ios开发的
- (void)setThumbnailDataFromImage:(UIImage *)image{
CGSize origImageSize = [image size];
// The rectangle of the thumbnail
CGRect newRect = CGRectMake(0, 0, 40, 40);
// Figure out a scaling ratio to make sure we maintain the same aspect ratio
// --------------------
// [START] 这里看不懂 1
float ratio = MAX(newRect.size.width / origImageSize.width,
newRect.size.height / origImageSize.height);
// [END] 这里看不懂 1
// --------------------
// Create a transparent bitmap context with a scaling factor
// equal to that of the screen
UIGraphicsBeginImageContextWithOptions(newRect.size, NO, 0.0);
// Create a path that is a rounded rectangle
UIBezierPath *path = [UIBezierPath bezierPathWithRoundedRect:newRect
cornerRadius:5.0];
// Make all subsequent drawing clip to this rounded rectangle
[path addClip];
// Center the image in the thumbnail rectangle
// --------------------
// [START] 这里看不懂 2
CGRect projectRect;
projectRect.size.width = ratio * origImageSize.width;
projectRect.size.height = ratio * origImageSize.height;
projectRect.origin.x = (newRect.size.width - projectRect.size.width) / 2.0;
projectRect.origin.y = (newRect.size.height - projectRect.size.height) / 2.0;
// [END] 这里看不懂 2
// --------------------
// Draw the image on it
[image drawInRect:projectRect];
// Get the image from the image context, keep it as our thumbnail
UIImage *smallImage = UIGraphicsGetImageFromCurrentImageContext();
[self setThumbnail:smallImage];
// Get the PNG representation of the image and set it as our archivable data
NSData *data = UIImagePNGRepresentation(smallImage);
[self setThumbnailData:data];
// Cleanup image context resources, we're done
UIGraphicsEndImageContext();
}
关于那两段代码,
- 第一段那个比例为什么要取大的?
- 第二段代码是计算图片的居中显示位置,为什么要这么计算,为什么这么计算就居中了?
看了半会没看懂,求大神解释
回答:
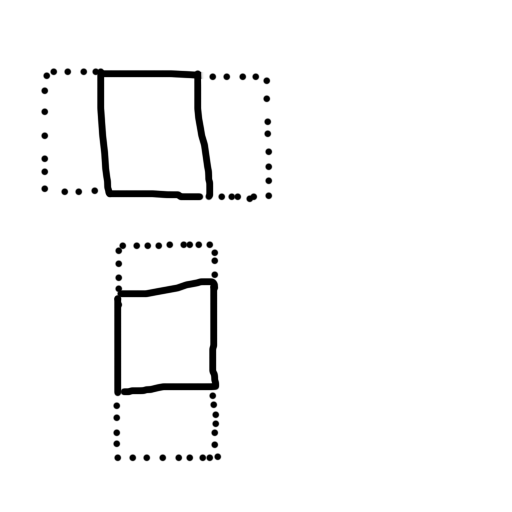
他这个算法就是图像的内容保持原有比例并且居中,但是有一点问题,就是如果图像比40x40小的话没做处理。
mac笔记本,手指拖一下,画的不好,见谅
首先你获取图片缩放的比例,取max,就是以短边为准(图像大于40x40的话)。
然后你的内容要居中,那么就用2的算法算点你可以依照下图自己想一下,应该就能理解了。
Quartz 2D Drawing
以上是 求解释一段代码,ios开发的 的全部内容, 来源链接: utcz.com/p/184635.html


