【Java】Maxwell (mysql-to-json)初体验
Maxwell (mysql-to-json)初体验
前言
以前写过一篇关于 阿里的 canal ,它也是通过监听 mysql 的 binlogs 日志的工具,本公司目前就是使用这个,而我今天要说的是 maxwell 它是在内部自己转换为 json 格式 输出到 其他中间件
1.下载和安装Maxwell
直接下载
官网地址: http://maxwells-daemon.io/

或者 Docker 下载
我这里选择的是使用Docker的方式进行安装
docker pull zendesk/maxwell
2.配置 Mysql 开起binlogs
配置 my.cnf
我的路径在 /etc/my.cnf
$ vi my.cnf[mysqld]
server_id=1
log-bin=master
binlog_format=row
或者直接运行如下指令:
mysql> set global binlog_format=ROW;mysql> set global binlog_row_image=FULL;
需要给 maxwell 用户 一定的权限
mysql> CREATE USER 'maxwell'@'%' IDENTIFIED BY 'XXXXXX';mysql> GRANT ALL ON maxwell.* TO 'maxwell'@'%';
mysql> GRANT SELECT, REPLICATION CLIENT, REPLICATION SLAVE ON *.* TO 'maxwell'@'%';
# or for running maxwell locally:
mysql> CREATE USER 'maxwell'@'localhost' IDENTIFIED BY 'XXXXXX';
mysql> GRANT ALL ON maxwell.* TO 'maxwell'@'localhost';
mysql> GRANT SELECT, REPLICATION CLIENT, REPLICATION SLAVE ON *.* TO 'maxwell'@'localhost';
3. Maxwell 输出到 stdout 标准输出模式启
在保证 mysql 可以访问 并且正常启动的情况下 输入以下命令:
docker run -it --rm zendesk/maxwell bin/maxwell --user=maxwell \--password=maxwell --host=192.168.25.5 --producer=stdout
命令解析
--user = maxwell : 是前面配置的 mysql 的用户
--password=maxwell : 是前面配置的mysql 的 maxwell的 密码
--host = 192.168.25.5 : 是本机的 mysql 地址
--producer : 是指 标准的输出方式(控制台输出)
执行sql :
insert into user(id , userName , userAge , userAddress) values (200, "johnny" , 25 , "wuxi") 
可以看到 maxwell 控制台 对其进行输出了 这个插入操作
{"database":"test","table":"user","type":"insert","ts":1609312375,"xid":735,"commit":true,"data":{"id":200,"userName":"johnny","userAge":25,"userAddress":"wuxi"}}
4.Maxwell 输出到 kafka 模式
4.1 启动 zookeeper
具体环境自行准备

4.2 启动kafka

4.3 启动maxwell 指定producer = kafka
producer = kafka
docker run -it --rm zendesk/maxwell bin/maxwell --user='maxwell' \--password='maxwell' --host='192.168.25.5' --producer=kafka \
--kafka.bootstrap.servers=192.168.25.5:9092 --kafka_topic=maxwell
参数解析
--user = maxwell : 是前面配置的 mysql 的用户
--password=maxwell : 是前面配置的mysql 的 maxwell的 密码
--host = 192.168.25.5 : 是本机的 mysql 地址
--producer = kafka : 自定输出json到 kafka中
--kafka.bootstrap.servers=192.168.25.5:9092 : 指定kafka 的 地址
--kafka_topic=maxwell : 指定 kafka topic
maxwell启动成功

4.4 启动kafka consumer 来监听消息
./kafka-console-consumer --bootstrap-server 192.168.25.5:9092 -topic maxwell
执行sql :
insert into user(id , userName , userAge , userAddress) values (201, "candy" , 26 , "wuxi") 可以看到 maxwell 将这个插入操作json发送到kafka中 并且被 console-consumer 进行了消费

5.Maxwell 输出到 Redis 模式
准备一个可以访问的Redis 我的是在虚拟机上的 192.168.25.101 6379
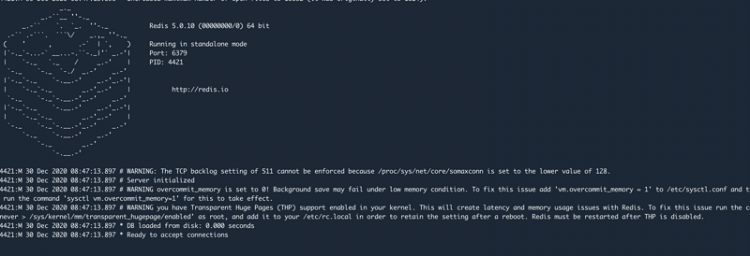
producer = redis
docker run -it --rm zendesk/maxwell bin/maxwell --user='maxwell' --password='maxwell' --host='192.168.25.5' \--producer=redis --redis_host=47.98.250.186 --redis_port=6380 --redis_type=lpush

执行sql :
insert into user(id , userName , userAge , userAddress) values (203, "jack" , 26 , "wuxi");insert into user(id , userName , userAge , userAddress) values (204, "jack2" , 26 , "wuxi");
insert into user(id , userName , userAge , userAddress) values (205, "jack3" , 26 , "wuxi");
可以看到 maxwell 将这些插入操作json发送到redis中

127.0.0.1:6379> lrange maxwell 0 -11) "{\"database\":\"test\",\"table\":\"user\",\"type\":\"insert\",\"ts\":1609315062,\"xid\":4462,\"commit\":true,\"data\":{\"id\":205,\"userName\":\"jack3\",\"userAge\":26,\"userAddress\":\"wuxi\"}}"
2) "{\"database\":\"test\",\"table\":\"user\",\"type\":\"insert\",\"ts\":1609315062,\"xid\":4461,\"commit\":true,\"data\":{\"id\":204,\"userName\":\"jack2\",\"userAge\":26,\"userAddress\":\"wuxi\"}}"
3) "{\"database\":\"test\",\"table\":\"user\",\"type\":\"insert\",\"ts\":1609315012,\"xid\":4322,\"commit\":true,\"data\":{\"id\":203,\"userName\":\"jack\",\"userAge\":26,\"userAddress\":\"wuxi\"}}"
6.使用 Maxwell BootStrap 初始化表
6.1 官网相关解释
摘取官网的 参数解释
| option | description |
|---|---|
| --log_level LOG_LEVEL | log level (DEBUG, INFO, WARN or ERROR) |
| --user USER | mysql username |
| --password PASSWORD | mysql password |
| --host HOST | mysql host |
| --port PORT | mysql port |
| --database DATABASE | mysql database containing the table to bootstrap |
| --table TABLE | mysql table to bootstrap |
| --where WHERE_CLAUSE | where clause to restrict the rows bootstrapped from the specified table |
| --client_id CLIENT_ID | specify which maxwell instance should perform the bootstrap operation |
| --comment COMMENT | arbitrary comment to be added to every bootstrap row record |
摘取 官网 Starting a table bootstrap
You can start a bootstrap using:
bin/maxwell-bootstrap --database fooDB --table barTableOptionally, you can include a where clause to replay part of the data.
bin/maxwell-bootstrap --database fooDB --table barTable --where "my_date >= '2017-01-07 00:00:00'"Alternatively you can insert a row in the maxwell.bootstrap table to trigger a bootstrap.
mysql> insert into maxwell.bootstrap (database_name, table_name) values ('fooDB', 'barTable');Note that if a Maxwell client_id has been set you should specify the client id.
mysql> insert into maxwell.bootstrap (database_name, table_name, client_id) values ('fooDB', 'barTable', 'custom_maxwell_client_id');You can schedule bootstrap tasks to be run in the future by setting the started_at column. Maxwell will wait until this time to start the bootstrap.
mysql> insert into maxwell.bootstrap (database_name, table_name, client_id, started_at)values ('fooDB', 'barTable', 'custom
6.2 演示 使用maxwell 同步全表到kafka 中
6.2.1 准备 kafka 和 maxwell 和 consumer
保证 kafka 和 maxwell 已经 连接了 并且提供一个 kafka-console-consumer
kafka 启动

maxwell连接kafka

Kafka-console-consumer

6.2.2 Docker 启动 maxwell-bootstrap 脚本
依然使用Docker的方式 指定 /bin脚本为maxwell-bootstrap
docker run -it --rm zendesk/maxwell bin/maxwell-bootstrap --user maxwell \--password maxwell --host=192.168.25.5 --database test --table user --client_id maxwell
--database test :指定database
--table user : 指定table = user
当上面命令执行后 可以看到 kafka-console-consumer 就能收到 database = test 库 table = user全表的数据了
在 type = bootstrap-start 和 type = bootstrap-comlete 之间的就是 全量数据,而bootstrap-start和bootstrap-comlete 两条只是作为标志记录的,data对应是空 第一条则是 执行上面命令所插入bootstrap引导表的 数据
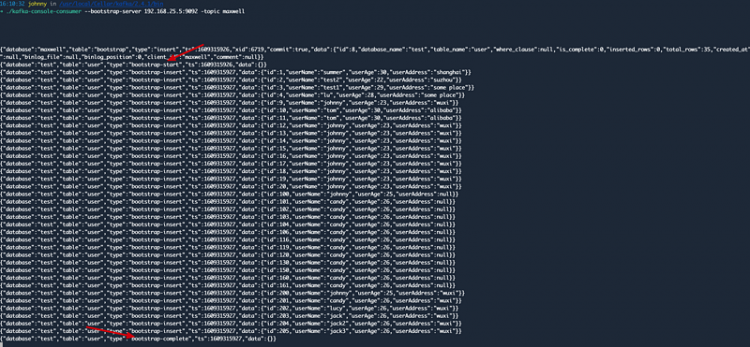
执行 docker run -it --rm zendesk/maxwell bin/maxwell-bootstrap 会自动在 maxwell 数据库的 bootstrap 表中 添加如下记录
{"database":"maxwell","table":"bootstrap","type":"insert","ts":1609315926,"xid":6719,"commit":true,"data":{"id":8,"database_name":"test","table_name":"user","where_clause":null,"is_complete":0,"inserted_rows":0,"total_rows":35,"created_at":null,"started_at":null,"completed_at":null,"binlog_file":null,"binlog_position":0,"client_id":"maxwell","comment":null}}
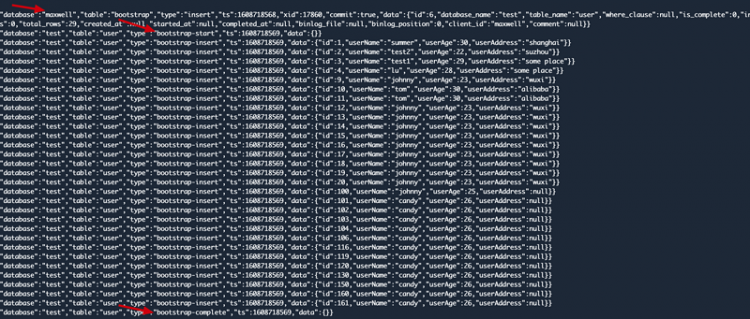
6.2.3 直接插入 bootstrap表 触发
insert into maxwell.bootstrap (database_name, table_name) values ('test', 'address');
6.3 bootstrap过程中 maxwell崩溃
在进行bootstrap过程中,如果maxwell崩溃,重启时,bootstrap会完全重新开始,不管之前进行到多少,若不希望这样,可以到数据库中 maxwell 设置 is_complete 字段值为1(表示完成),或者删除该行
7. 扩展 Maxwell 过滤器配置
Maxwell 可以通过 --filter 配置项来指定过滤规则,通过 exclude 排除,通过 include 包含,值可以为具体的数据库、数据表、数据列,甚至用 Javascript 来定义复杂的过滤规则;可以用正则表达式描述,有几个来自官网的例子
# 仅匹配foodb数据库的tbl表和所有table_数字的表--filter='exclude: foodb.*, include: foodb.tbl, include: foodb./table_\d+/'
# 排除所有库所有表,仅匹配db1数据库
--filter = 'exclude: *.*, include: db1.*'
# 排除含db.tbl.col列值为reject的所有更新
--filter = 'exclude: db.tbl.col = reject'
# 排除任何包含col_a列的更新
--filter = 'exclude: *.*.col_a = *'
# blacklist 黑名单,完全排除bad_db数据库,若要恢复,必须删除maxwell库
--filter = 'blacklist: bad_db.*'
总结:
本篇主要讲解了 Maxwell 主要是干嘛的,并且介绍了 Maxwell 如何配合 Kafka 和 Redis 进行使用,最后还介绍了 Maxwell BootStrap 的操作方式,最后扩展了 Maxwell 的过滤器配置方式 。。 除了 Maxwell 还有 阿里的 Canal 你会更喜欢哪个呢 ,我比较喜欢 Maxwell 不过公司 目前在用 Canal 。。
个人博客网站 https://www.askajohnny.com 欢迎来访问!
以上是 【Java】Maxwell (mysql-to-json)初体验 的全部内容, 来源链接: utcz.com/a/91709.html


