vue2+webpack4搭建一个项目
生成了package.json文件之后,安装webpack,vue,loader等相关的包:
npm install webpack --save-dev //安装webpacknpm install --save-dev webpack-cli //4以后需要
npm i vue -S
npm i vue-loader vue-template-compiler -D
npm install --save-dev babel-loader @babel/core
npm install @babel/preset-env --save-dev
npm i babel-plugin-transform-vue-jsx
npm install babel-plugin-syntax-jsx babel-helper-vue-jsx-merge-props --save-dev
npm install css-loader style-loader --save-dev
npm install --save-dev postcss-loader autoprefixer postcss
npm install stylus-loader stylus --save-dev
npm install html-webpack-plugin --save-dev
npm install file-loader --save-dev
npm install url-loader --save-dev
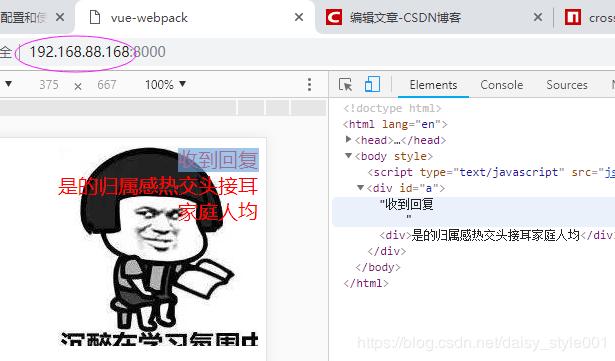
新建一个vue组件:
<template><div id='a'>{{text}}
<div>是的归属感热交头接耳家庭人均</div>
</div>
</template>
<script>
export default {
data() {
return {
text:"收到回复"
}
},
}
</script>
<style>
#a{
color:red;
text-align: right;
height: 200px;
width: 200px;
background-image: url('../../assets/cb4410c6637e44cd98710355e2754aec.jpeg');
float:right;
}
</style>
在根目录下新建一个webpack.config.js文件:
const path=require('path');const HtmlWebpackPlugin = require('html-webpack-plugin')
//const webpack=require('webpack');
const { VueLoaderPlugin } = require('vue-loader');
const config = {
entry: path.resolve(__dirname,'src/index.js'),
output: {
filename: 'js/[name].js',
path: path.resolve(__dirname,'dist')
},
module:{
rules:[
{test: /.vue$/,use:'vue-loader'},
{test: /\.js$/,loader: 'babel-loader' },
{test: /\.css$/,loader: "style-loader!css-loader"},
{ test: /\.styl$/, loader: 'style-loader!css-loader!stylus-loader'},
{
test: /\.(png|jpg|jpeg|gif|svg)$/i,
loader: 'url-loader',
options: {
limit: 1024, //如果文件小于字节限制,则可以返回DataURL,否则返回data:'xxx....'格式
name:'img/[hash:5].[ext]',//指定打包后的相对路径和名称
}
},
]
},
plugins: [
new HtmlWebpackPlugin({
template:'index.html',//位置根目录
}),
new VueLoaderPlugin(),//"vue-loader": "^15.7.0", 之后请确保引入这个插件!
],
devServer: {
contentBase: path.join(__dirname, 'dist'),
compress: true,
port:8000,
host:'0.0.0.0',//方便手机访问本机ip
overlay:{//把错误呈现在网页上
errors:true
}
}
};
module.exports=config;
在入口文件index.js中将vue组件挂载到dom节点上:
import Vue from 'vue' //引用类库import App from './components/app.vue'
import '../style/stylus.styl'
const root=document.createElement('div');//创建一个节点
document.body.appendChild(root);
new Vue({ //实例化一个vue对象
render: h=>h(App)
}).$mount(root)//挂载
webpack-dev-server的使用
安装:
npm install webpack-dev-server --save-dev //提供实时重新加载的开发服务器一起使用,仅用于开发。在package.json中自定义脚本
"scripts": {"start:dev": "webpack-dev-server"
}
在webpack配置文件中加入devServer配置:
devServer: {contentBase: path.join(__dirname, 'dist'),
compress: true,
port:8000,
host:'0.0.0.0',//方便手机访问本机ip
overlay:{//把错误呈现在网页上
errors:true
},
//open:true,//自动打开浏览器
hot: true,//热模块替换功能,只改变内容,不刷新页面
},
在plugins中加入:
plugins: [...
new webpack.HotModuleReplacementPlugin(),///热模块替换
new webpack.NoEmitOnErrorsPlugin(),//减少不必要的代码显示
],
执行命令:npm run start:dev


vue2核心知识介绍
- 数据绑定
- vue文件开发方式
- render方法
API重点:
- 生命周期方法
- computed
配置vue的jsx写法以及postcss
在根目录新建文件postcss.config.js
const autoprefixer=require('autoprefixer');module.exports={
plugins:[
autoprefixer()
]
}
在根目录新建文件.babelrc
{"presets": ["@babel/preset-env"],
"plugins": ["transform-vue-jsx"]
}
在webpack.config.js文件中修改配置:
{
test: /\.styl$/,
use: [
'style-loader',
'css-loader',
{
loader: 'postcss-loader',
options: {
sourceMap:true,
}
},
'stylus-loader'
]
},
以上是 vue2+webpack4搭建一个项目 的全部内容, 来源链接: utcz.com/a/56026.html


