vue.js 使用技巧总结
前言
写 vue 有很长一段时间了 , 在使用过程中会遇到各种场景的挑战 , 本文记录了我在使用 vue 中发现的一些好的实践,希望能够帮助到大家。
vue.js 使用技巧
覆盖 element-ui 样式
只覆盖某个组件内的 element-ui 样式,而不影响全局。
命名空间
由于 element-ui 的样式我们是在全局引入的,所以你想在某个页面里面覆盖它的样式就不能加 scoped,但你又想只覆盖这个页面的 element 样式,你就可在它的父级加一个 class,用命名空间来解决问题。
.article-page {/* 你的命名空间 */
.el-tag {
/* element-ui 元素*/
margin-right: 0px;
}
}
样式穿透
vue 工程本来就比较庞大复杂,一个页面很可能会加载很多的组件,难免名字相同,除非你的项目有很严格的 命名空间管理 ,否则我更推荐使用深度作用选择器的方式来覆盖样式。
<el-dialog><el-tablestyle="margin-left:30px"></el-table>
</el-dialog>
<stylescoped>
.el-dialog >>> .el-table{
margin-left:20px!important;
/*这里的margin-left:20px;将会覆盖内联样式*/
}
</style>
注意:如果你使用了一些预处理的东西,如 sass 你可以通过 /deep/ 来代替 >>> 实现想要的效果。
sass 和 js 之间变量共享
使用场景:动态换肤,需要将用户选择的主题传递给 css,初始化时 css 又需要将默认主题色传递给 js。
js 将变量传递给 sass
可以通过 vue 内联标签的方式实现,或者使用 css var(),用 less 的话 modifyVars ,等等方案都能实现 js 与 css 的变量传递。
<div:style="{'background-color':color}" ></div>sass 将变量给 js
js 该怎么获取 sass 中的变量呢,通过 css-modules:export 来实现。
// var.scss$theme: blue;
:export {
theme: $theme;
}
// test.jsimport variables from'@/styles/var.scss'
console.log(variables.theme) // blue
调试 template 代码
在 vue.js 开发过程中,我们可以使用 DevTools 来完成代码调试工作,但有时候会遇到 template 模板渲染时 JavaScript 变量出错的问题。
我们可以使用 console.log 的方式来调试,推荐使用 vue 原型挂载的方式,毕竟不会只有一个组件需要调试。
// main.jsVue.prototype.$log = window.console.log;
// .vue
<div>{{$log(message)}}</div>
当然我们也可以用 || 运算符,这样既能调试,也不会影响渲染。
<div>{{ $log(message) || message }}</div>attrs 和 listeners 二次封装组件
我们平时写业务的时候免不了需要对一些第三方组件进行二次封装,当我们去二次封装别人组件时,可能别人组件上有很多属性,我们不想再次重写一遍。
<template><div>
<el-buttonv-bind="$attrs">确定</el-button>
<div>
</template>
// 父组件使用
<my-buttontype='primary'size='mini'/>
另外,防止小伙伴们不熟悉 attrs 和 listeners,这里也做个简单介绍。
// 父组件<hometitle="这是标题" @change="change"width="80"height="80"imgUrl="imgUrl"/>
// 子组件mounted() {
console.log(this.$attrs) //{title: "这是标题", width: "80", height: "80", imgUrl: "imgUrl"}
console.log(this.$listeners) //即可拿到 change 事件
},
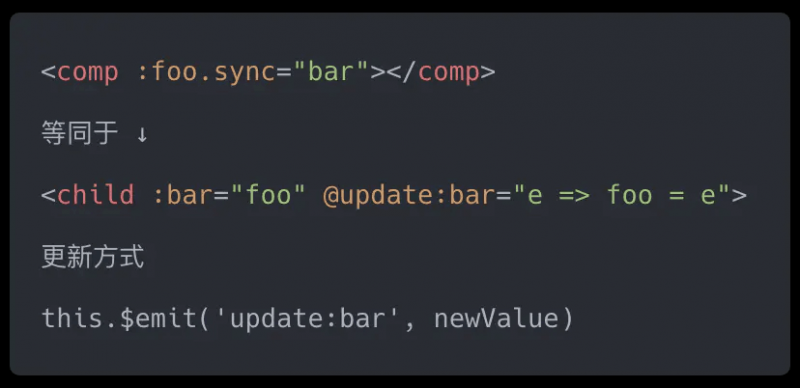
.sync 语法糖
当你有需要在子组件修改父组件值的时候这个方法很好用,它的实现机制和v-model是一样的。
热更新速度优化
热更新是我们每天打交道的东西,热更新的快慢,直接影响我们的开发效率。
首先,路由懒加载非常非常不适用于开发环境,会严重热更新速度。
区分开发环境
最早的方案是区分开发环境与生产环境,在路由文件夹下分别新建两个文件:
开发环境:
module.exports = file =>require("@iews/" + file + ".vue").default;生成环境:
module.exports = file =>() =>import("@iews/" + file + ".vue");这样组件在开发环境下就是非懒加载,生产环境下就是懒加载的了。
dynamic-import-node
babel 的 dynamic-import-node 是一种新的解决方案,其实思路都是一样的,只不过不需要开发者在需要建两份路由。
"env": {"development": {
"plugins": ["dynamic-import-node"]
}
}
最后,除了路由懒加载外,还应排查以下几点问题:
没有合理使用 souce map开发环境不要压缩代码,提取 cssbabelpolyfill等
利用 object.freeze 提升性能
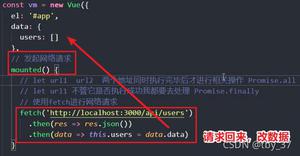
比方我们需要渲染一个非常大的数组对象,例如用户列表,对象列表,文章列表等等。
exportdefault {data: () => ({
users: {}
}),
async created() {
const users = await axios.get("/api/users");
this.users = users;
}
};
vue 会将 data 对象中的所有的属性加入到 vue 的响应式系统中,当这些属性的值发生改变时,视图将会产生 响应,若对象的体积比较大,会消耗很多浏览器解析时间。
所以我们可以通过减少数据的响应式转换来提供前端的性能。
exportdefault {data: () => ({
users: {}
}),
async created() {
const users = await axios.get("/api/users");
this.users = Object.freeze(users);
}
};
始终在 v-for 中使用 :key
加上 key 可以最大化的利用节点,减少性能消耗,至于原因,需要大家理解 diff 的过程,并且要对 virtual dom 有个了解。
<!-- 不好的做法--><divv-for='product in products'></div>
<!-- 好的做法 -->
<divv-for='product in products':key='product.id'>
注意:在工作中,发现很多人直接用index作为key,好像几乎没遇到过什么问题。确实,index作为key,在表现上确实几乎没有问题,但它主要有两点不足。
index 作为 key ,其实就等于不加 key
index 作为 key,只适用于不依赖子组件状态或临时 DOM 状态 (例如:表单输入值) 的列表渲染输出(这是 vue 官网的说明)
不要在同个元素上同时使用 v-if 和 v-for 指令
永远不要把 v-if 和 v-for 同时用在同一个元素上,v-for 比 v-if 优先级高,所以嵌套使用的的话,每次 v-for 都会执行 v-if,造成不必要的计算,影响性能,尤其是当之需要渲染很小一部分的时候。
<ul><li
v-for='product in products'
:key='product.id'
v-if='product.price < 50'
>
{{ product.name }}
<>
</ul>
为避免上述问题,可以使用过滤方法,方式如下:
<ul><liv-for='products in productsUnderPrice(50)':key='product._id' >
{{ product.name }}
<>
</ul>
<script>
exportdefault {
data () {
return {
products: []
}
},
methods: {
productsUnderPrice (price) {
returnthis.products.filter(product => product.price < price)
}
}
}
</script>
利用 require.context 简化 vux
require.context 是 webpack 用来管理依赖的一个函数,可以利用它实现无限制的多级模块导入。
首先看我的 store 目录结构:
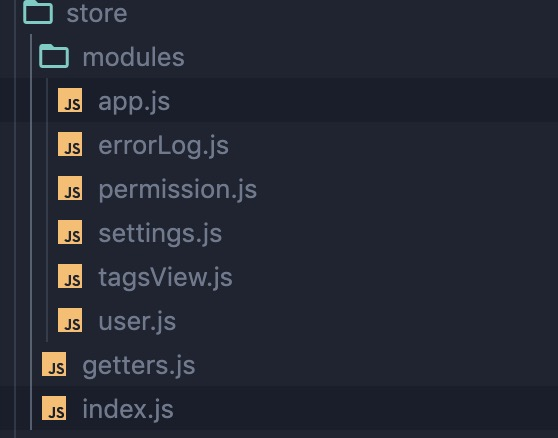
每一个文件都是一个模块,所以在 store/index.js 里面可以这样写 :
import Vue from'vue'import Vuex from'vuex'
Vue.use(Vuex)
const modulesFiles = require.context('./modules', true, /.js$/)
const modules = modulesFiles.keys().reduce((modules, modulePath) => {
// set './app.js' => 'app'
const moduleName = modulePath.replace(/^./(.*).w+$/, '$1')
const value = modulesFiles(modulePath)
modules[moduleName] = value.default
return modules
}, {})
const store = new Vuex.Store({
modules
})
exportdefault store
使用 render 渲染组件
模板语法在大多数情况下很好,但有时候不是这样,所以这个时候渲染函数就会发挥作用。
// 模板语法<template>
<div>
<divv-if="level === 1"><slot></slot></div>
<pv-else-if="level === 2"><slot></slot></p>
<h1v-else-if="level === 3"><slot></slot></h1>
<h2v-else-if="level === 4"><slot></slot></h2>
<spanv-else-if="level === 5"><slot></slot></stong>
<textareav-else-if="level === 6"><slot></slot></textarea>
</div>
</template>
// render 渲染函数
<script>
exportdefault {
name: hehe ,
render(h) {
const tag = [ div , p , span , h1 , h2 , textarea ][this.level-1]
return h(tag, this.$slots.default)
},
props: {
level: { type: Number, required: true }
}
}
</script>
简单清晰很多!简单来说,这样代码精简很多。
注意:如果组件中有模板语法,那么 render 函数就会无效,并且如果使用了 render 函数,那么 vue 中自带的一些指令就不在生效了,包括 v-if , v-for 和 v-model ,需要我们自己实现。
render 适合复杂逻辑, template 适合逻辑简单;
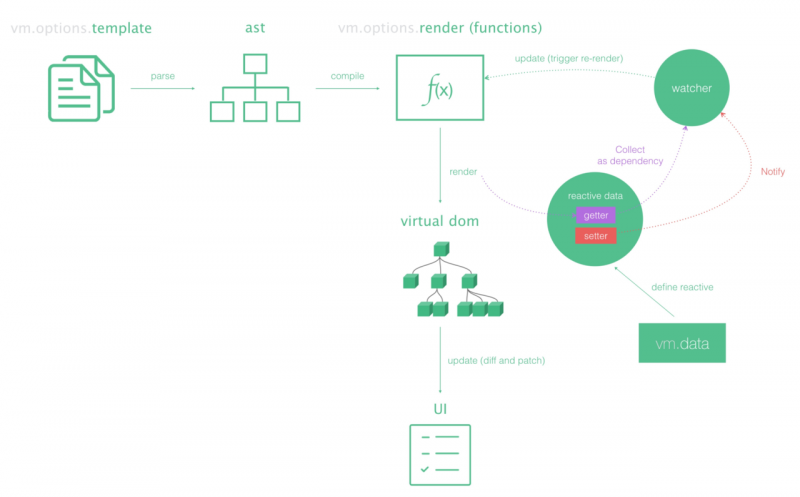
在 vue 原理中,template 通过编译生成 AST,在由 AST 生成 render 函数,最后生成 虚拟DOM ,所以说 render 的性能会更高。
我们有必要了解 vue 中的一些基本概念,最后上一张图,这张图从宏观上展现了 vue 整体流程。
jsx 语法糖
复杂的 render 函数书写异常痛苦,好在官方提供了一个 Babel 插件,在 vue 的 render 函数中也可以直接使用 jsx 语法。
注意:如果你使用的是 vue-cli 3.x 创建的项目,那么不需要任何配置,直接就可以使用 jsx。
//模板语法 <h1 v-if="level === 1">
<slot></slot>
</h1>
<h2v-else-if="level === 2">
<slot></slot>
</h2>
<h3v-else-if="level === 3">
<slot></slot>
</h3>
//jsx
const App = {
render() {
const tag = `h${this.level}`
return<tag>{this.$slots.default}</tag>
}
}
函数式组件
如果我们所需的组件比较简单,没有管理任何状态,也没有生命周期方法,它只是接受一些 prop 的函数,在这样的场景下,我们可以使用函数式组件。
render
<script>exportdefault{
functional: true, // 添加属性functional: true,表示该组件为函数式组件
// Props 是可选的
props: {
// ...
},
// 为了弥补缺少的实例
// 提供第二个参数作为上下文
render: function (createElement, context) {
// ...
},
}
</script>
functional
<templatefunctional><divv-for="(item,index) in props.arr">{{item}}</div>
</template>
context 描述
函数式组件是无状态的,也没有 this 上下文,没有 data 等属性,所以所有数据都是由 render 函数的第二个参数 context 获得的。
props:提供所有 prop 的对象 data:传递给组件的整个数据对象,作为 createElement 的第二个参数传入组件 children: VNode 子节点的数组 parent:对父组件的引用 slots: 一个函数,返回了包含所有插槽的对象 scopedSlots: (2.6.0+) 一个暴露传入的作用域插槽的对象。也以函数形式暴露普通插槽。 listeners: (2.3.0+) 一个包含了所有父组件为当前组件注册的事件监听器的对象。这是 data.on 的一个别名。 injections: (2.3.0+) 如果使用了 inject 选项,则该对象包含了应当被注入的属性。
动态切换组件
如果我们打算根据状态引用不同的组件,比如 tab 页,那么就会涉及到组件动态加载。
<component:is="currentTabComponent"></component>但是这样每次组件都会重新加载,会消耗大量性能,所以 <keep-alive> 就起到了作用
<keep-alive><component:is="currentTabComponent"></component>
</keep-alive>
vue.js 常用的 API
vue.directive
在 vue 中,除了 v-model、v-if、v-show 等指令,还可以自己定义一些指令,来实现我们想要的功能。
使用场景:用于不可避免要操作 dom 元素时,把它放在自定义指令中。
全局指令
就是定义了一个指令,所有组件都可以使用。
参数1是指令的名字,参数2可以是函数也可以是对象。
// 函数Vue.directive("save-color",function(el,binding,vnode){
el.style["color"]= binding.value; // 改变元素颜色
console.log(el) // 指令所在的dom元素
console.log(binding) // 存放绑定的信息
console.log(vnode) // 虚拟节点,指令绑定元素的节点
})
// 对象
Vue.directive("save-color",{
bind() {
// 当指令绑定到 HTML 元素上时触发.**只调用一次**
el.style["color"]= binding.value;
},
}
)
// 使用自定义指令
<template>
<divv-save-color="color">{{message}}</div>
</template>
<script>
exportdefault{
data(){
return{
color: red
}
}
}
</script>
组件指令
定义在某个组件内部,只在这个组件内部使用。
// 某组件data(){
return {
// ...
}
},
directives: {
save-color: {
// 指令的定义
bind:function(el,binding){
el.style["color"]= binding.value;
}
}
},
methods:{// ...}
自定义指令生命周期
bind() // 当指令绑定到 HTML 元素上时触发. **只调用一次**inserted() //当绑定了指令的这个HTML元素插入到父元素上时触发(在这里父元素是 `div#app`)
updated // 所在组件的`VNode`更新时调用
componentUpdated() // 指令所在组件的 VNode 及其子 VNode 全部更新后调用。
unbind() // 只调用一次,指令与元素解绑时调用.
vue.mixin
在组件中,有一些常用的方法或是重复的 js 逻辑,如校验手机验证码,解析时间等,我们可以独立抽离出来,然后利用 mixins 实现混入。
混入:相当于扩展了组件的对象与方法,可以理解为形成了一个新的组件,能在不同组件里重用相同的代码。
注意:可以混入的不只有 methods ,还可以包含生命周期、data、computed 相当灵活。
局部混入
当组件使用 mixin 时,mixin 对象的所有信息,组件都可以访问到,就想在访问自己的对象一样。
// mixin.js fileexportdefault {
data () {
msg: 'Hello World'
},
created: function () {
console.log('Printing from the Mixin')
},
methods: {
displayMessage: function () {
console.log('Now printing from a mixin function')
}
}
}
// -----------------------------------------
// main.js file
import mixin from'./mixin.js'
new Vue({
mixins: [mixin],
created: function () {
console.log(this.$data)
this.displayMessage()
}
})
// => "Printing from the Mixin"
// => {msg: 'Hello World'}
// => "Now printing from a mixin function"
全局混入
全局的意思大家都懂,就是在所有组件都可以使用被 mixin 的对象。
Vue.mixin({//这里是要混入的内容
})
注意:请谨慎使用全局混入的方法。毕竟只要使用了全局混入,所有实例都会共享混入的内容,不管你是否添加了 mixins。
mixins 特点
方法和参数在各组件中不共享 mixin的数据对象和组件的数据发生冲突时以组件数据优先 混入对象中如果有生命周期的钩子,那么混入对象和被混入对象的钩子都会被执行一遍,而且混入对象的钩子将在 实例(或组件)自身钩子之前先执行。因为同名钩子函数将混合为一个数组,因此都将被调用。 mixins 可以有多个,比如:mixins:[ mix1, mix2 , mix3],前提是定义了这些混入对象,不然就会报错。
vue.filter
能够对数据进行过滤处理,返回需要的结果,非常的方便和快捷。
全局过滤器
大部分的过滤器是要全局使用的,不会每每用到就在组件里面去写,抽成全局的会更好些。
srcb/filters.js
functionformatMoney(value, fractionDigits = 2) {if (!value) {
return"";
}
return (value / 100).toFixed(fractionDigits).toString();
}
exportdefaultfunction(instance) {
instance.filter("formatMoney", formatMoney);
}
src/main.js
import Vue from'vue'import App from'./App'
import router from'./router'
import initFilters from"@b/filters"
Vue.config.productionTip = false
initFilters(Vue)
new Vue({
el: '#app',
router,
components: { App },
template: '<App/>'
})
template文件调用
<template><divclass="demo">
<h1>{{ msg }}</h1>
<h2>{{ price | formatMoney }}</h2>
<h2>{{ (price/100).toFixed(2) }}</h2>
</div>
</template>
<script>
exportdefault {
name: 'Demo',
data () {
return {
msg: 'Welcome to Your Vue.js App',
price: 1000
}
}
}
</script>
<stylescoped></style>
局部过滤器
本地过滤器存储在 Vue 组件中,作过 filters 属性中的函数。
exportdefault { data() {
return {
}
},
filters: {
// 首字母大写过滤器
capitalize: function (value) {
if (!value) return''
value = value.toString()
return value.charAt(0).toUpperCase() + value.slice(1)
}
}
};
过滤器的使用方法
双花括号插值(应用比较多)
{{ phone | privatePhone }}v-bind 表达式 (2.1.0+ 开始支持)。
<divv-bind:data=" phone | privatephone "></div>使用多个过滤器
{{ phone | privatePhone | privatePhon2 }}过滤器之间需要用管道符 | 隔开,其执行顺序从左往右。
vue.extend
我们会用 vue.extend 封装一些全局插件,比如 toast, diolog 等。
平常我们都是使用 component 注册组件,然后在模板中使用,而 vue.extend 则是编程式的写法,并且显示与否需要手动的去做组件的挂载和销毁。
toast.js
import Vue from'vue'
const Toast = Vue.extend({
template: '<div>{{ text }}</div>',
data: function () {
return {
text: 'extend test'
}
}
})
let instance
const toast = function(options) {
options = options || {}
instance = new Toast({
data: options
})
instance.vm = instance.$mount()
document.body.appendChild(instance.vm.$el)
return instance.vm
}
exportdefault toast;
在 main.js 引入 toast 组价并挂载在 vue 原型上
import Vue from'vue'import toast from'./components/toast'
Vue.prototype.$toast = toast
在项目中调用
this.$toast({ text: 'Hello Word' })vue.nextTick
定义:在下次 dom 更新循环结束之后执行延迟回调。在修改数据之后立即使用这个方法,获取更新后的 dom。
简单理解,就是数据更新完成,并且在 dom 中渲染后,自动执行该函数。
testClick:function(){let that=this;
that.testMsg="修改后的值";
that.$nextTick(function(){
console.log(that.$refs.aa.innerText); //输出:修改后的值
});
}
其他
watch
常规用法
created(){this.getList()
},
watch: {
inpVal(){
this.getList()
}
}
监听路由
watch:{ $route(to,from){
console.log(from.path); //从哪来
console.log(to.path); //到哪去
}
}
立即执行
watch:{$route:{
handler(val,oldval){
console.log(val); //新路由信息
console.log(oldval); //老路由信息
},
// 深度观察监听
deep: true
}
}
route
路由传参
默认方案
// 路由定义{
path: /describe/:id ,
name: Describe ,
component: Describe
}
// 页面传参
this.$router.push({
path: `/describe/${id}`,
})
// 页面获取
this.$route.params.id
params
// 路由定义{
path: /describe ,
name: Describe ,
omponent: Describe
}
// 页面传参
this.$router.push({
name: Describe ,
params: {
id: id
}
})
// 页面获取
this.$route.params.id
query
// 路由定义{
path: /describe ,
name: Describe ,
component: Describe
}
// 页面传参
this.$router.push({
path: /describe ,
query: {
id: id
`}
)
// 页面获取
this.$route.query.id
对比
params 参数不会拼接在路由后面,页面刷新参数会丢失
默认方案 和 query 参数拼接在后面,暴露了信息
路由跳转
this.$router.push():跳转到不同的url,但这个方法回向history栈添加一个记录,点击后退会返回到上一个页面this.$router.replace():不会有记录
this.$router.go(n):n可为正数可为负数。正数返回上一个页面,类似 window.history.go(n)
v-slot
默认插槽
// 父组件<todo-list>
<templatev-slot:default>
任意内容
<p>我是默认插槽 </p>
</template>
</todo-list>
// 子组件
<slot>我是默认值</slot>
具名插槽
言简意骇,就是有名字的插槽。
// 父组件<todo-list>
<templatev-slot:todo>
任意内容
<p>我是默认插槽</p>
</template>
</todo-list>
//子组件
<slotname="todo">我是默认值</slot>
作用域插槽
子组件内数据可以被父页面拿到,解决了数据只能从父页面传递给子组件。
// 父组件<todo-list>
<templatev-slot:todo="slotProps" >
{{slotProps.user.firstName}}
</template>
</todo-list>
//slotProps 可以随意命名
//slotProps 接取的是子组件标签slot上属性数据的集合所有v-bind:user="user"
// 子组件
<slotname="todo":user="user":test="test">
{{ user.lastName }}
</slot>
data() {
return {
user:{
lastName:"Zhang",
firstName:"yue"
},
test:[1,2,3,4]
}
},
// {{ user.lastName }}是默认数据 v-slot:todo 当父页面没有(="slotProps")
结尾
如果这篇文章帮助到了你,欢迎点赞和关注,搜索《海洋里的魔鬼鱼》加入我们的技术群一起学习讨论,共同探索前端的边界。

以上是 vue.js 使用技巧总结 的全部内容, 来源链接: utcz.com/a/32824.html