搭建项目ssm
搭建项目ssm
1.简介SSM
SSM(Spring+SpringMVC+MyBatis) 框架集由Spring、MyBatis两个开源框架整合而成(SpringMVC是Spring中的部分内容)。常作为数据源较简单的web项目的框架。
Spring
Spring就像是整个项目中装配bean的大工厂,在配置文件中可以指定使用特定的参数去调用实体类的构造方法来实例化对象。也可以称之为项目中的粘合剂。
Spring的核心思想是IoC(控制反转),即不再需要程序员去显式地new一个对象,而是让Spring框架帮你来完成这一切。
SpringMVC
SpringMVC在项目中拦截用户请求,它的核心Servlet即DispatcherServlet承担中介或是前台这样的职责,将用户请求通过HandlerMapping去匹配Controller,Controller就是具体对应请求所执行的操作。SpringMVC相当于SSH框架中struts。
mybatis
mybatis是对jdbc的封装,它让数据库底层操作变的透明。mybatis的操作都是围绕一个sqlSessionFactory实例展开的。mybatis通过配置文件关联到各实体类的Mapper文件,Mapper文件中配置了每个类对数据库所需进行的sql语句映射。在每次与数据库交互时,通过sqlSessionFactory拿到一个sqlSession,再执行sql命令。
2.搭建项目
配置环境-->导入mybatis-->编写代码-->测试
搭建ssm项目需要
mybatis mysql juit
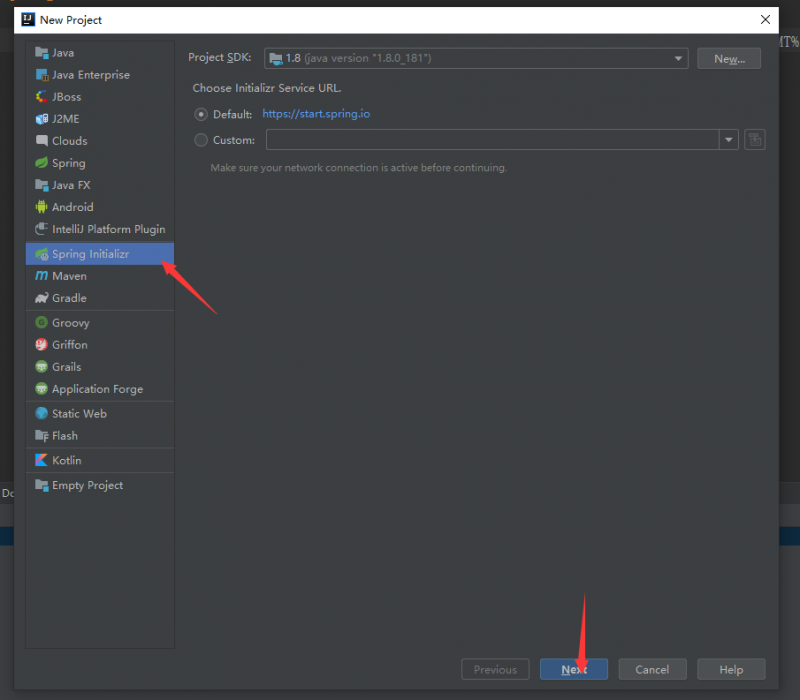
2.1 File-New-Project
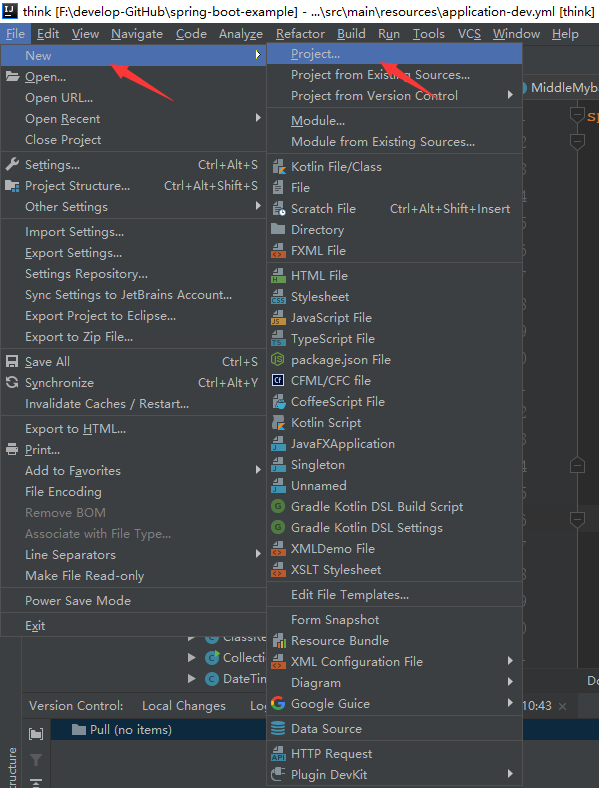
2.2 使用spring initializr 搭建项目
Spring initializr 是Spring 官方提供的一个用来初始化一个Spring boot 项目的工具。
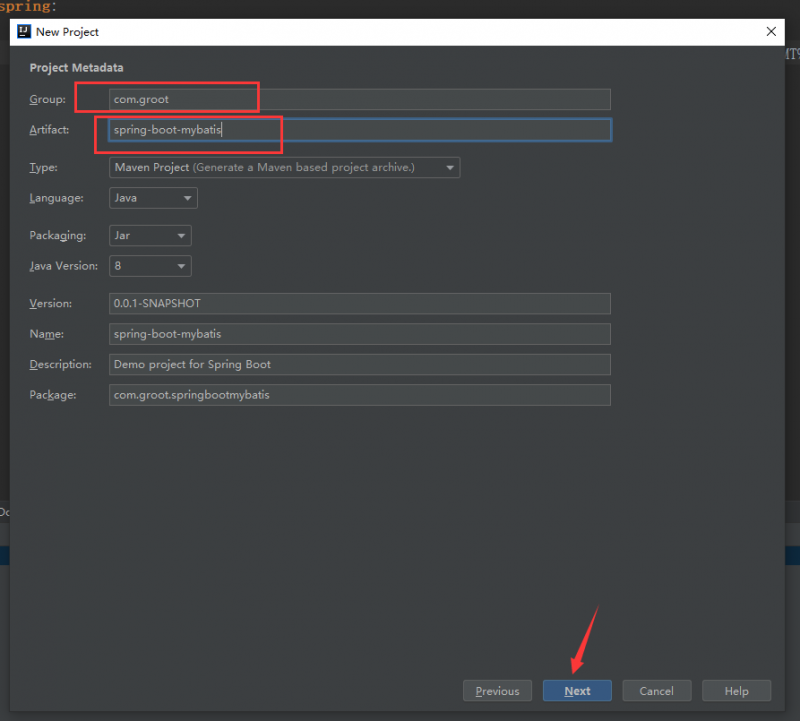
2.3.设置Project 名称
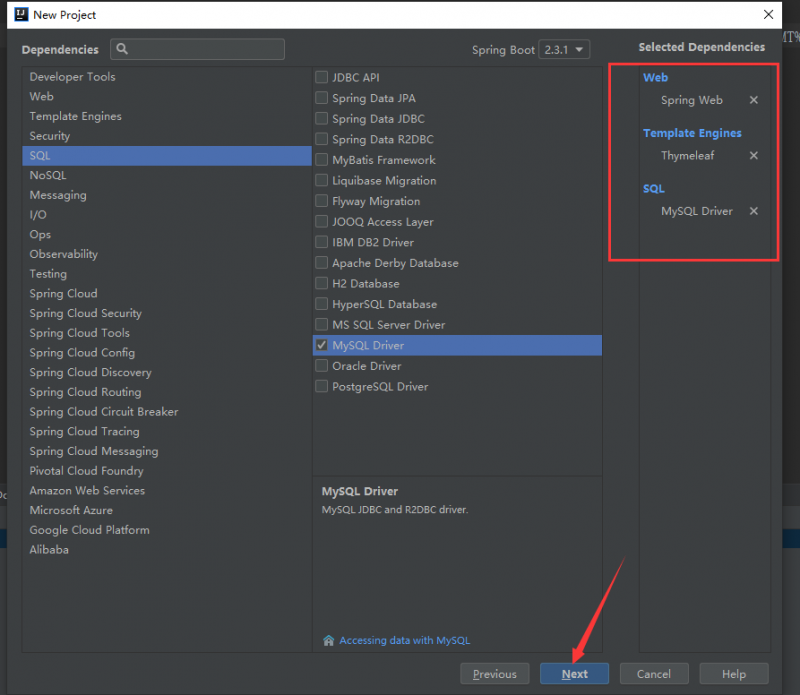
2.4.选择项目中所需要的组件
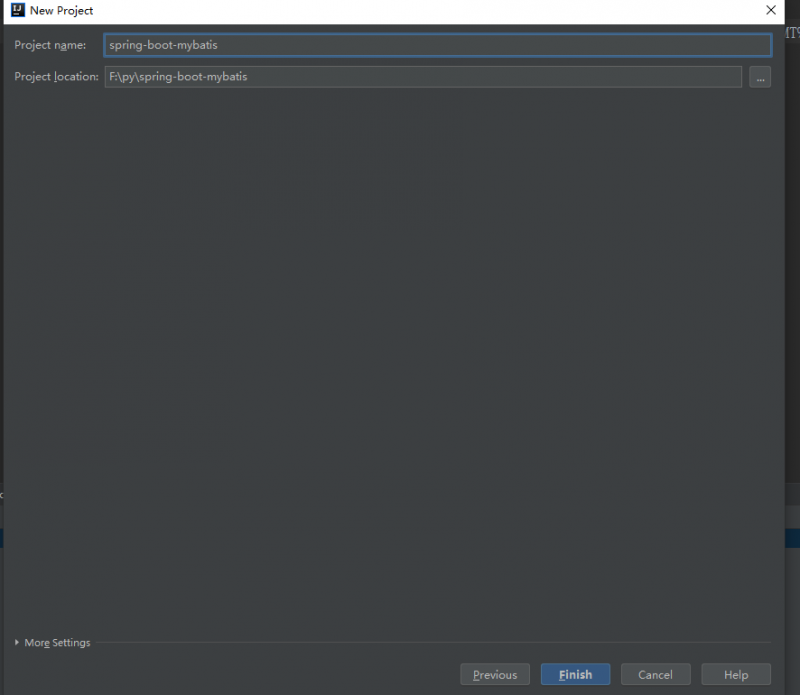
2.5.保存项目
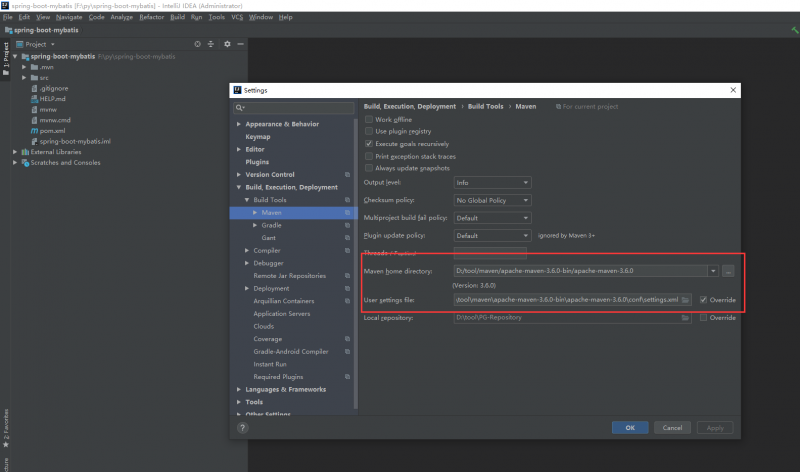
2.6.检查下maven地址[File-Setting-Maven]
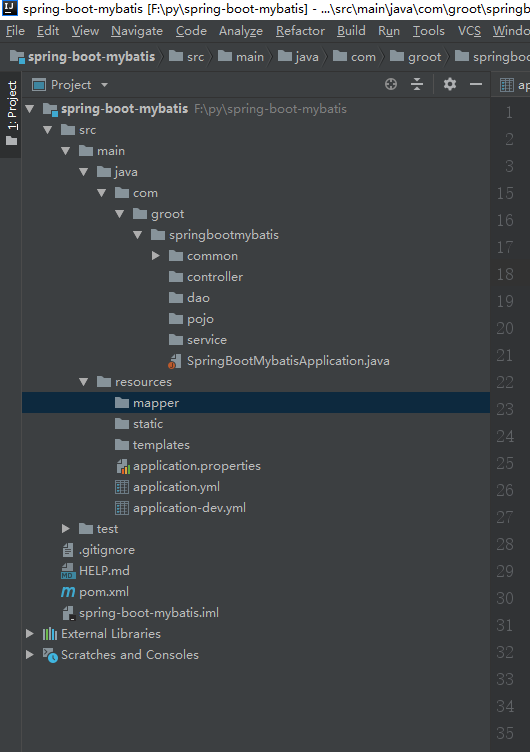
2.7.构建项目格式
common 放一些公用组件 controller是前端访问使用 dao (Mapper 用于和Mybatis进行交货) pojo(就是VO) service(由Controller调用Service,ServiceImpl,Mapper进行执行数据) mapper(mybatis语句注意存放的是Xml文件sql语句)
2.8.配置application.yml
spring: profiles:
server:
port:8100

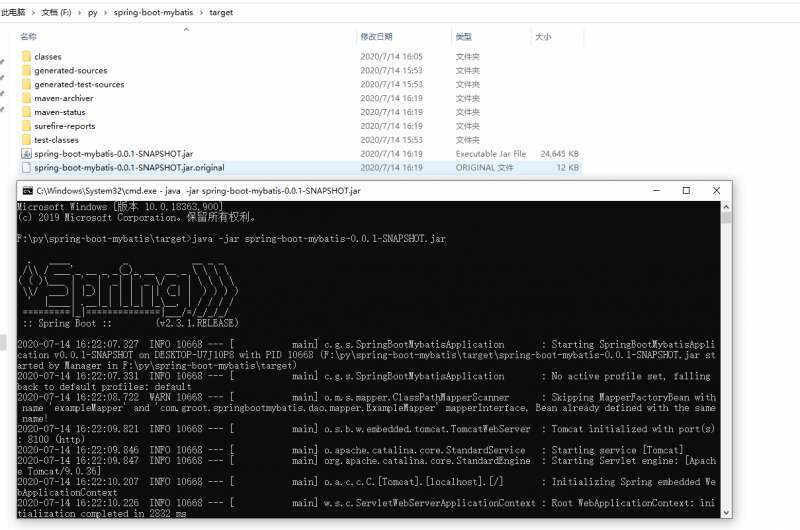
Tomcat started on port(s): 8100 则启动成功
2.9.配置数据源
这里我们写一个通用的扫描配置数据库
@ConfigurationpublicclassDataSourceConfig{
@Bean(name = "octMybatisDataSource")
@Qualifier("octMybatisDataSource")
@ConfigurationProperties(prefix = "spring.datasource")
public DataSource octMybatisDataSource(){
DruidDataSource dataSource = new DruidDataSource();
return dataSource;
}
}
2.10.配置mybatis扫描路径
/** * Mybatis配置,只读
*/
@Configuration
@EnableTransactionManagement
@MapperScan(basePackages = {"com.groot.springbootmybatis.dao.mapper","com.groot.springbootmybatis.dao.mapper"})
publicclassMiddleMybatisConfig{
@Bean(name = "middleMybatisSqlSessionFactory")
public SqlSessionFactory testSqlSessionFactory(@Qualifier("octMybatisDataSource") DataSource dataSource) throws Exception {
SqlSessionFactoryBean bean = new SqlSessionFactoryBean();
bean.setDataSource(dataSource);
PathMatchingResourcePatternResolver pathMatchingResourcePatternResolver = new PathMatchingResourcePatternResolver();
String packageSearchPath = ResourcePatternResolver.CLASSPATH_ALL_URL_PREFIX + "/mapper/*.xml";
bean.setMapperLocations(pathMatchingResourcePatternResolver.getResources(packageSearchPath));
return bean.getObject();
}
@Bean(name = "middleMybatisSqlSessionTemplate")
public SqlSessionTemplate testSqlSessionTemplate(@Qualifier("middleMybatisSqlSessionFactory") SqlSessionFactory sqlSessionFactory) throws Exception {
returnnew SqlSessionTemplate(sqlSessionFactory);
}
}
2.11.在application文件中增加数据库配置
spring: datasource:
url:jdbc:mysql://127.0.0.1:3306/oct?useUnicode=true&characterEncoding=UTF-8&serverTimezone=GMT%2B8
username:root
password:1q2w3e
driver-class-name:com.mysql.cj.jdbc.Driver
initialSize:10
minIdle:10
maxActive:30
timeBetweenEvictionRunsMillis:60000
validationQuery:SELECT1
testWhileIdle:true
testOnBorrow:false
testOnReturn:false
2.12.创建VO
publicclassExampleDemoVO{
@JsonFormat(shape = JsonFormat.Shape.STRING, pattern = "yyyy-MM-dd", timezone = "GMT+8")
private Date bTime;
@JsonFormat(shape = JsonFormat.Shape.STRING, pattern = "yyyy-MM-dd", timezone = "GMT+8")
private Date eTime;
@JsonFormat(shape = JsonFormat.Shape.STRING, pattern = "yyyy-MM-dd ", timezone = "GMT+8")
private Date createTime;
@JsonFormat(shape = JsonFormat.Shape.STRING, pattern = "yyyy-MM-dd ", timezone = "GMT+8")
private Date updateTime;
private Integer createUser;
private Integer updateUser;
private Integer valid;
private Date rVersion;
private String deliveryNo;
private Integer bookingId;
private Integer taskId;
/**
* 页面收货方编码
* */
private List<String> receiveNos;
public List<String> getReceiveNos(){
return receiveNos;
}
publicvoidsetReceiveNos(List<String> receiveNos){
this.receiveNos = receiveNos;
}
public Date getCreateTime(){
return createTime;
}
publicvoidsetCreateTime(Date createTime){
this.createTime = createTime;
}
public Date getUpdateTime(){
return updateTime;
}
publicvoidsetUpdateTime(Date updateTime){
this.updateTime = updateTime;
}
public Integer getCreateUser(){
return createUser;
}
publicvoidsetCreateUser(Integer createUser){
this.createUser = createUser;
}
public Integer getUpdateUser(){
return updateUser;
}
publicvoidsetUpdateUser(Integer updateUser){
this.updateUser = updateUser;
}
public Integer getValid(){
return valid;
}
publicvoidsetValid(Integer valid){
this.valid = valid;
}
public Date getrVersion(){
return rVersion;
}
publicvoidsetrVersion(Date rVersion){
this.rVersion = rVersion;
}
public String getDeliveryNo(){
return deliveryNo;
}
publicvoidsetDeliveryNo(String deliveryNo){
this.deliveryNo = deliveryNo;
}
public Integer getBookingId(){
return bookingId;
}
publicvoidsetBookingId(Integer bookingId){
this.bookingId = bookingId;
}
public Integer getTaskId(){
return taskId;
}
publicvoidsetTaskId(Integer taskId){
this.taskId = taskId;
}
}
2.13.创建service
publicinterfaceExampleDemoService{List<ExampleDemoVO> getExampleList();
}
2.14.创建serviceImpl
在接口的实现类中需要增加注解@Service
@ServicepublicclassExampleDemoServiceImplimplementsExampleDemoService{
@Autowired
ExampleMapper exampleMapper;
@Override
public List<ExampleDemoVO> getExampleList(){
List<ExampleDemoVO> list= exampleMapper.findExampleList();
return list;
}
}
2.15.创建Mapper
@MapperpublicinterfaceExampleMapper{
List<ExampleDemoVO> findExampleList();
}
2.16.创建controler
@RestController@RequestMapping(value = {"/springboot"})
publicclassMybatisController{
@Autowired
ExampleDemoService service;
@GetMapping("/mybatis")
publicvoidhello(){
List<ExampleDemoVO> list= service.getExampleList();
System.out.println("获取到的数据为:"+list.size());
}
}
2.17.访问地址如下
访问地址
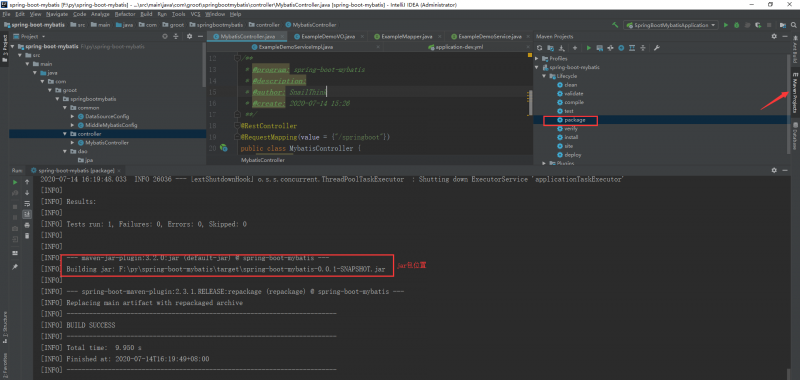
2.18.将代码打包
由于集成了maven所以可以直接使用maven打成jar包
2.19.运行Jar包
上一步已经可以看到文件路径
再该路径执行cmd 然后 **java -jar spring-boot-mybatis-0.0.1-SNAPSHOT.jar **
2.20.将项目上传到gitee
20.1 修改.gitignore文件
/target/!.mvn/wrapper/maven-wrapper.jar
STS
.apt_generated
.classpath
.factorypath
.project
.settings
.springBeans
.sts4-cache
IntelliJ IDEA
.idea
.idea/
/.idea/
.mvn
*.iws
*.iml
*.ipr
mvnw.cmd
mvnw
/.mvn
NetBeans
/nbproject/private//build/
/nbbuild/
/dist/
/nbdist/
/.nb-gradle/
/.idea
/.git
20.2 初始化文件
$ git add . #将当前目录所有文件添加到git暂存区$ git commit -m "my first commit" #提交并备注提交信息
$ git remote add origin https://gitee.com/用户个性地址/HelloGitee.git
$ git push origin master #将本地提交推送到远程仓库
20.2 项目地址
https://gitee.com/VincentBlog/spring-boot-mybatis.git
3.问题总结
1.The driver is automatically registered via the SPI and manual loading of the driver class is generally unnecessary
Loading class `com.mysql.jdbc.Driver'. Thisisdeprecated. Thenewdriverclassis `com.mysql.cj.jdbc.Driver'. ThedriverisautomaticallyregisteredviatheSPIandmanualloadingofthedriverclassisgenerallyunnecessary.问题原因:
升级后的mysql驱动类,Driver位置由com.mysql.jdbc.Driver 变为com.mysql.cj.jdbc.Driver
解决方案:
将数据配置文件里spring.datasource.driver-class-name=com.mysql.jdbc.Driver修改为如下
spring.datasource.driver-class-name=com.mysql.cj.jdbc.Driver
2.Invalid bound statement (not found): com.groot.springbootmybatis.dao.mapper.ExampleMapper.findExampleList
2.1 找不到mapper的路径,检查mapper的路径和是否有问题
<mappernamespace="com.groot.springbootmybatis.dao.mapper.ExampleMapper"></mapper>
3.解决idea新建maven项目时一直loading问题
打开:Setting---->Build Tools → Maven → Importing,
set VM options for importer to -Xmx1024m 中数字改成1024
关注
如果你觉得我的文章对你有帮助话,欢迎点赞👍 关注❤️ 分享👥!
如果本篇博客有任何错误,请批评指教,不胜感激!
点个在看,分享到朋友圈,对我真的很重要!!!

本文使用 mdnice 排版
以上是 搭建项目ssm 的全部内容, 来源链接: utcz.com/a/32716.html

