组件库构建工具vant-cli

一个组件库需要哪些功能?
最近接到一个需求,针对公司的组件库开发一个文档。刚开始接到这个需求的时候一头雾水。但仔细分析会发现,一个ui库主要有三部分组成:
- 组件:可编译成可供不可模块加载方式的组件库
- 使用文档:方便查阅组件不同参数配置
- 组件示例:方便用户使用,也可在开发阶段发现BUG
但是这样的组件库要怎么开发呢,难道针对“使用文档”和“示例”还要单独开发一个项目。当然这种做法是不可取的,不然我们每次增加一个新的组件都要到“使用文档”和“示例”项目去编写对应的功能,而且这样的代码也不易维护。那么有没有可能我们在一个组件目录下完成组件的编写,使用文档和示例,因为毕竟组件的开发的人也是对组件最了解的人,使用文档和示例也应有开发相应组件的人来编写和维护。
vant组件库的目录结构
于是上网查阅了一些开源组件库。当看到Vant-ui的时候,深深的被它精美的页面设计吸引了。于是看了一下它的源码结构,果然好看的外表下也有一颗有趣的灵魂。
项目结构:
project├─ src # 组件源代码
│ ├─ button # button 组件源代码
│ └─ dialog # dialog 组件源代码
│
├─ docs # 静态文档目录
│ ├─ home.md # 文档首页
│ └─ changelog.md # 更新日志
│
├─ babel.config.js # Babel 配置文件
├─ vant.config.js # Vant Cli 配置文件
├─ pacakge.json
└─ README.md
组件结构:
button├─ demo # 示例目录
│ └─ index.vue # 组件示例
├─ index.vue # 组件源码
└─ README.md # 组件文档
深深的被这样的清晰的结构折服,但这华丽的外表下,底层做了大量的转换工作。
vant-cli的作用
vant组件库,主要是由他们内部开发的vant-cli进行编译打包。vant-cli对于开发环境和生产环境的构建是不一样的。
- 开发环境:启动服务用于展示UI库文档,方便用户开发组件,编写组件文档和示例
- 生产环境:编译组件库,供不同模块加载方式使用
vant-cli开发环境的构建
启动服务用于展示UI库文档,方便用户开发组件,编写组件文档和示例
先来看下vant库的文档

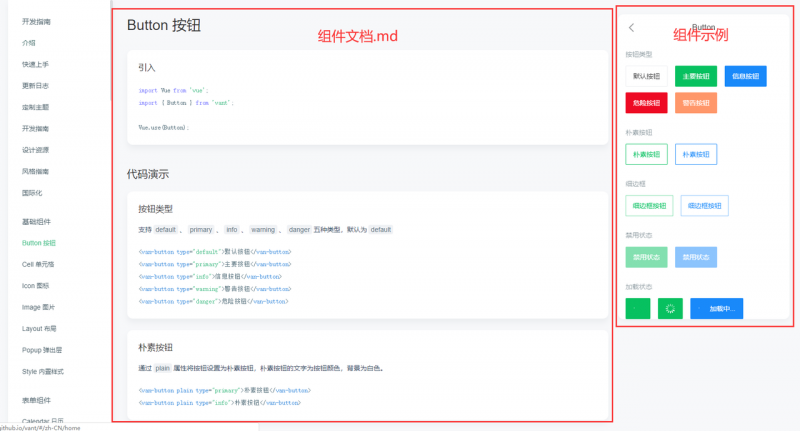
文档分为三部分:
- UI库模板
- 组件文档
- 组件示例
UI库模板
模板风格在vant-cli脚手架中定义好的,可在源码@vantclisitedesktopcomponentsindex.vue中可以找到
van-doc组件<div class="van-doc">
<doc-header
:lang="lang"
:config="config"
:versions="versions"
:lang-configs="langConfigs"
@switch-version="$emit('switch-version', $event)"
/>
<doc-nav :lang="lang" :nav-config="config.nav" />
<doc-container :has-simulator="!!simulator">
<doc-content>
//组件文档slot
<slot />
</doc-content>
</doc-container>
//示例模拟器
<doc-simulator v-if="simulator" :src="simulator" />
</div>
<van-doc
:lang="lang"
:config="config"
:versions="versions"
:simulator="simulator"
:lang-configs="langConfigs"
>
//通过不同的路由展示不同的组件文档
<router-view />
</van-doc>
组件文档
slot部分,是由组件外部通过<router-view />动态传入的,我们就可以切换不同的路由对应不同的"组件文档.md",但是md文档怎么就能通过vue组件的形式引入进来的呢?
- 把所有的"md"文件通过入口文件引入进来
- 把"md"文件转成"vue"文件
怎么把所有的"组件文档.md"文件通过入口文件引入进来呢?
vant-cli在开发环境时构建的时,在webpack配置中使用了添加了VantCliSitePlugin插件,
plugins: [ new vant_cli_site_plugin_1.VantCliSitePlugin(),
],
在这个插件中genSiteEntry方法中做了如下两件事
async function genSiteEntry() { ...
gen_site_mobile_shared_1.genSiteMobileShared(); //生成引入所有"组件文档.md"的入口文件
gen_site_desktop_shared_1.genSiteDesktopShared(); // 生成引入所有"示例.vue"的入口文件
...
}
genSiteDesktopShared生成的入口文件code,如下
"import config from 'C:/Users/hongjunjie/Desktop/vant/vant-demo2/vant.config';import Home from 'C:/Users/hongjunjie/Desktop/vant/vant-demo2/docs/home.md';
import Quickstart from 'C:/Users/hongjunjie/Desktop/vant/vant-demo2/docs/quickstart.md';
import DemoButton from 'C:/Users/hongjunjie/Desktop/vant/vant-demo2/src/demo-button/README.md';
import DemoUtils from 'C:/Users/hongjunjie/Desktop/vant/vant-demo2/src/demo-utils/README.md';
export { config };
export const documents = {
Home,
Quickstart,
DemoButton,
DemoUtils
};
export const packageVersion = '1.0.0';
"
怎么把"md"文件转成"vue"文件?
这个时候只是引入了"组件文档.md"的文件,什么时候会转成"vue"文件呢,这种场景我们很自然的会想到loader,正如"vue-loader"可以解析"vue"文件,
在webpack配置可以发现
{ test: /.md$/,
use: [CACHE_LOADER, 'vue-loader', '@vant/markdown-loader'],
},
@vant/markdown-loader可以帮助我们将"md"转成"vue"文件
组件示例
为了更好的演示效果,组件示例应该是可以单独的运行在手机端的,所以应该抽离成单独的一个页面。在UI库文档中,通过iframe的形式加载进来。
//模块器组件<div :class="['van-doc-simulator', { 'van-doc-simulator-fixed': isFixed }]">
<iframe ref="iframe" :src="src" :style="simulatorStyle" frameborder="0" />
</div>
"src"是外部传入的一个单独的页面地址,所以webpack构建的时候要对示例演示部分进行单独打包。webpack多入口文件配置,如下
entry: { 'site-desktop': [path_1.join(__dirname, '../../site/desktop/main.js')],
'site-mobile': [path_1.join(__dirname, '../../site/mobile/main.js')],
},
output: {
chunkFilename: '[name].js',
},
plugins: [
new html_webpack_plugin_1.default({
title,
logo: siteConfig.logo,
description: siteConfig.description,
chunks: ['chunks', 'site-desktop'],
template: path_1.join(__dirname, '../../site/desktop/index.html'),
filename: 'index.html',
baiduAnalytics,
}),
new html_webpack_plugin_1.default({
title,
logo: siteConfig.logo,
description: siteConfig.description,
chunks: ['chunks', 'site-mobile'],
template: path_1.join(__dirname, '../../site/mobile/index.html'),
filename: 'mobile.html',
baiduAnalytics,
}),
],
因为在上文VantCliSitePlugin插件中genSiteDesktopShared方法生成了引入了所有的"组件示例.vue"入口文件,通过遍历组件示例动态配置路由实现在模拟器切换到不同路由展示组件示例。
import { demos, config } from 'site-mobile-shared';names.forEach(name => {
const component = decamelize(name);
...
routes.push({
name,
path: `/${component}`,
component: demos[name],
meta: {
name,
},
});
});
vant-cli生产环境的构建
编译组件库,供不同模块加载方式使用
主要分析下es模块的编辑结果
在生产环境构建时,会依次执行以下任务
const tasks = [ {
text: 'Build ESModule Outputs',
task: buildEs,
},
{
text: 'Build Commonjs Outputs',
task: buildLib,
},
{
text: 'Build Style Entry',
task: buildStyleEntry,
},
{
text: 'Build Package Entry',
task: buildPacakgeEntry,
},
{
text: 'Build Packed Outputs',
task: buildPackages,
},
];
async function buildEs() {
common_1.setModuleEnv('esmodule');
//讲编写的src下目录编写的组件,copy到es文件夹下
await fs_extra_1.copy(constant_1.SRC_DIR, constant_1.ES_DIR);
await compileDir(constant_1.ES_DIR);
}
async function compileDir(dir) {
const files = fs_extra_1.readdirSync(dir);
await Promise.all(files.map(filename => {
const filePath = path_1.join(dir, filename);
//删除Demo和Test文件夹
if (common_1.isDemoDir(filePath) || common_1.isTestDir(filePath)) {
return fs_extra_1.remove(filePath);
}
//递归处理子文件夹
if (common_1.isDir(filePath)) {
return compileDir(filePath);
}
//编译不同文件
return compileFile(filePath);
}));
}
async function compileFile(filePath) {
//编译vue文件:将vue文件处理成js文件,template=>render
if (common_1.isSfc(filePath)) {
return compile_sfc_1.compileSfc(filePath);
}
//编译js文件
if (common_1.isScript(filePath)) {
return compile_js_1.compileJs(filePath);
}
//编译css|less|scss文件
if (common_1.isStyle(filePath)) {
return compile_style_1.compileStyle(filePath);
}
//删除多余文件:如md
return fs_extra_1.remove(filePath);
}
编译后的组件如下
button├─ index.js # 组件编译后的 JS 文件
├─ index.css # 组件编译后的 CSS 文件
├─ index.less # 组件编译前的 CSS 文件,可以为 less 或 scss
└─ style # 按需引入样式的入口
├─ index.js # 按需引入编译后的样式
└─ less.js # 按需引入未编译的样式,可用于主题定制
所有的组件都编译完后,还缺少一个主入口文件,导出所有组件
async function buildPacakgeEntry() { ...
const esEntryFile = path_1.join(constant_1.ES_DIR, 'index.js');
生成主入口文件,导出所有组件
gen_package_entry_1.genPackageEntry({
outputPath: esEntryFile,
pathResolver: (path) => `./${path_1.relative(constant_1.SRC_DIR, path)}`,
});
...
}
function genPackageEntry(options) { const names = common_1.getComponents();
const version = process.env.PACKAGE_VERSION || constant_1.getPackageJson().version;
const components = names.map(common_1.pascalize);
//主入口文件code
const content = `${genImports(names, options)}
const version = '${version}';
function install(Vue) {
//全局注册所有组件
components.forEach(item => {
if (item.install) {
Vue.use(item);
} else if (item.name) {
Vue.component(item.name, item);
}
});
}
if (typeof window !== 'undefined' && window.Vue) {
install(window.Vue);
}
export {
install,
version,
${genExports(components)} //导出所有组件
};
export default {
install,
version
}`
common_1.smartOutputFile(options.outputPath, content);
}
最后构建完成是的目录结构
project├─ es # es 目录下的代码遵循 esmodule 规范
├─ button # button 组件编译后的代码目录
├─ dialog # dialog 组件编译后的代码目录
└─ index.js # 引入所有组件的入口,支持 tree shaking
总结
统一的组件的管理入口,包含组件、文档说明、示例,针对不用环境构建用于不同目的的文件,构建过程封闭,我们只用关心符合目录结构的组件、文档、示例编写,方便维护和扩展。
感谢vant团队的开源,不仅减少重复造轮子的时间,也让我们学会了更加宝贵的代码编程思想和规范。最后,谢谢大家的观看。
以上是 组件库构建工具vant-cli 的全部内容, 来源链接: utcz.com/a/26835.html


