flutter前端入门踩坑记录

flutter是谷歌的移动UI框架,可以快速在iOS和Android上构建高质量的原生用户界面。 flutter可以与现有的代码一起工作。在全世界,flutter正在被越来越多的开发者和组织使用,并且flutter是完全免费、开源的。flutter使构建精美的移动应用程序变得轻松快捷。
本文的安装环境和开发步骤文档不推荐完全照着开发,因为不会涉及的很细节,而且官方的文档(直接看英文官方文档,中国的文档可能由于翻译不及时,也会踩坑)一直都在更新和变化,推荐去flutter官网跟着步骤和提示一步步走,本文主要是记录一些踩坑问题和心得。
- 官方中文文档
- 官方英文安装文档
GitHub
1. 安装与环境配置
1.1. 系统配置要求
- 操作系统:MacOS(64位)
- 磁盘空间:700 MB(不包含 IDE 或其余工具所需要的磁盘空间)
- 命令工具:Flutter 需要你的开发环境中已经配置了以下命令行工具。
- bash
- curl
- git 2.x
- mkdir
- rm
- unzip
- which 可以查看软件按照目录,如which node
如何查看开发环境是否配置了命令行工具?
- 打开终端
- 输入 xx --help,如输入 git --help,如果出现git相关的命令, 表示开发环境中已经配置了 git 命令行工具,如图:
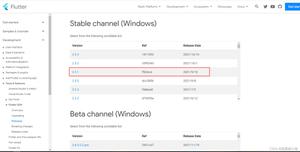
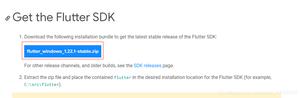
1.2. 获取Flutter SDK
- 下载 MacOS 版本的
flutter安装包 - 打开终端,定位到目标路径,比如:
cd /Applications/honghong/study/flutter/- 解压到目标路径 输入上述命令后,紧接着上面的窗口输入解压命令,确保文件能解压到目标路径,~/Downloads/ 表示安装包的路径
unzip ~/Downloads/flutter_macos_v1.5.4-hotfix.2-stable.zip- 查看文件路径:把文件拖到浏览器中会显示文件路径
- 配置
flutter的 PATH 环境变量:
export PATH="$PATH:`pwd`/flutter/bin"这个命令配置了 PATH 环境变量,且只会在你 当前 命令行窗口中生效。 如果想让它永久生效,还需要 更新 PATH 环境变量。
- 更新 PATH 环境变量 (1)首先确定你想要把Flutter SDK 放置在哪一个目录内,获取并记录这个目录的路径 打开或者创建,本文档的路径为 /Applications/honghong/study/flutter/
- 打开或者创建 打开终端,输入以下命令
open $HOME/.bash_profile打开文件后加入一下代码: export PATH="$PATH:[PATH_TO_FLUTTER_GIT_DIRECTORY]/flutter/bin"
1.3. 设置iOS模拟器
要准备在iOS模拟器上运行和测试flutter应用,请按照以下步骤操作:
- 在Mac上,通过Spotlight或使用以下命令找到Simulator:
content_copy
$ open -a Simulator- 通过检查模拟器的“ **硬件”>“设备”**菜单中的设置,确保模拟器使用的是64位设备(iPhone 5s或更高版本)。
- 根据开发计算机的屏幕大小,模拟的高屏幕密度iOS设备可能会溢出屏幕。在模拟器的“ **窗口”>“比例”**菜单下设置设备比例 。
2. 创建并运行一个简单的 Flutter 应用
- 通过允许以下命令来创建一个新的 Flutter 应用
flutter create flutter_app创建时 遇到的坑
- 需要等很长很长未知的时间,原来网络问题。。。
翻译后:
- 暂时不配置真机,真机能成功 但是一旦你把app卸载了 就再也装不上了,不知道什么原因,先熟悉语法和功能,后面再解决真机的问题
- 切换到项目路线:
cd flutter_app- 要在模拟器中启动应用程序,请确保模拟器正在运行(如何运行模拟器,请参考【设置iOS模拟器】),然后输入:
$ flutter run第一次运行这个命令需要等好几分钟的时间
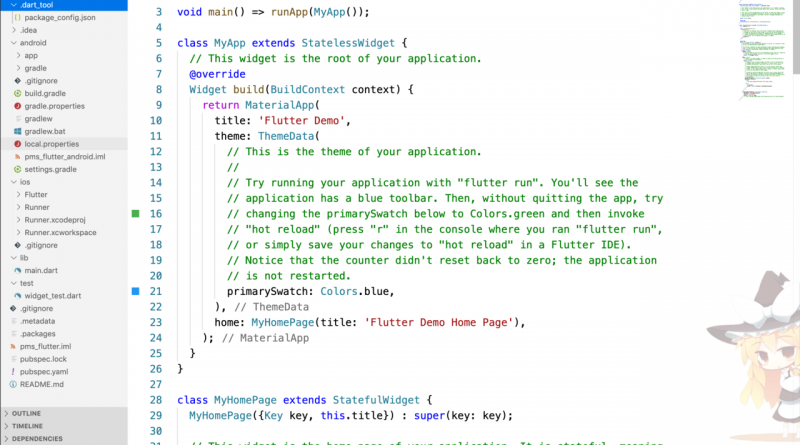
启动项目后出现以下界面:
此时我们可以用编辑器打开代码看一下代码结构:
3. 编辑工具设定
(一)安装Android Studio 下载安装成功后,打开编辑器时弹出 Unable to access Android SDK add-on list(Unable to access Android SDK add-on list) 的错误,是网络原因导致的
Android Studio,IntelliJ或VS Code等编辑器添加编辑器插件都支持的,我选择的编辑器是VSCode,需要在编辑器中下载扩展插件:
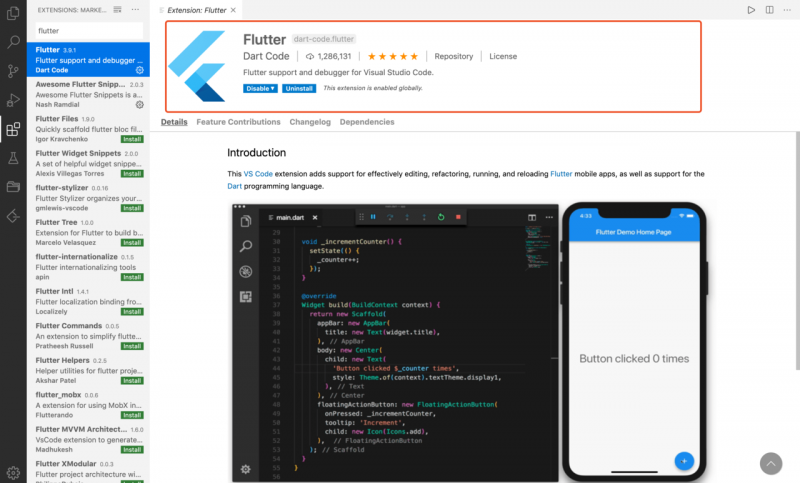
4. 开发代码
4.1. 下载新依赖
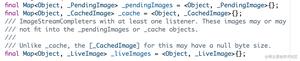
flutter pub get4.2. http请求封装(部分代码)
import'dart:async';import'dart:convert';
import'package:dio/dio.dart';
import'package:shared_preferences/shared_preferences.dart';
var request = new Dio(BaseOptions(
baseUrl: "",
connectTimeout: 5000,
// 5s
headers: {'api': '1.0.0', 'channel': '2'},
contentType: Headers.jsonContentType,
// Transform the response data to a String encoded with UTF8.
// The default value is [ResponseType.JSON].
responseType: ResponseType.plain,
));
classHttpUtils{
staticString csrfToken;
// 获取本地储存的token
static Future<dynamic> getCsrfToken() async {
csrfToken = '';
Future<dynamic> future = Future(() async {
SharedPreferences _prefs = await SharedPreferences.getInstance();
return json.decode(_prefs.getString('userInfo'));
});
// 请求拦截器
request.interceptors
.add(InterceptorsWrapper(onRequest: (RequestOptions options) {
future.then((value) {
csrfToken = value['csrfToken'] ?? null;
options.headers['csrfToken'] = csrfToken == null ? null : csrfToken;
return options;
});
}));
}
static Future get(String url, Map<String, dynamic> params) async {
// 请求拦截器
await getCsrfToken();
var response;
print('get请求header头:+${request.options.headers}');
response = await request.get(url, queryParameters: params);
return response.data;
}
static Future post(String url, params) async {
// 请求拦截器
await getCsrfToken();
var response;
response = await request.post(url, data: params);
return response.data;
}
}
4.3. UI组件
使用 material 组件,
5. 踩坑记录
5.1. 安装过程中
5.1.1. flutter安装不成功,运行失败
如果您位于中国,多半是和网络有关系,因为flutter是国外的,需要访问 pub.flutter-io 网址,如果无法访问,则需要配置镜像,请参见本页:
flutter.dev/community/c…
5.1.1.1. 配置Flutter使用镜像站点
如果您在中国安装或使用Flutter,使用托管Flutter依赖项的可信任本地镜像站点可能会有所帮助。要指示Flutter工具使用备用存储位置,需要在运行命令之前设置两个环境变量PUB_HOSTED_URL和 。FLUTTER_STORAGE_BASE_URL``flutter
以MacOS或Linux为例,以下是使用镜像站点的设置过程的前几个步骤。在要存储本地Flutter克隆的目录中的Bash shell中运行以下命令:
content_copy
$ export PUB_HOSTED_URL=https://pub.flutter-io.cn$ export FLUTTER_STORAGE_BASE_URL=https://storage.flutter-io.cn
$ git clone -b dev https://github.com/flutter/flutter.git
$ export PATH="$PWD/flutter/bin:$PATH"
$ cd ./flutter
$ flutter doctor
完成这些步骤后,您应该能够继续 正常设置Flutter。从这里开始,包通过获取flutter pub get来自被下载flutter-io.cn在任何外壳PUB_HOSTED_URL 和FLUTTER_STORAGE_BASE_URL设置。
该flutter-io.cn服务器是GDG China维护的Flutter依赖项和软件包的临时镜像。Flutter团队不能保证此服务的长期可用性。如果有其他镜像,您可以自由使用。如果您有兴趣在中国设置自己的镜像,请联系 flutter-dev@googlegroups.com 寻求帮助。
按照以上步骤设置后,运行 flutter doctor 测试一下 flutter ,出现以下界面表示安装成功。
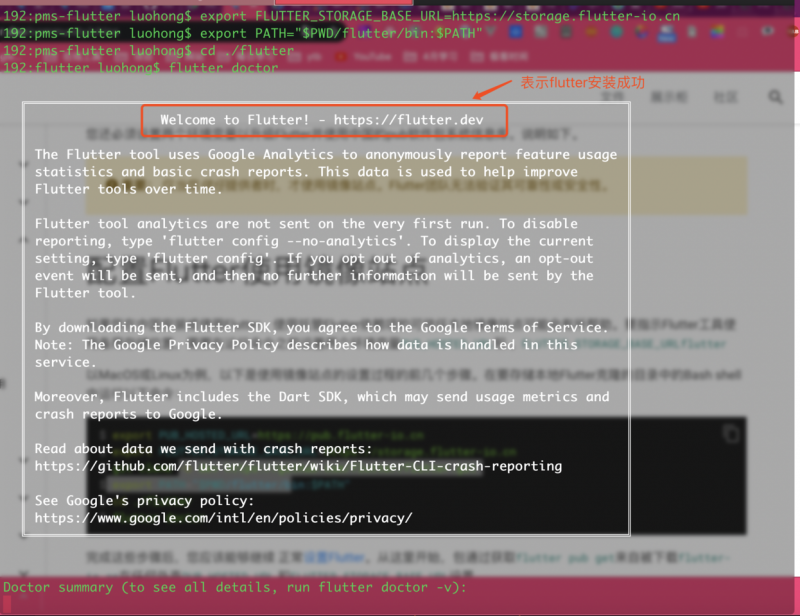
同时还会自动帮你检测你电脑上的IDE版本或者licenses是否支持,需要用哪个编辑器就按照提示去安装或者更新即可。
5.2. 启动过程
启动过程遇到太多坑了,比如模拟器是依赖Xcode,Xcode需要更新到最新版本,但是Xcode的更新又依赖macOS的更新,macOS和Xcode更新都特别慢,大概花了两个小时搞定。创建的项目终于能启动成功。
5.2.1. "flutter run" prints warning multiple times after switching Flutter SDK's
可以通过在系统上项目的根目录中运行flutter pub get来解决此问题
4.2.2. Waiting for another flutter command to release the startup lock...
删除以下文件且保证网络通畅
<YOUR FLUTTER FOLDER>/bin/cache/lockfile
/Users/luohong/.nvm/versions/node/v12.7.0/bin:/usr/local/bin:/usr/bin:/bin:/usr/sbin:/sbin:/Applications/honghong/github/pms-flutter/flutter/bin
如果是在VSCode中输入flutter命令,那么删除文件后需要关闭编辑器,重新打开。
如果上面路径下提示成功,在其他路径下提示不成功,那么进行下面命令:
vim ~/.zshrc
在打开的文件里最下面增加一行代码,就是配置的路径
export PATH=/Users/用户名/Desktop/Flutter/flutter/bin:$PATH
保存退出后,再使用source命令重新加载一下:
source ~/.zshrc
到这里,应该可是在任何路径下使用flutter命令了。
5.2.3. Failed to launch iOS Simulator
Failed to launch iOS Simulator: Error: Emulator didn't connect within 60 seconds
Cannot launch without an active device
解决方法:
- 第一步:flutter clean
- 第二步:I got same problem and fixed by this:
rm -rf <flutter_repo_directory>/bin/cache && flutter doctor -v
参考链接:github.com/flutter/flu…
5.2.4. Error running pod install
Error launching application on iPhone SE (2nd generation).
解决方法:
- 部署到iOS设备
要将Flutter应用程序部署到物理iOS设备,您需要第三方CocoaPods依赖关系管理器和Apple Developer帐户。您还需要在Xcode中设置物理设备部署。
- 通过运行以下命令来安装和设置CocoaPods:
content_copy
$ sudo gem install cocoapods$ pod setup
5.2.5. Error output from CocoaPods:
Error output from CocoaPods:↳
/System/Library/Frameworks/Ruby.framework/Versions/2.6/usr/lib/ruby/2.6.0/universal-darwin19/rbconfig.rb:229: warning: Insecure world
writable dir /Applications/honghong/github/pms-flutter/flutter in PATH, mode 040777
[!] Automatically assigning platform `iOS` with version `8.0` on target `Runner` because no platform was specified. Please specify a
platform for this target in your Podfile. See `https://guides.cocoapods.org/syntax/podfile.html#platform`.
Error running pod install
Error launching application on iPhone SE (2nd generation).
解决方法:
这里说的是需要安装ios依赖,需要去ios根目录安装
cd iospod install --verbose
复制代码
每次修改完成ios记得执行下 flutter clean
(pod是ios的包管理器命令,包管理器叫CocoaPods)
完成之后,这时候
[!] `<PBXGroup UUID=`97C146E51CF9000F007C117D`>` attempted to initialize anobject with an unknown UUID. `CF3B75C9A7D2FA2A4C99F110` for attribute:
`children`. This can be the result of a merge and the unknown UUID is being
discarded.
复制代码
Error output from Xcode build:↳
** BUILD FAILED **
Xcode's output:
↳
error:
/Users/xiexiuyue/Documents/www/flutter/cjyy/ios/Flutter/Debug.xcconfig:1:
could not find included file 'Pods/Target Support
Files/Pods-Runner/Pods-Runner.debug.xcconfig' in search paths (in target
'Runner')
error:
/Users/xiexiuyue/Documents/www/flutter/cjyy/ios/Flutter/Debug.xcconfig:1:
could not find included file 'Pods/Target Support
Files/Pods-Runner/Pods-Runner.debug.xcconfig' in search paths (in target
'Runner')
error:
/Users/xiexiuyue/Documents/www/flutter/cjyy/ios/Flutter/Debug.xcconfig:1:
could not find included file 'Pods/Target Support
Files/Pods-Runner/Pods-Runner.debug.xcconfig' in search paths (in target
'Runner')
error:
/Users/xiexiuyue/Documents/www/flutter/cjyy/ios/Flutter/Debug.xcconfig:1:
could not find included file 'Pods/Target Support
Files/Pods-Runner/Pods-Runner.debug.xcconfig' in search paths (in target
'Runner')
error:
/Users/xiexiuyue/Documents/www/flutter/cjyy/ios/Flutter/Debug.xcconfig:1:
could not find included file 'Pods/Target Support
Files/Pods-Runner/Pods-Runner.debug.xcconfig' in search paths (in target
'Runner')
error:
/Users/xiexiuyue/Documents/www/flutter/cjyy/ios/Flutter/Debug.xcconfig:1:
could not find included file 'Pods/Target Support
Files/Pods-Runner/Pods-Runner.debug.xcconfig' in search paths (in target
'Runner')
warning: Capabilities for Runner may not function correctly because its
entitlements use a placeholder team ID. To resolve this, select a
development team in the build settings editor. (in target 'Runner')
note: Using new build systemnote: Planning buildnote: Constructing build
description
Could not build the application for the simulator.
Error launching application on iPhone Xʀ.
复制代码
安装一些插件会导致iOS原生代码发生变化,这时候如果以为单单是因为改了然后恢复原来的,继续执行,如果发现错误就clean然后继续,会发现错误继续。
没错,flutter run 、 flutter pub get 都会导致iOS原生代码的修改,这时候不管怎么搞,代码都无法执行,这时候就得找到上次得代码了,然后看最近添加的几个包里面,排查是哪个包出现的问题。
链接:juejin.im/post/5d91ef…
**解决办法:**是使用移除sudo gem uninstall cocoapodsCocoapods sudo gem install cocoapods -v 1.7.5,然后使用,然后安装Cocoapods 1.7.5 pod setup。
I'm also getting this issue with 1.8.1, I can also confirm installing cocoapods 1.7.5 fixes it. Make sure to uninstall previous versions or it won't work! :)sudo gem uninstall cocoapods
If using brew, run this too: brew uninstall cocoapods
sudo gem install cocoapods -v 1.7.5
pod setup
flutter doctor -v
Maybe there should be a (temporary) note in the docs in the iOS setup while this is fixed.
Edit: version 1.8.1 is now working as expected so no need for this workaround, see #41491
github.com/flutter/flu…
5.2.6. getter 'value' was called on null
如果您已经为变量创建并分配了值,但该变量仍然显示getter 'value' was called on null,请尝试使用Run或Restart应用代替Hot Reload。因为Hot Reload将不会调用initstate()(变量将为其赋值),该调用只会由Restarting应用程序调用。
5.3. 真机调试
5.3.1. iOS真机
5.3.1.1. Building for iOS, but the linked and embedded framework 'App.framework' was built for iOS Simulator.
flutter.dev/docs/develo…
github.com/flutter/flu…
I can confirm the bug exists when using Flutter (0.5.7-pre.105) with latest beta of Xcode (10.0 beta 3). As you can read from build log, Flutter.framework/Flutter executable has indeed wrong access permissions ("write" flag is missing for"owner"). I didn't manage to solve the problem, but I noticed that switching to legacy build system in Xcode helps.Open ios/Runner.xcworkspace in Xcode 10 beta 3
From Xcode menu select: "File ~> Workspace settings..."
Change selected build system from "New build system (Default)" to "Legacy build system"
If there is no Runner.xcworkspace in ios directory, open Runner.xcodeproj and instead of "Workspace Settings..." choose "Project settings...", rest is the same.
I think the issue could be a bug in "New build system" that comes with Xcode 10 (that would mean it'
s independent from Flutter), or it could be a problem with build configuration for Flutter.framework. Anyway, as a workaround we can just switch to legacy build system (known as a default one from previous versions of Xcode) and the problem should disappear.5.3.2. Android真机
5.3.2.1. flutter启动超时失败
解决方法:所有的配置请求地址一定要改为国内镜像,重启编辑器,flutter clean这几个步骤不能少。
www.jianshu.com/p/171a9660e…
6. 发布应用
6.1. 发布Android apk
Java binary at: /Applications/Android Studio.app/Contents/jre/jdk/Contents/Home/bin/java上面的路径替换掉 keytool
keytool -genkey -v -keystore ~/key.jks -keyalg RSA -keysize 2048 -validity 10000 -alias key替换后为:
/Applications/Android Studio.app/Contents/jre/jdk/Contents/Home/bin/java -genkey -v -keystore ~/key.jks -keyalg RSA -keysize 2048 -validity 10000 -alias key192:pms_flutter luohong$ keytool -genkey -v -keystore ~/key.jks -keyalg RSA -keysize 2048 -validity 10000 -alias key输入密钥库口令:
在命令行中:
- 输入
cd <app dir>
(替换<app dir>为应用程序的目录。) - 运行
flutter build apk --split-per-abi
(flutter build命令默认为--release。)
此命令产生三个APK文件:
<app dir>/build/app/outputs/apk/release/app-armeabi-v7a-release.apk<app dir>/build/app/outputs/apk/release/app-arm64-v8a-release.apk<app dir>/build/app/outputs/apk/release/app-x86_64-release.apk
7. 注意事项
- 网络条件满足的情况下,安装并启动成功demo,按照提示一步步走是非常顺利的。
- 尽量查看官方的英文资料,这些是一手资料,查看
issuses,查看和自己遇到相同问题的人,注意版本问题。
8.参考资料
佐笾-掘金
9. 心得和体会
app的开发需要一台性能好的电脑和良好的网络条件,布局的时候要熟悉flex布局原理,理解主轴、交叉轴等知识。由于没有开发者账号,目前我只发布了安卓版本的,并成功安卓到安卓手机。以上就是我的踩坑总结和心得
感谢大家的阅读,如果文中有不当的地方,麻烦指出来,我及时更正。
以上是 flutter前端入门踩坑记录 的全部内容, 来源链接: utcz.com/a/20220.html