【Nodejs教程精选】Stylus让CSS也能编程
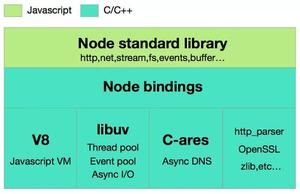
从零开始nodejs系列文章,将介绍如何利Javascript做为服务端脚本,通过Nodejs框架web开发。Nodejs框架是基于V8的引擎,是目前速度最快的Javascript引擎。chrome浏览器就基于V8,同时打开20-30个网页都很流畅。Nodejs标准的web开发框架Express,可以帮助我们迅速建立web站点,比起PHP的开发效率更高,而且学习曲线更低。非常适合小型网站,个性化网站,我们自己的Geek网站!!
关于作者
- 张丹(Conan), 程序员Java,R,PHP,Javascript
- weibo:@Conan_Z
- blog: http://blog.fens.me
- email: bsspirit@gmail.com
转载请注明出处:
http://blog.fens.me/nodejs-stylus-css/

前言
到目前为止,前端开发三个最重要的部分HTML, Javascript, CSS中,不管是文档还是工具,对于CSS的支持是最少的。在HTML5+CSS3的时代,我们要更加懂CSS,要让CSS也成为开发的利器。
对于开发来说,CSS的弱点在于静态化。我们不得不背CSS的各种规范,然后一字一句的编写文件。我们需要一个真正能提高开发效率的工具,LESS, SASS都在这方面做了一些贡献。
Stylus比LESS更强大,而且基于nodejs比SASS更符合我们的思路。
目录
- Stylus介绍
- Stylus安装
- Stylus语法
- 在Express3项目中使用Stylus
- 基于grunt自动处理
1. Stylus介绍
Stylus是一个CSS的预处理框架,Stylus是一种新型语言,可以创建健壮的、动态的、富有表现力的CSS。
什么是CSS预处理技术?CSS预处理技术,是指用一种新语言用来为CSS 增加可编程的的特性,无需考虑浏览器的兼容性问题。你可以在 CSS 中使用变量、简单的程序逻辑、函数等等在编程语言中的一些基本技巧,可以让你的 CSS 更见简洁,适应性更强。
Stylus默认使用 .styl 的作为文件扩展名,支持多样性的CSS语法。
2. Stylus安装
系统环境:
win7 64bit, node v0.10.5, npm 1.2.19我们直接基于一个Express3的项目进行安装。express的入门,请参考文章:Nodejs开发框架Express3.0开发手记–从零开始
~ D:\workspace\javascript>express -e nodejs-stylus~ D:\workspace\javascript>cd nodejs-stylus && npm install
~ D:\workspace\javascript\nodejs-stylus>npm install stylus
stylus@0.37.0 node_modules\stylus
├── debug@0.7.2
├── cssom@0.2.5
├── mkdirp@0.3.5
└── sax@0.5.5
配置Stylus的测试环境
增加两个文件:
- stylus.js: 启动命令,渲染stylus的文件,在命令打印渲染后的结果
- stylus.styl: stylus可编程的样式文件
增加stylus.js文件
~ vi stylus.js
var stylus = require("stylus"),
str = require("fs").readFileSync("public/stylus/stylus.styl", "utf8");
stylus.render(str,function (err, css) {
if (err) throw err;
console.log(css);
});
增加public/stylus/stylus.styl文件
~ vi public/stylus/stylus.styl
border-radius()
-webkit-border-radius: arguments
-moz-border-radius: arguments
border-radius: arguments
body a
display inline-block
padding: 2px 5px
font: 12px/1.4 Arial, sans-serif
background: black
color: #eee
border-radius: 2px
form input
padding: 5px
border: 1px solid
border-radius: 5px
运行stylus.js的命令
~ D:\workspace\javascript\nodejs-stylus>node stylus.js
body a {
display: inline-block;
padding: 2px 5px;
font: 12px/1.4 Arial, sans-serif;
background: #000;
color: #eee;
-webkit-border-radius: 2px;
-moz-border-radius: 2px;
border-radius: 2px;
}
form input {
padding: 5px;
border: 1px solid;
-webkit-border-radius: 5px;
-moz-border-radius: 5px;
border-radius: 5px;
}
我们看到了stylus的渲染效果,通过可编程的stylus.styl文件,生成标准的CSS的样式。接下来,我们继续看Stylus的基本使用。
3. Stylus语法
1). 选择器(Selectors)
body
color white
==>
body {
color: #fff;
}
pad(n)
padding (- n)
body
pad(5px)
==>
body {
padding: -5px;
}
foo bar baz,
form input,
> a
border 1px solid
==>
foo bar baz,
form input,
> a {
border: 1px solid;
}
textarea
input
color #A7A7A7
&:hover
color #000
==>
textarea,
input {
color: #a7a7a7;
}
textarea:hover,
input:hover {
color: #000;
}
2). 变量(Variables)
font-size = 14px
body
font font-size Arial, sans-seri
==>
body {
font: 14px Arial, sans-seri;
}
#logo
position: absolute
top: 50%
left: 50%
width: 150px
height: 80px
margin-left: -(@width / 2)
margin-top: -(@height / 2)
==>
#logo {
position: absolute;
top: 50%;
left: 50%;
width: 150px;
height: 80px;
margin-left: -75px;
margin-top: -40px;
}
body
color: red
ul
li
color: blue
a
background-color: @color
==>
body {
color: #f00;
}
body ul li {
color: #00f;
}
body ul li a {
background-color: #00f;
}
3). 插值(Interpolation)
vendor(prop, args)
-webkit-{prop} args
-moz-{prop} args
{prop} args
button
border-radius 1px 2px / 3px 4px
==>
button {
border-radius: 1px 2px/3px 4px;
}
table
for row in 1 2 3 4 5
tr:nth-child({row})
height: 10px * row
==>
table tr:nth-child(1) {
height: 10px;
}
table tr:nth-child(2) {
height: 20px;
}
table tr:nth-child(3) {
height: 30px;
}
table tr:nth-child(4) {
height: 40px;
}
table tr:nth-child(5) {
height: 50px;
}
4). 运算符(Operators)
body
n = 5
foo: (n)em
foo: (n)%
foo: (n * 5)px
foo: unit(n + 5, '%')
==>
body {
foo: 5em;
foo: 5%;
foo: 25px;
foo: 10%;
}
a = 15px
div
if a is defined
padding 5px
if b
margin 5px
==>
div {
padding: 5px;
margin: 5px;
}
pad(types = padding, n = 5px)
if padding in types
padding n
if margin in types
margin n
body
pad()
body
pad(margin)
body
pad(padding margin, 10px)
==>
body {
padding: 5px;
}
body {
margin: 5px;
}
body {
padding: 10px;
margin: 10px;
}
5). 混合书写(Mixins)
border-radius(n)
-webkit-border-radius n
-moz-border-radius n
border-radius n
form input[type=button]
border-radius 5px
==>
form input[type=button] {
-webkit-border-radius: 5px;
-moz-border-radius: 5px;
border-radius: 5px;
}
support-for-ie ?= true
opacity(n)
opacity n
if support-for-ie
filter unquote('progid:DXImageTransform.Microsoft.Alpha(Opacity=' + round(n * 100) + ')')
#logo
&:hover
opacity 0.5
==>
#logo:hover {
opacity: 0.5;
filter: progid:DXImageTransform.Microsoft.Alpha(Opacity=50);
}
inline-list()
li
display inline
comma-list()
inline-list()
li
&:after
content ', '
&:last-child:after
content ''
ul
comma-list()
==>
ul li {
display: inline;
}
ul li:after {
content: ', ';
}
ul li:last-child:after {
content: '';
}
6). 方法(Functions)
invoke(a, b, fn)
fn(a, b)
add(a, b)
a + b
body
padding invoke(5, 10, add)
padding invoke(5, 10, sub)
==>
body {
padding: 15;
padding: fn(5, 10);
}
get(hash, key)
return pair[1] if pair[0] == key for pair in hash
div
hash = (one 1) (two 2) (three 3)
padding:get(hash, two)
==>
div {
padding: 2;
}
7). 关键字参数(Keyword Arguments)
body {
color: rgba(255, 200, 100, 0.5);
color: rgba(red: 255, green: 200, blue: 100, alpha: 0.5);
color: rgba(alpha: 0.5, blue: 100, red: 255, 200);
color: rgba(alpha: 0.5, blue: 100, 255, 200);
}
==>
body {
color: rgba(255,200,100,0.5);
color: rgba(255,200,100,0.5);
color: rgba(255,200,100,0.5);
color: rgba(255,200,100,0.5);
}
//查看函数或混合书写中接受的参数
p(rgba)
==>
inspect: rgba(red, green, blue, alpha)
8). 内置方法(Built-in Functions)
red(#c00)
green(#0c0)
blue(#00c)
alpha(rgba(0,0,0,0.3))
dark(black)
light(white)
hue(hsla(50deg, 100%, 80%))
saturation(hsla(50deg, 100%, 80%))
lightness(hsla(50deg, 100%, 80%))
nums = 1 2
push(nums, 3, 4, 5)
nums= 4 5
unshift(nums, 3, 2, 1)
pairs = (one 1) (two 2) (three 3)
keys(pairs)
values(pairs)
typeof(12)
typeof(#fff)
unit(15in)
unit(10%,px)
match('^foo(bar)?', foo)
match('^foo(bar)?', foobar)
abs(-5px)
ceil(5.5in)
floor(5.6px)
round(5.5px)
min(1, 5)
max(1, 5)
even(6px)
odd(5mm)
sum(1 2 3)
avg(1 2 3)
join(',', 1 2 3)
hsla(10, 50, 30)
rgba(255,0,0,1)
rgb(255,204,0)
#fc08
lighten(#2c2c2c, 30)
darken(#D62828, 30)
desaturate(#f00, 40%)
saturate(#c33, 40%)
invert(#d62828)
unquote("sans-serif")
s('bar()')
s('bar(%s)', 'baz')
warn("oh noes!")
error('add() expects units')
op = '+'
operate(op, 15, 5)
last(1 2 3)
length((1 2 3 4))
p('test')
opposite-position(right)
image-size('tux.png')
add-property('bar', 1 2 3)
stop(50%, orange)
9). 多参数(Rest Params)
box-shadow(args...)
-webkit-box-shadow args
-moz-box-shadow args
box-shadow args
#login
box-shadow 1px 2px 5px #eee
==>
#login {
-webkit-box-shadow: 1px 2px 5px #eee;
-moz-box-shadow: 1px 2px 5px #eee;
box-shadow: 1px 2px 5px #eee;
}
box-shadow()
-webkit-box-shadow arguments
-moz-box-shadow arguments
box-shadow arguments
#login
box-shadow #ddd 1px 1px, #eee 2px 2px
==>
#login {
-webkit-box-shadow: #ddd 1px 1px, #eee 2px 2px;
-moz-box-shadow: #ddd 1px 1px, #eee 2px 2px;
box-shadow: #ddd 1px 1px, #eee 2px 2px;
}
10). 注释(Comments)
// one line
==>
/*
* multi-line
*/
==>
/*
* multi-line
*/
/*!
* multi-line buffered
*/
==>
/*
* multi-line buffered
*/
11). 条件(Conditionals)
box(x, y, margin-only = false)
if margin-only
margin y x
else
padding y x
div
box(5px, 10px, true)
==>
div {
margin: 10px 5px;
}
negative(n)
error('invalid num') unless n is a 'unit'
return yes if n < 0 no negative(15) ==> no
negative('str')
==>
invalid num
at negative() (stylus:173)
12). 迭代(Iteration)
apply(props)
props = arguments if length(arguments) > 1
for prop in props
{prop[0]} prop[1]
body
apply(one 1, two 2, three 3)
==>
body {
one: 1;
two: 2;
three: 3;
}
body
list = (one 1) (two 2) (three 3)
apply(list)
==>
body {
one: 1;
two: 2;
three: 3;
}
first-even(nums)
return n if n % 2 == 0 for n in nums
div
padding first-even(1 3 5 5 6 3 2)px
==>
div {
padding: 6px;
}
13). @import,@media,@font-face, @keyframes, @extend,@css
//样式文件导入
@import "reset.css" //原始css导入
@import 'mixins/vendor'//stylus动态导入
//与标准CSS一样
@media print
#header
#footer
display none
//与标准CSS一样
@font-face
font-family Geo
font-style normal
src url(fonts/geo_sans_light/GensansLight.ttf)
//@keyframes没用过不知道干什么的!汗!
vendors = official
@keyframes foo {
from {
color: black
}
to {
color: white
}
}
==>
@keyframes foo {
0% {
color: #000;
}
100% {
color: #fff;
}
}
//@extend样式
.message {
padding: 10px;
border: 1px solid #eee;
}
.warning {
@extend .message;
color: #E2E21E;
}
==>
.message,
.warning {
padding: 10px;
border: 1px solid #eee;
}
.warning {
color: #e2e21e;
}
//@css不转义,直接输出字符串
@css {
body {
font: 14px;
}
}
==>
body {
font: 14px;
}
14). 自检API(Introspection API)
reset()
if mixin == 'root'
got
root true
else if mixin
got 'a mixin'
else
'not a mixin'
reset()
body
reset()
foo reset()
==>
got {
root: true;
}
body {
got: 'a mixin';
foo: 'not a mixin';
}
4. 在Express3项目中使用Stylus
刚开我们一直在讲Stylus的语法,下面我们配置到项目里试一下真正地效果。
实现自动编译stylus到css,我们还要借助于grunt。
~ D:\workspace\javascript\nodejs-stylus>npm install grunt-contrib-stylus --save-dev需要修改的文件:
- Gruntfile.js:grunt的配置文件
- demo.styl:stylus的脚本
- index.ejs:ejs模板文件
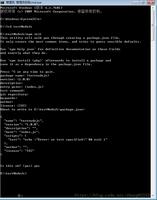
配置grunt的stylus任务
~ vi Gruntfile.jsmodule.exports = function (grunt) {
grunt.initConfig({
pkg: grunt.file.readJSON('package.json'),
stylus: {
compile: {
files: {
'public/stylesheets/demo.css': ['public/stylus/demo.styl']
}
}
}
});
grunt.loadNpmTasks('grunt-contrib-stylus');
grunt.registerTask('default', ['stylus']);
}
增加一个demo.styl的文件
~ vi public/stylus/demo.stylbody
color red
pad(n)
padding (- n)
body
pad(5px)
修改index.ejs文件
~ vi views/index.ejs
<!DOCTYPE html>
<html>
<head>
<title><%= title %></title>
<link rel='stylesheet' href='http://blog.fens.me/stylesheets/demo.css' />
</head>
<body>
<h1><%= title %></h1>
<p>Welcome to <%= title %></p>
</body>
</html>
运行grunt命令:
grunt stylus自动生成一个文件:
public/stylesheets/demo.css
打开浏览器:localhost:3000
5. 基于grunt自动处理
接下来通过grunt wath配置自动更新。
下载grunt-contrib-watch插件
~ D:\workspace\javascript\nodejs-stylus>npm install grunt-contrib-watch --save-dev修改Gruntfile.js文件,增加watch的配置
module.exports = function (grunt) {
grunt.initConfig({
pkg: grunt.file.readJSON('package.json'),
stylus: {
compile: {
files: {
'public/stylesheets/demo.css': ['public/stylus/*.styl']
}
}
},
watch: {
scripts: {
files: ['public/stylus/demo.styl'],
tasks: ['stylus']
}
}
});
grunt.loadNpmTasks('grunt-contrib-stylus');
grunt.loadNpmTasks('grunt-contrib-watch');
grunt.registerTask('default', ['stylus']);
}
接下来,我们启动两个命令窗口,一个用于grunt watch,一个用于supervisor.
~ D:\workspace\javascript\nodejs-stylus>grunt watch
~ D:\workspace\javascript\nodejs-stylus>supervisor app.js

修改demo.styl
~ vi public/stylus/demo.styl
body
color red
background gray
pad(n)
padding (- n)
body
pad(5px)
点击保存后。
grunt watch日志
OK
>> File "public\stylus\demo.styl" changed.
Running "stylus:compile" (stylus) task
File public\stylesheets\demo.css created.
Done, without errors.
Completed in 0.825s at Mon Sep 02 2013 15:06:21 GMT+0800 (中国标准时间) - Waiting...
supervisro日志
GET / 200 0ms - 205b
GET /stylesheets/demo.css 200 13ms - 57b
刷新页面: http://localhost:3000/
我们实现了,stylus与express3开发的自动集成!
到目前为止,就像学一门新语言一样,还是晕头转向!Stylus很强大,但是能不能真正被用起来,还需要我们更多的探索。
5. 在线体验和资源
作者提供了在线体验的应用:http://learnboost.github.io/stylus/try.html
中文资源:http://www.zhangxinxu.com/jq/stylus/
转载请注明出处:
http://blog.fens.me/nodejs-stylus-css/

以上是 【Nodejs教程精选】Stylus让CSS也能编程 的全部内容, 来源链接: utcz.com/a/129816.html