【JS】GraphQL 实践篇一
GraphQL 实践篇一
PatWu16发布于 今天 12:22
Nestjs+GraphQL搭建服务
前面我们介绍了GraphQL的概念和基础知识,这篇文章记录下使用Nestjs+GraphQL搭建Node服务。
安装
npm i --save @nestjs/graphql graphql-tools graphql apollo-server-express注册
// app.module.tsimport { Module } from '@nestjs/common';
import { GraphQLModule } from '@nestjs/graphql';
import { ConfigModule, ConfigService } from 'nestjs-config';
@Module({
imports: [
ConfigModule.load(path.resolve(__dirname, 'config', '**/!(*.d).{ts,js}')),
GraphQLModule.forRootAsync({
imports: [ConfigModule],
useFactory: (config: ConfigService) => config.get('graphql'),
inject: [ConfigService],
})
],})
export class ApplicationModule {}
// src/config/graphql.ts
import * as path from 'path';
export default {
autoSchemaFile: path.join(process.cwd(), 'src/schema.gql'), // 最后生成的`Schema 文件,不可修改`
installSubscriptionHandlers: true, // 启用订阅
};
启动项目,并访问 http://localhost:3000/graphql,我们便可以看到graphql页面。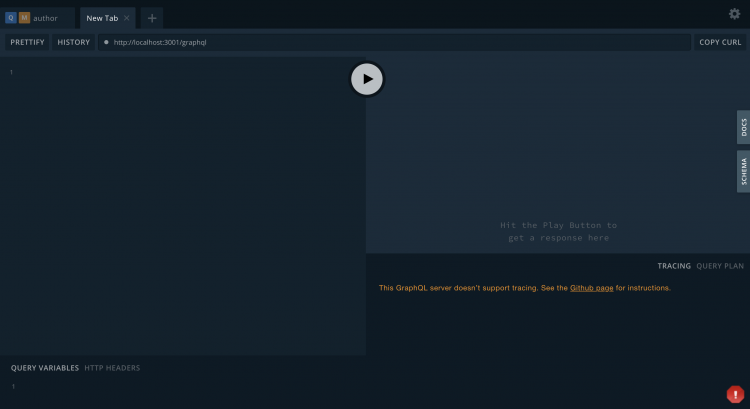
编写服务端逻辑
接下来我们注册一个author模块,目录结构如下: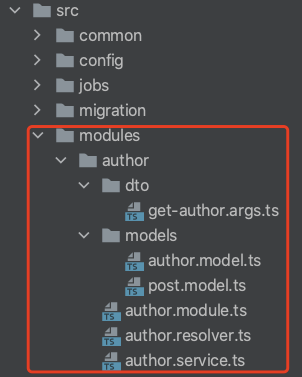
// author.module.tsimport { Module } from '@nestjs/common';
import { AuthorService } from './author.service';
import { AuthorResolver } from './author.resolver';
@Module({
providers: [
AuthorService,
AuthorResolver
]
})
export class AuthorModule {}
// author.service.ts// 此文件用于写数据库查询等逻辑,我们着重学习GraphQL的使用,故此处不做相关Demo
import { Injectable } from '@nestjs/common';
@Injectable()
export class AuthorService {
async findOneById() {}
}
// author.resolver.tsimport { Args, Mutation, Query, Resolver, Subscription, ResolveField, Parent, Int } from '@nestjs/graphql';
import { PubSub } from 'graphql-subscriptions';
import { Author } from './models/author.model';
import { Post } from './models/post.model';
import { AuthorService } from './author.service';
// import { GetAuthorArgs } from './dto/get-author.args';
const pubSub = new PubSub();
@Resolver(() => Author)
export class AuthorResolver {
constructor(
private authorsService: AuthorService
) {}
// 根据id查询作者信息
@Query(returns => Author, {
name: 'author',
description: 'get author info by id',
nullable: false
})
async getAuthor(@Args('id', {
type: () => Int,
description: 'author id',
nullable: false
}) id: number): Promise<any> {
// return this.authorsService.findOneById(id);
return {
id,
firstName: 'wu',
lastName: 'pat',
};
}
// 使用DTO接受参数
// @Query(returns => Author)
// async getAuthor(@Args() args: GetAuthorArgs) {
// return this.authorsService.findOneById(args);
// }
// 修改作者信息
@Mutation(returns => Author, {
name: 'changeAuthor',
description: 'change author info by id',
nullable: false
})
async changeAuthor(
@Args('id') id: number,
@Args('firstName') firstName: string,
@Args('lastName') lastName: string,
): Promise<any> {
// return this.authorsService.findOneById(id);
return {
id,
firstName,
lastName,
};
}
// 解析posts字段
@ResolveField()
async posts(@Parent() author: Author): Promise<any> {
const { id } = author;
// return this.postsService.findAll({ authorId: id });
return [{
id: 4,
title: 'hello',
votes: 2412,
}];
}
// 新增文章
@Mutation(returns => Post)
async addPost() {
const newPost = {
id: 1,
title: '新增文章'
};
// 新增成功后,通知更新
await pubSub.publish('postAdded', { postAdded: newPost });
return newPost;
}
// 监听变更
@Subscription(returns => Post, {
name: 'postAdded',
// filter: (payload, variables) => payload.postAdded.title === variables.title,
// 过滤订阅
// resolve(this: AuthorResolver, value) { // 修改payload参数
// return value;
// } })
async postAdded(/*@Args('title') title: string*/) {
return (await pubSub.asyncIterator('postAdded'));
}}
// author.model.tsimport { Field, Int, ObjectType } from '@nestjs/graphql';
import { Post } from './post.model';
@ObjectType({ description: 'Author model' })
export class Author {
@Field(type => Int, {
description: '作者id'
})
id: number;
@Field({
nullable: true,
description: '作者姓姓氏'
})
firstName?: string;
@Field({
nullable: true,
description: '作者姓名字'
})
lastName?: string;
// 要声明数组的项(而不是数组本身)是可为空的,请将nullable属性设置'items'
// 如果数组及其项都是可空的,则设置nullable为'itemsAndList'
@Field(type => [Post], {
nullable: 'items',
description: '作者发表的文章'
})
posts: Post[];
}
// posts.model.tsimport { Field, Int, ObjectType } from '@nestjs/graphql';
@ObjectType()
export class Post {
@Field(type => Int)
id: number;
@Field() title: string;
@Field(type => Int, {
nullable: true
})
votes?: number;
}
上面的代码包含了查询、变更、订阅类型,此时我们会发现src下面新增了一个文件schema.gql,这个文件就是自动生成的类型文件:
# ------------------------------------------------------# THIS FILE WAS AUTOMATICALLY GENERATED (DO NOT MODIFY)
# ------------------------------------------------------
type Post {
id: Int!
title: String!
votes: Int
}
"""Author model"""
type Author {
"""作者id"""
id: Int!
"""作者姓姓氏"""
firstName: String
"""作者姓名字"""
lastName: String
"""作者发表的文章"""
posts: [Post]!
}
type Query {
"""get author info by id"""
author(
"""author id"""
id: Int!
): Author!
}
type Mutation {
"""change author info by id"""
changeAuthor(lastName: String!, firstName: String!, id: Float!): Author!
addPost: Post!
}
type Subscription {
postAdded: Post!
}
执行查询
这时我们的服务已经运行起来,可以执行查询了。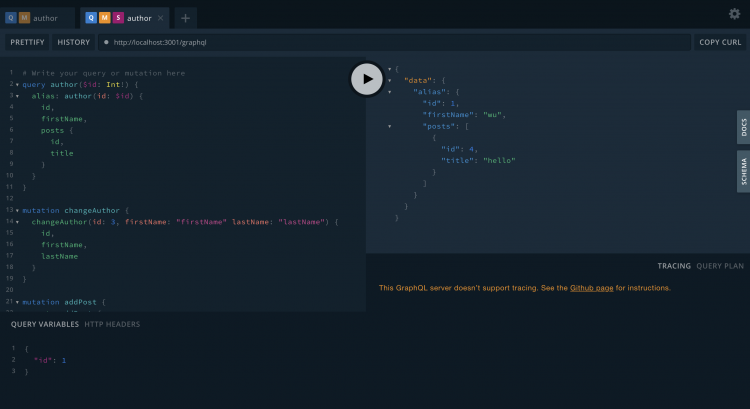
# 左下角编写QUERY VARIABLES{
"id": 1
}
# Write your query or mutation here# 查询作者信息
query author($id: Int!) {
alias: author(id: $id) {
id,
firstName,
posts {
id,
title
}
}
}
# 修改作者信息
mutation changeAuthor {
changeAuthor(id: 3, firstName: "firstName" lastName: "lastName") {
id,
firstName,
lastName
}
}
# 发布文章
mutation addPost {
post: addPost {
id,
title
}
}
# 订阅文章新增
subscription postAdded{
postAdded {
id,
title
}
}
// 自省查询
query schema{
__schema {
types {
name
}
}
}
至此,我们的Nestjs+GraphQL服务便搭建完成,给自己一个👍!
javascriptnode.jsgraphqlnestjs
阅读 40发布于 今天 12:22
本作品系原创,采用《署名-非商业性使用-禁止演绎 4.0 国际》许可协议
PatWu16
13 声望
0 粉丝
PatWu16
13 声望
0 粉丝
宣传栏
Nestjs+GraphQL搭建服务
前面我们介绍了GraphQL的概念和基础知识,这篇文章记录下使用Nestjs+GraphQL搭建Node服务。
安装
npm i --save @nestjs/graphql graphql-tools graphql apollo-server-express注册
// app.module.tsimport { Module } from '@nestjs/common';
import { GraphQLModule } from '@nestjs/graphql';
import { ConfigModule, ConfigService } from 'nestjs-config';
@Module({
imports: [
ConfigModule.load(path.resolve(__dirname, 'config', '**/!(*.d).{ts,js}')),
GraphQLModule.forRootAsync({
imports: [ConfigModule],
useFactory: (config: ConfigService) => config.get('graphql'),
inject: [ConfigService],
})
],})
export class ApplicationModule {}
// src/config/graphql.ts
import * as path from 'path';
export default {
autoSchemaFile: path.join(process.cwd(), 'src/schema.gql'), // 最后生成的`Schema 文件,不可修改`
installSubscriptionHandlers: true, // 启用订阅
};
启动项目,并访问 http://localhost:3000/graphql,我们便可以看到graphql页面。
编写服务端逻辑
接下来我们注册一个author模块,目录结构如下:
// author.module.tsimport { Module } from '@nestjs/common';
import { AuthorService } from './author.service';
import { AuthorResolver } from './author.resolver';
@Module({
providers: [
AuthorService,
AuthorResolver
]
})
export class AuthorModule {}
// author.service.ts// 此文件用于写数据库查询等逻辑,我们着重学习GraphQL的使用,故此处不做相关Demo
import { Injectable } from '@nestjs/common';
@Injectable()
export class AuthorService {
async findOneById() {}
}
// author.resolver.tsimport { Args, Mutation, Query, Resolver, Subscription, ResolveField, Parent, Int } from '@nestjs/graphql';
import { PubSub } from 'graphql-subscriptions';
import { Author } from './models/author.model';
import { Post } from './models/post.model';
import { AuthorService } from './author.service';
// import { GetAuthorArgs } from './dto/get-author.args';
const pubSub = new PubSub();
@Resolver(() => Author)
export class AuthorResolver {
constructor(
private authorsService: AuthorService
) {}
// 根据id查询作者信息
@Query(returns => Author, {
name: 'author',
description: 'get author info by id',
nullable: false
})
async getAuthor(@Args('id', {
type: () => Int,
description: 'author id',
nullable: false
}) id: number): Promise<any> {
// return this.authorsService.findOneById(id);
return {
id,
firstName: 'wu',
lastName: 'pat',
};
}
// 使用DTO接受参数
// @Query(returns => Author)
// async getAuthor(@Args() args: GetAuthorArgs) {
// return this.authorsService.findOneById(args);
// }
// 修改作者信息
@Mutation(returns => Author, {
name: 'changeAuthor',
description: 'change author info by id',
nullable: false
})
async changeAuthor(
@Args('id') id: number,
@Args('firstName') firstName: string,
@Args('lastName') lastName: string,
): Promise<any> {
// return this.authorsService.findOneById(id);
return {
id,
firstName,
lastName,
};
}
// 解析posts字段
@ResolveField()
async posts(@Parent() author: Author): Promise<any> {
const { id } = author;
// return this.postsService.findAll({ authorId: id });
return [{
id: 4,
title: 'hello',
votes: 2412,
}];
}
// 新增文章
@Mutation(returns => Post)
async addPost() {
const newPost = {
id: 1,
title: '新增文章'
};
// 新增成功后,通知更新
await pubSub.publish('postAdded', { postAdded: newPost });
return newPost;
}
// 监听变更
@Subscription(returns => Post, {
name: 'postAdded',
// filter: (payload, variables) => payload.postAdded.title === variables.title,
// 过滤订阅
// resolve(this: AuthorResolver, value) { // 修改payload参数
// return value;
// } })
async postAdded(/*@Args('title') title: string*/) {
return (await pubSub.asyncIterator('postAdded'));
}}
// author.model.tsimport { Field, Int, ObjectType } from '@nestjs/graphql';
import { Post } from './post.model';
@ObjectType({ description: 'Author model' })
export class Author {
@Field(type => Int, {
description: '作者id'
})
id: number;
@Field({
nullable: true,
description: '作者姓姓氏'
})
firstName?: string;
@Field({
nullable: true,
description: '作者姓名字'
})
lastName?: string;
// 要声明数组的项(而不是数组本身)是可为空的,请将nullable属性设置'items'
// 如果数组及其项都是可空的,则设置nullable为'itemsAndList'
@Field(type => [Post], {
nullable: 'items',
description: '作者发表的文章'
})
posts: Post[];
}
// posts.model.tsimport { Field, Int, ObjectType } from '@nestjs/graphql';
@ObjectType()
export class Post {
@Field(type => Int)
id: number;
@Field() title: string;
@Field(type => Int, {
nullable: true
})
votes?: number;
}
上面的代码包含了查询、变更、订阅类型,此时我们会发现src下面新增了一个文件schema.gql,这个文件就是自动生成的类型文件:
# ------------------------------------------------------# THIS FILE WAS AUTOMATICALLY GENERATED (DO NOT MODIFY)
# ------------------------------------------------------
type Post {
id: Int!
title: String!
votes: Int
}
"""Author model"""
type Author {
"""作者id"""
id: Int!
"""作者姓姓氏"""
firstName: String
"""作者姓名字"""
lastName: String
"""作者发表的文章"""
posts: [Post]!
}
type Query {
"""get author info by id"""
author(
"""author id"""
id: Int!
): Author!
}
type Mutation {
"""change author info by id"""
changeAuthor(lastName: String!, firstName: String!, id: Float!): Author!
addPost: Post!
}
type Subscription {
postAdded: Post!
}
执行查询
这时我们的服务已经运行起来,可以执行查询了。
# 左下角编写QUERY VARIABLES{
"id": 1
}
# Write your query or mutation here# 查询作者信息
query author($id: Int!) {
alias: author(id: $id) {
id,
firstName,
posts {
id,
title
}
}
}
# 修改作者信息
mutation changeAuthor {
changeAuthor(id: 3, firstName: "firstName" lastName: "lastName") {
id,
firstName,
lastName
}
}
# 发布文章
mutation addPost {
post: addPost {
id,
title
}
}
# 订阅文章新增
subscription postAdded{
postAdded {
id,
title
}
}
// 自省查询
query schema{
__schema {
types {
name
}
}
}
至此,我们的Nestjs+GraphQL服务便搭建完成,给自己一个👍!
以上是 【JS】GraphQL 实践篇一 的全部内容, 来源链接: utcz.com/a/108058.html




得票时间