容器技术之Docker基础入门Linux

在docker容器里通常只会有一个进程和该进程的子进程,通常该进程的进程编号为1,这也就说明了如果docker容器里进程编号为1的进程宕了,那么该容器也就随之宕掉;docker的镜像是采用的一种“分层构建,联合挂载”的方式实现;将不同功能的镜像通过一定的层次结构进行挂载,组合成一个新的镜像;在docker启动为容器时,它会在该镜像的最上层加上一个可写层;这使得我们可以在容器内部修改某些数据;而保存修改后的数据只会对当前容器有效,如果在用同一镜像启动为其他容器时,我们修改的数据在后面的容器是不存在的,原因就是镜像的每一层都是只读的;只有镜像运行为容器时才会有一层可写层,而该可写层只针对该容器生效;
前文我们了解了下LXC的基础用法以及图形管理工具LXC WEB Panel的简单使用,有兴趣的朋友可以参考https://www.cnblogs.com/qiuhom-1874/p/12904188.html;今天这篇随笔主要是想把docker的相关的基础知识梳理一下;
一、docker和LXC
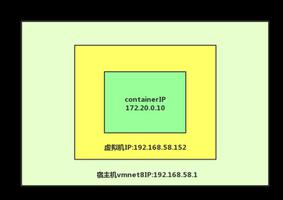
首先我们来说一下docker和传统LXC容器有什么不同。传统LXC是将内核的资源用名称空间的方式将其不同容器的资源,虚拟成多份;使得每个容器间的资源相互隔离;在前边我们也提到过LXC只是容器的一种客户端工具;真正实现容器的是内核功能;而docker和LXC没有本质的不同,都是容器的客户端工具;LXC是使用内核的功能将不同容器间的资源相互隔离,而docker是LXC上的另一种封装;LXC在创建容器时,依赖一个模板,而docker创建容器时,依赖镜像;
从上面的图可看出,LXC容器里跑了很多进程,而docker是一个容器跑一个进程,以及该进程的子进程;LXC更像是系统级容器,而docker更像是进程级容器或者说应用程序级容器;
在docker容器里通常只会有一个进程和该进程的子进程,通常该进程的进程编号为1,这也就说明了如果docker容器里进程编号为1的进程宕了,那么该容器也就随之宕掉;docker的镜像是采用的一种“分层构建,联合挂载”的方式实现;将不同功能的镜像通过一定的层次结构进行挂载,组合成一个新的镜像;在docker启动为容器时,它会在该镜像的最上层加上一个可写层;这使得我们可以在容器内部修改某些数据;而保存修改后的数据只会对当前容器有效,如果在用同一镜像启动为其他容器时,我们修改的数据在后面的容器是不存在的,原因就是镜像的每一层都是只读的;只有镜像运行为容器时才会有一层可写层,而该可写层只针对该容器生效;
二、docker的架构
docker是C/S架构,对于客户端来说主要是docker的命令和其他工具调用docker API;服务端主要是docker守护进程;客户端和服务端是基于http或https协议进行通信;和我们传统的其他服务不同的是,docker的服务端没有监听在TCP或UDP的某个套接字上;它通常是监听在unix sock 套接字上(默认是/var/run/docker.sock),这也意味着客户端和服务端必须在同一主机上;运行docker容器的过程是这样的;客户端通过API调用或者命令键入通过http或https协议将命令发送给docker服务端,docker服务端收到命令后,它首先要检查本地仓库是否有对应版本的镜像,如果有它就会直接将其运行成容器;如果没有它会去指定的rigistry(存放镜像仓库的仓库)中找对应的镜像仓库,然后再去找对应的版本的镜像,通过https协议将其下载到本地仓库中,然后再将其启动为容器;默认情况不指定rigistry的地址时,默认是到dockerhub.com中找对应的镜像仓库中的对应版本镜像;如果没有指定镜像的版本,默认会去找latest版本(最新版本);从上面的过程可以看到docker运行成容器,最核心的是镜像,没有镜像就不可能运行容器;我们可以把镜像理解成应用程序,就好比我们要在电脑上运行某个应用,前提是我们要先安装好应用程序才行;其实docker的镜像就是将应用程序和应用程序依赖的库、文件、环境打包在一起;
三、docker的安装
1、配置yum仓库,默认centos7的extras库里有docker的包,但是版本太低了,如果要使用较新版本的docker可以用阿里云的镜像仓库;配置方法请参考https://developer.aliyun.com/mirror/docker-ce?spm=a2c6h.13651102.0.0.3e221b11mqdEEz;
2、安装docker-ce
[root@node1 yum.repos.d]# yum install -y docker-ceLoaded plugins: fastestmirror
docker-ce-stable | 3.5 kB 00:00
docker-ce-stable/x86_64/primary_db | 42 kB 00:00
Loading mirror speeds from cached hostfile
* base: mirrors.cn99.com
* extras: mirrors.aliyun.com
* updates: mirrors.aliyun.com
Resolving Dependencies
--> Running transaction check
---> Package docker-ce.x86_64 3:19.03.9-3.el7 will be installed
……省略部分内容
Installed:
docker-ce.x86_64 3:19.03.9-3.el7
Dependency Installed:
audit-libs-python.x86_64 0:2.8.5-4.el7
checkpolicy.x86_64 0:2.5-8.el7
container-selinux.noarch 2:2.119.1-1.c57a6f9.el7
containerd.io.x86_64 0:1.2.13-3.2.el7
docker-ce-cli.x86_64 1:19.03.9-3.el7
libcgroup.x86_64 0:0.41-21.el7
libsemanage-python.x86_64 0:2.5-14.el7
policycoreutils-python.x86_64 0:2.5-34.el7
python-IPy.noarch 0:0.75-6.el7
setools-libs.x86_64 0:3.3.8-4.el7
Dependency Updated:
audit.x86_64 0:2.8.5-4.el7
audit-libs.x86_64 0:2.8.5-4.el7
libselinux.x86_64 0:2.5-15.el7
libselinux-python.x86_64 0:2.5-15.el7
libselinux-utils.x86_64 0:2.5-15.el7
libsemanage.x86_64 0:2.5-14.el7
libsepol.x86_64 0:2.5-10.el7
policycoreutils.x86_64 0:2.5-34.el7
selinux-policy.noarch 0:3.13.1-266.el7
selinux-policy-targeted.noarch 0:3.13.1-266.el7
Complete!
[root@node1 yum.repos.d]#
3、启动docker
[root@node1 yum.repos.d]# systemctl start docker
4、添加docker加速器
[root@node1 yum.repos.d]# cd /etc/docker/[root@node1 docker]# cat >> daemon.json << EOF
> {
> "registry-mirrors": ["https://cyr1uljt.mirror.aliyuncs.com","https://registry.docker-cn.com"]
> }
> EOF
[root@node1 docker]# cat daemon.json
{
"registry-mirrors": ["https://cyr1uljt.mirror.aliyuncs.com","https://registry.docker-cn.com"]
}
[root@node1 docker]# systemctl daemon-reload
[root@node1 docker]# systemctl restart docker
[root@node1 docker]
4、验证docker的版本以及加速器地址
[root@node1 docker]# docker versionClient: Docker Engine - Community
Version: 19.03.9
API version: 1.40
Go version: go1.13.10
Git commit: 9d988398e7
Built: Fri May 15 00:25:27 2020
OS/Arch: linux/amd64
Experimental: false
Server: Docker Engine - Community
Engine:
Version: 19.03.9
API version: 1.40 (minimum version 1.12)
Go version: go1.13.10
Git commit: 9d988398e7
Built: Fri May 15 00:24:05 2020
OS/Arch: linux/amd64
Experimental: false
containerd:
Version: 1.2.13
GitCommit: 7ad184331fa3e55e52b890ea95e65ba581ae3429
runc:
Version: 1.0.0-rc10
GitCommit: dc9208a3303feef5b3839f4323d9beb36df0a9dd
docker-init:
Version: 0.18.0
GitCommit: fec3683
[root@node1 docker]# docker info
Client:
Debug Mode: false
Server:
Containers: 0
Running: 0
Paused: 0
Stopped: 0
Images: 0
Server Version: 19.03.9
Storage Driver: overlay2
Backing Filesystem: xfs
Supports d_type: true
Native Overlay Diff: true
Logging Driver: json-file
Cgroup Driver: cgroupfs
Plugins:
Volume: local
Network: bridge host ipvlan macvlan null overlay
Log: awslogs fluentd gcplogs gelf journald json-file local logentries splunk syslog
Swarm: inactive
Runtimes: runc
Default Runtime: runc
Init Binary: docker-init
containerd version: 7ad184331fa3e55e52b890ea95e65ba581ae3429
runc version: dc9208a3303feef5b3839f4323d9beb36df0a9dd
init version: fec3683
Security Options:
seccomp
Profile: default
Kernel Version: 3.10.0-693.el7.x86_64
Operating System: CentOS Linux 7 (Core)
OSType: linux
Architecture: x86_64
CPUs: 4
Total Memory: 3.686GiB
Name: node1
ID: T6OZ:HBP6:Q5UV:RVBY:RCHM:DX3A:4JWY:QY55:OUEX:NRMN:BMRZ:UGCU
Docker Root Dir: /var/lib/docker
Debug Mode: false
Registry: https://index.docker.io/v1/
Labels:
Experimental: false
Insecure Registries:
127.0.0.0/8
Registry Mirrors:
https://cyr1uljt.mirror.aliyuncs.com/
https://registry.docker-cn.com/
Live Restore Enabled: false
[root@node1 docker]#
提示:可以看到我们安装的docker版本是19.03.9的版本;添加到两条加速器都在registry mirrors中出现了;到此docker的安装和配置就基本完成了;接下来我们来说说一下docker的使用;
四、docker的镜像
1、获取镜像
前面我们说了要想运行docker就必须得有一镜像,镜像是docker容器的最核心之一;那么我们怎么去下载仓库里的镜像呢?docker image pull这个命令是直接从dockerhub仓库中直接下载镜像到本地,首先我们来看看docker image pull 这个命令的帮助文档吧
[root@node1 ~]# docker image pull --helpUsage: docker image pull [OPTIONS] NAME[:TAG|@DIGEST]
Pull an image or a repository from a registry
Options:
-a, --all-tags Download all tagged images in the repository
--disable-content-trust Skip image verification (default true)
--platform string Set platform if server is multi-platform
capable
-q, --quiet Suppress verbose output
[root@node1 ~]#
提示:从上面的帮助信息我们可以了解到,这个命令后面必须要跟一个镜像的名称,表示从dockerhub仓库中下载指定名称的镜像到本地;其中镜像的名称是name:tag的格式,如果只写了镜像名称,默认会下载该镜像的最新版本;其中-a表示下载指定镜像仓库中的所有镜像; --disable-content-trust表示忽略镜像的验证默认是忽略的;-q表示安静模式,不输出多余的下载信息;
下载nginx镜像
[root@node1 ~]# docker image pull nginx:stable-alpinestable-alpine: Pulling from library/nginx
cbdbe7a5bc2a: Pull complete
6ade829cd166: Pull complete
Digest: sha256:2668e65e1a36a749aa8b3a5297eee45504a4efea423ec2affcbbf85e31a9a571
Status: Downloaded newer image for nginx:stable-alpine
docker.io/library/nginx:stable-alpine
[root@node1 ~]#
提示:以上命令表示从dockerhub仓库中下载nginx的stable-alpine版本的镜像到本地;docker image pull这个命令等同docker pull,后者是以前老版本的用法,新版docker为了兼容老版本的docker命令,所以保留了老版本的用法;如果要想从非官方镜像仓库中下载镜像我们可以手动指定其他镜像仓库的地址;如下
[root@node1 ~]# docker image pull hub.c.163.com/public/ubuntu:14.0414.04: Pulling from public/ubuntu
f4ab0b34ba6a: Pull complete
2f0787dc0bfe: Pull complete
54c427d77362: Pull complete
51e87d5424ff: Pull complete
5dfa314e7290: Pull complete
a3ed95caeb02: Pull complete
Digest: sha256:ffc2fc66f8e0bfa4b417b817054d3ebec130c8db44342b8fa394e25779633257
Status: Downloaded newer image for hub.c.163.com/public/ubuntu:14.04
hub.c.163.com/public/ubuntu:14.04
[root@node1 ~]#
查看本地仓库有哪些镜像
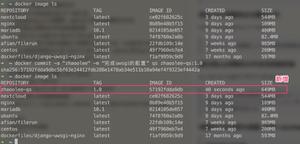
[root@node1 ~]# docker image lsREPOSITORY TAG IMAGE ID CREATED SIZE
nginx stable-alpine ab94f84cc474 3 weeks ago 21.3MB
hub.c.163.com/public/ubuntu 14.04 2fe5c4bba1f9 4 years ago 237MB
[root@node1 ~]# docker images
REPOSITORY TAG IMAGE ID CREATED SIZE
nginx stable-alpine ab94f84cc474 3 weeks ago 21.3MB
hub.c.163.com/public/ubuntu 14.04 2fe5c4bba1f9 4 years ago 237MB
[root@node1 ~]#
提示:docker image ls 该命令是查看本地仓库中的镜像,会把本地已有的镜像列出来;等同docker images这个命令;从上面的信息可以看到我们本地有两个镜像
给镜像打标签
[root@node1 ~]# docker image tag --helpUsage: docker image tag SOURCE_IMAGE[:TAG] TARGET_IMAGE[:TAG]
Create a tag TARGET_IMAGE that refers to SOURCE_IMAGE
[root@node1 ~]#
提示:docker image tag 命令等同 docker tag
[root@node1 ~]# docker image lsREPOSITORY TAG IMAGE ID CREATED SIZE
nginx stable-alpine ab94f84cc474 3 weeks ago 21.3MB
hub.c.163.com/public/ubuntu 14.04 2fe5c4bba1f9 4 years ago 237MB
[root@node1 ~]# docker image tag hub.c.163.com/public/ubuntu:14.04 163.com/ubuntu:14.04
[root@node1 ~]# docker images
REPOSITORY TAG IMAGE ID CREATED SIZE
nginx stable-alpine ab94f84cc474 3 weeks ago 21.3MB
163.com/ubuntu 14.04 2fe5c4bba1f9 4 years ago 237MB
hub.c.163.com/public/ubuntu 14.04 2fe5c4bba1f9 4 years ago 237MB
[root@node1 ~]# docker tag 163.com/ubuntu:14.04 ub:14.04
[root@node1 ~]# docker images
REPOSITORY TAG IMAGE ID CREATED SIZE
nginx stable-alpine ab94f84cc474 3 weeks ago 21.3MB
163.com/ubuntu 14.04 2fe5c4bba1f9 4 years ago 237MB
ub 14.04 2fe5c4bba1f9 4 years ago 237MB
hub.c.163.com/public/ubuntu 14.04 2fe5c4bba1f9 4 years ago 237MB
[root@node1 ~]#
提示:打标签的本质就是在给镜像去别名,从上面的信息可以看到163.com/ubuntu 、ub和hub.c.163.com/ubuntu这三个镜像的ID都是相同的,这意味着这三个镜像是指向同一镜像的;
查看镜像的详细信息
[root@node1 ~]# docker image inspect nginx:stable-alpine[
{
"Id": "sha256:ab94f84cc4744a5addf3c896206e1e666abde0eadc26990d640395cfacae24a5",
"RepoTags": [
"nginx:stable-alpine"
],
"RepoDigests": [
"nginx@sha256:2668e65e1a36a749aa8b3a5297eee45504a4efea423ec2affcbbf85e31a9a571"
],
"Parent": "",
"Comment": "",
"Created": "2020-04-24T12:59:54.146056172Z",
"Container": "5cdc5c83fb963292b8ae3ad7abae5069a88c76e51ae91dfb9f9d7fa604f088e6",
"ContainerConfig": {
"Hostname": "5cdc5c83fb96",
"Domainname": "",
"User": "",
"AttachStdin": false,
"AttachStdout": false,
"AttachStderr": false,
"ExposedPorts": {
"80/tcp": {}
},
"Tty": false,
"OpenStdin": false,
"StdinOnce": false,
"Env": [
"PATH=/usr/local/sbin:/usr/local/bin:/usr/sbin:/usr/bin:/sbin:/bin",
"NGINX_VERSION=1.18.0",
"NJS_VERSION=0.4.0",
"PKG_RELEASE=1"
],
"Cmd": [
"/bin/sh",
"-c",
"#(nop) ",
"CMD ["nginx" "-g" "daemon off;"]"
],
"ArgsEscaped": true,
"Image": "sha256:5d84a370ed482284aad8af6a5ea7bcca5a91c5bf7f8e061f2d336835cd724e6e",
"Volumes": null,
"WorkingDir": "",
"Entrypoint": null,
"OnBuild": null,
"Labels": {
"maintainer": "NGINX Docker Maintainers <docker-maint@nginx.com>"
},
"StopSignal": "SIGTERM"
},
"DockerVersion": "18.09.7",
"Author": "",
"Config": {
"Hostname": "",
"Domainname": "",
"User": "",
"AttachStdin": false,
"AttachStdout": false,
"AttachStderr": false,
"ExposedPorts": {
"80/tcp": {}
},
"Tty": false,
"OpenStdin": false,
"StdinOnce": false,
"Env": [
"PATH=/usr/local/sbin:/usr/local/bin:/usr/sbin:/usr/bin:/sbin:/bin",
"NGINX_VERSION=1.18.0",
"NJS_VERSION=0.4.0",
"PKG_RELEASE=1"
],
"Cmd": [
"nginx",
"-g",
"daemon off;"
],
"ArgsEscaped": true,
"Image": "sha256:5d84a370ed482284aad8af6a5ea7bcca5a91c5bf7f8e061f2d336835cd724e6e",
"Volumes": null,
"WorkingDir": "",
"Entrypoint": null,
"OnBuild": null,
"Labels": {
"maintainer": "NGINX Docker Maintainers <docker-maint@nginx.com>"
},
"StopSignal": "SIGTERM"
},
"Architecture": "amd64",
"Os": "linux",
"Size": 21314634,
"VirtualSize": 21314634,
"GraphDriver": {
"Data": {
"LowerDir": "/var/lib/docker/overlay2/e175dd426f8fc3b61248f51b13ebbcc0130de67cd0b604e6e5c2f4b5776b5568/diff",
"MergedDir": "/var/lib/docker/overlay2/eda604afa15f728fe10851129414b80826b909d1741a969eb3587dcd50bfe0da/merged",
"UpperDir": "/var/lib/docker/overlay2/eda604afa15f728fe10851129414b80826b909d1741a969eb3587dcd50bfe0da/diff",
"WorkDir": "/var/lib/docker/overlay2/eda604afa15f728fe10851129414b80826b909d1741a969eb3587dcd50bfe0da/work"
},
"Name": "overlay2"
},
"RootFS": {
"Type": "layers",
"Layers": [
"sha256:3e207b409db364b595ba862cdc12be96dcdad8e36c59a03b7b3b61c946a5741a",
"sha256:34cf0e74977f5cabe21fd5465978f35ec87b57ed928745a0f2054bc7e1dcbcf9"
]
},
"Metadata": {
"LastTagTime": "0001-01-01T00:00:00Z"
}
}
]
[root@node1 ~]#
提示:使用docker image inspect 命令可以获取指定镜像的详细信息,包括制作作者、架构以及各层次的摘要信息等等信息;该命令等同docker inspect;上面命令返回了一个json格式的数据,很不方便我们查看某个字段的信息,如果想要获取某个字段的信息我们可以使用-f选项来指定要查看的字段;如下
[root@node1 ~]# docker image inspect -f "{{.Config.Cmd}}" nginx:stable-alpine[nginx -g daemon off;]
[root@node1 ~]# docker image inspect -f "{{.RootFS}}" nginx:stable-alpine
{layers [sha256:3e207b409db364b595ba862cdc12be96dcdad8e36c59a03b7b3b61c946a5741a sha256:34cf0e74977f5cabe21fd5465978f35ec87b57ed928745a0f2054bc7e1dcbcf9] }
[root@node1 ~]# docker image inspect -f "{{.RootFS.Type}}" nginx:stable-alpine
layers
[root@node1 ~]#
提示:使用-f指定字段需要注意,需要从"."开始,字段名称需要用双大括号括起来
查看镜像历史
[root@node1 ~]# docker image history nginx:stable-alpineIMAGE CREATED CREATED BY SIZE COMMENT
ab94f84cc474 3 weeks ago /bin/sh -c #(nop) CMD ["nginx" "-g" "daemon… 0B
<missing> 3 weeks ago /bin/sh -c #(nop) STOPSIGNAL SIGTERM 0B
<missing> 3 weeks ago /bin/sh -c #(nop) EXPOSE 80 0B
<missing> 3 weeks ago /bin/sh -c set -x && addgroup -g 101 -S … 15.7MB
<missing> 3 weeks ago /bin/sh -c #(nop) ENV PKG_RELEASE=1 0B
<missing> 3 weeks ago /bin/sh -c #(nop) ENV NJS_VERSION=0.4.0 0B
<missing> 3 weeks ago /bin/sh -c #(nop) ENV NGINX_VERSION=1.18.0 0B
<missing> 3 weeks ago /bin/sh -c #(nop) LABEL maintainer=NGINX Do… 0B
<missing> 4 weeks ago /bin/sh -c #(nop) CMD ["/bin/sh"] 0B
<missing> 4 weeks ago /bin/sh -c #(nop) ADD file:b91adb67b670d3a6f… 5.61MB
[root@node1 ~]#
提示:以上命令表示查看nginx:stable-alpine这个镜像的历史记录,该命令显示了各层镜像都做了哪些操作;各层镜像的创建信息;该命令等同docker history;
搜索镜像
[root@node1 ~]# docker search nginxNAME DESCRIPTION STARS OFFICIAL AUTOMATED
nginx Official build of Nginx. 13212 [OK]
jwilder/nginx-proxy Automated Nginx reverse proxy for docker con… 1806 [OK]
richarvey/nginx-php-fpm Container running Nginx + PHP-FPM capable of… 775 [OK]
linuxserver/nginx An Nginx container, brought to you by LinuxS… 113
bitnami/nginx Bitnami nginx Docker Image 83 [OK]
tiangolo/nginx-rtmp Docker image with Nginx using the nginx-rtmp… 73 [OK]
jc21/nginx-proxy-manager Docker container for managing Nginx proxy ho… 61
nginxdemos/hello NGINX webserver that serves a simple page co… 49 [OK]
jlesage/nginx-proxy-manager Docker container for Nginx Proxy Manager 43 [OK]
nginx/nginx-ingress NGINX Ingress Controller for Kubernetes 31
privatebin/nginx-fpm-alpine PrivateBin running on an Nginx, php-fpm & Al… 25 [OK]
schmunk42/nginx-redirect A very simple container to redirect HTTP tra… 18 [OK]
nginxinc/nginx-unprivileged Unprivileged NGINX Dockerfiles 16
centos/nginx-112-centos7 Platform for running nginx 1.12 or building … 13
centos/nginx-18-centos7 Platform for running nginx 1.8 or building n… 13
blacklabelops/nginx Dockerized Nginx Reverse Proxy Server. 13 [OK]
raulr/nginx-wordpress Nginx front-end for the official wordpress:f… 12 [OK]
nginx/nginx-prometheus-exporter NGINX Prometheus Exporter 12
sophos/nginx-vts-exporter Simple server that scrapes Nginx vts stats a… 7 [OK]
mailu/nginx Mailu nginx frontend 6 [OK]
bitwarden/nginx The Bitwarden nginx web server acting as a r… 5
bitnami/nginx-ingress-controller Bitnami Docker Image for NGINX Ingress Contr… 5 [OK]
wodby/nginx Generic nginx 1 [OK]
ansibleplaybookbundle/nginx-apb An APB to deploy NGINX 1 [OK]
centos/nginx-110-centos7 Platform for running nginx 1.10 or building … 0
[root@node1 ~]# docker search -s 500 nginx
Flag --stars has been deprecated, use --filter=stars=3 instead
NAME DESCRIPTION STARS OFFICIAL AUTOMATED
nginx Official build of Nginx. 13212 [OK]
jwilder/nginx-proxy Automated Nginx reverse proxy for docker con… 1806 [OK]
richarvey/nginx-php-fpm Container running Nginx + PHP-FPM capable of… 775 [OK]
[root@node1 ~]# docker search -s 5000 nginx
Flag --stars has been deprecated, use --filter=stars=3 instead
NAME DESCRIPTION STARS OFFICIAL AUTOMATED
nginx Official build of Nginx. 13212 [OK]
[root@node1 ~]#
提示:-s表示显示指定数以上星级的镜像
删除镜像
[root@node1 ~]# docker imagesREPOSITORY TAG IMAGE ID CREATED SIZE
nginx stable-alpine ab94f84cc474 3 weeks ago 21.3MB
ub 14.04 2fe5c4bba1f9 4 years ago 237MB
hub.c.163.com/public/ubuntu 14.04 2fe5c4bba1f9 4 years ago 237MB
163.com/ubuntu 14.04 2fe5c4bba1f9 4 years ago 237MB
[root@node1 ~]# docker image rm 163.com/ubuntu:14.04
Untagged: 163.com/ubuntu:14.04
[root@node1 ~]# docker image rm ub:14.04
Untagged: ub:14.04
[root@node1 ~]# docker images
REPOSITORY TAG IMAGE ID CREATED SIZE
nginx stable-alpine ab94f84cc474 3 weeks ago 21.3MB
hub.c.163.com/public/ubuntu 14.04 2fe5c4bba1f9 4 years ago 237MB
[root@node1 ~]# docker image rm hub.c.163.com/public/ubuntu:14.04
Untagged: hub.c.163.com/public/ubuntu:14.04
Untagged: hub.c.163.com/public/ubuntu@sha256:ffc2fc66f8e0bfa4b417b817054d3ebec130c8db44342b8fa394e25779633257
Deleted: sha256:2fe5c4bba1f935f179e83cd5354403d1231ffc9df9c1621967194410eaf8d942
Deleted: sha256:085e08b75e744804e23332efb202896749c4aff9433391a775607852d339c26e
Deleted: sha256:7f622f92c76a635c16f506bced3dc1641e9390a26ee9d8cb70f8616c3a21fbdf
Deleted: sha256:ae7b6867bb7b8f3a8235547e0634e7629b4008d807dc768064e760a91413a71f
Deleted: sha256:3eef796012f97f23ffdb11296f6b624a0db4b32eae986da589492b974e6eb596
Deleted: sha256:b268b9bd797e1d58a176fac2a338df41437e853beb5aaa8a4159227fc38c4b72
Deleted: sha256:89688d062a0607fb50d0955de8964659e66f1bb41164b2d2b473d1edd7d8af90
[root@node1 ~]#
提示:如果镜像有多个标签,指定其标签名表示删除该标签,只有当镜像只有一个标签是,才会把镜像完全删除;docker image rm 命令等同docker rmi命令;删除镜像除了可以指定的标签来删除镜像外,还可以指定镜像ID来删除镜像;
将指定镜像运行为容器
[root@node1 ~]# docker imagesREPOSITORY TAG IMAGE ID CREATED SIZE
nginx stable-alpine ab94f84cc474 3 weeks ago 21.3MB
[root@node1 ~]# docker run --name n1 -d nginx:stable-alpine
1b404faab5ba4af597e38a998ad21bca61fe99583234b68882931d766c34ebf3
[root@node1 ~]# docker ps
CONTAINER ID IMAGE COMMAND CREATED STATUS PORTS NAMES
1b404faab5ba nginx:stable-alpine "nginx -g "daemon of…" 6 seconds ago Up 4 seconds 80/tcp n1
[root@node1 ~]#
提示:要想将指定镜像运行成容器,需要使用docker run来运行;--name表示给容器起一个名称,-d表示不占据现有终端,后台运行;docker ps命令是查看当前系统正在运行的容器;该命令等同docker container ls ,如果想要查看当前系统所有容器运行情况,可以使用docker ps -a ,该命令会把运行状态的容器和停止状态的容器一并列出来;
查看刚才创建容器的ip地址
[root@node1 ~]# docker container inspect -f "{{.NetworkSettings.IPAddress}}" n1 172.17.0.2
[root@node1 ~]#
提示:镜像和容器的区别就是,镜像是静态的,容器是把镜像运行起来就叫容器,换句话说容器就是镜像的实例化产物;查看容器的详细信息我们需要使用docker container inspect 该命令同docker image inspect 的用法类似,如果不用-f过滤字段信息,它通常会显示以json格式的所有信息;此时我们就可以使用浏览器访问我们刚才启动的容器里的nginx服务了
[root@node1 ~]# elinks --dump http://172.17.0.2Welcome to nginx!
If you see this page, the nginx web server is successfully installed and
working. Further configuration is required.
For online documentation and support please refer to [1]nginx.org.
Commercial support is available at [2]nginx.com.
Thank you for using nginx.
References
Visible links
1. http://nginx.org/
2. http://nginx.com/
[root@node1 ~]# curl -I http://172.17.0.2
HTTP/1.1 200 OK
Server: nginx/1.18.0
Date: Fri, 22 May 2020 09:00:56 GMT
Content-Type: text/html
Content-Length: 612
Last-Modified: Tue, 21 Apr 2020 15:15:39 GMT
Connection: keep-alive
ETag: "5e9f0e1b-264"
Accept-Ranges: bytes
[root@node1 ~]#
提示:默认启动的容器会把网络接入到docker0桥,该桥是一个nat桥,所以要想访问到容器里的应用服务,需要用docker0桥所在主机去访问(本机),除此之外也可以通过搭建代理或者用在docker0桥上的其他容器又或者将容器里服务的端口暴露给宿主机;
停止容器
[root@node1 ~]# docker psCONTAINER ID IMAGE COMMAND CREATED STATUS PORTS NAMES
444eb763efe0 nginx:stable-alpine "nginx -g "daemon of…" About a minute ago Up About a minute 80/tcp n2
1b404faab5ba nginx:stable-alpine "nginx -g "daemon of…" 20 minutes ago Up 20 minutes 80/tcp n1
[root@node1 ~]# docker container stop n1
n1
[root@node1 ~]# docker ps
CONTAINER ID IMAGE COMMAND CREATED STATUS PORTS NAMES
444eb763efe0 nginx:stable-alpine "nginx -g "daemon of…" 2 minutes ago Up 2 minutes 80/tcp n2
[root@node1 ~]# docker ps -a
CONTAINER ID IMAGE COMMAND CREATED STATUS PORTS NAMES
444eb763efe0 nginx:stable-alpine "nginx -g "daemon of…" 2 minutes ago Up 2 minutes 80/tcp n2
1b404faab5ba nginx:stable-alpine "nginx -g "daemon of…" 21 minutes ago Exited (0) 7 seconds ago n1
[root@node1 ~]#
启动容器
[root@node1 ~]# docker psCONTAINER ID IMAGE COMMAND CREATED STATUS PORTS NAMES
444eb763efe0 nginx:stable-alpine "nginx -g "daemon of…" 2 minutes ago Up 2 minutes 80/tcp n2
[root@node1 ~]# docker container start n1
n1
[root@node1 ~]# docker ps
CONTAINER ID IMAGE COMMAND CREATED STATUS PORTS NAMES
444eb763efe0 nginx:stable-alpine "nginx -g "daemon of…" 2 minutes ago Up 2 minutes 80/tcp n2
1b404faab5ba nginx:stable-alpine "nginx -g "daemon of…" 22 minutes ago Up 2 seconds 80/tcp n1
[root@node1 ~]#
删除容器
[root@node1 ~]# docker container lsCONTAINER ID IMAGE COMMAND CREATED STATUS PORTS NAMES
444eb763efe0 nginx:stable-alpine "nginx -g "daemon of…" 3 minutes ago Up 3 minutes 80/tcp n2
1b404faab5ba nginx:stable-alpine "nginx -g "daemon of…" 23 minutes ago Up About a minute 80/tcp n1
[root@node1 ~]# docker container rm n1
Error response from daemon: You cannot remove a running container 1b404faab5ba4af597e38a998ad21bca61fe99583234b68882931d766c34ebf3. Stop the container before attempting removal or force remove
[root@node1 ~]# docker container stop n1
n1
[root@node1 ~]# docker ps -a
CONTAINER ID IMAGE COMMAND CREATED STATUS PORTS NAMES
444eb763efe0 nginx:stable-alpine "nginx -g "daemon of…" 4 minutes ago Up 4 minutes 80/tcp n2
1b404faab5ba nginx:stable-alpine "nginx -g "daemon of…" 23 minutes ago Exited (0) 5 seconds ago n1
[root@node1 ~]# docker container rm n1
n1
[root@node1 ~]# docker ps -a
CONTAINER ID IMAGE COMMAND CREATED STATUS PORTS NAMES
444eb763efe0 nginx:stable-alpine "nginx -g "daemon of…" 4 minutes ago Up 4 minutes 80/tcp n2
[root@node1 ~]# docker container ls
CONTAINER ID IMAGE COMMAND CREATED STATUS PORTS NAMES
444eb763efe0 nginx:stable-alpine "nginx -g "daemon of…" 5 minutes ago Up 5 minutes 80/tcp n2
[root@node1 ~]#
提示:运行的容器是没法直接删除的,必须先停止容器才行;如果不停止容器要删除容器可以使用-f选项来指定,当然通常我们都不建议这样用;
原文链接:https://www.cnblogs.com/qiuhom-1874/archive/2020/05/22/12933412.html
以上是 容器技术之Docker基础入门Linux 的全部内容, 来源链接: utcz.com/z/516679.html