PHP快速使用RabbitMQ实现项目中部分业务的解耦

步骤:
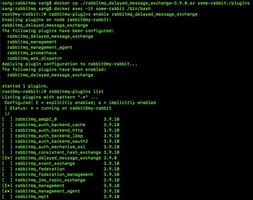
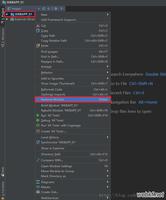
1. Linux安装完rabbitMQ后,没有配置文件,需要去github(https://github.com/rabbitmq/rabbitmq-server/tree/master/docs)上将rabbitmq.conf.example复制下载下来改为rabbitmq.conf。
2. 可以修改默认Vhost和管理员默认账号密码,最重要的是要将管理员开放给所有IP都可以登录(默认是只能是本地可以登录),修改方式如下。
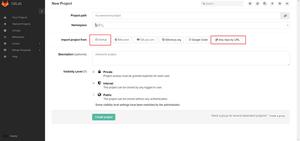
3. 进入到管控台后,先创建vhost,点击admin,侧栏框点击Virtual Hosts。
4. 添加Exchanges,先选择对应的Vhost
5. 添加队列,选择Queues,选择对应的Vhost
6. 队列添加完毕后选择其中一个添加的名称进入。
7. 绑定之前的Exchanges中其中一个,输入exchanges名字和自定义一个路由Key。
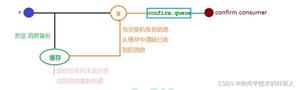
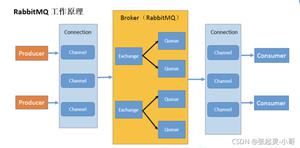
8. 成功后就可以通过PHP代码生产消息到该虚拟机,然后经过交换机路由到该队列中。
<?phpnamespace rabbitmq;
class Amq
{
/**
* @var object 对象实例
*/
protected static $instance;
protected $exchange="router_visit"; // 交换机(需要在队列中绑定)
protected $queue ="visit_log"; // 队列
protected $route ="router_visit"; // 路由key(需要在队列中绑定)
protected $consumer_tag="consumer";
protected $config = [
"host" => "146.53.206.264",
"port" => 5672,
"login" => "guest", //guest
"password" => "guest", //Na18gR@9tf
"vhost" => "log",
"amqp_debug" => true
];
protected $exchange_index = 0;
protected $exchange_type = [
"direct",
"fanout",
"topic",
"headers"
];
/**
* @note 实例化
* @author: beiqiaosu
* @since: 2019/11/13 16:10
*/
public static function getInstance()
{
if (!(self::$instance instanceof self)) {
self::$instance = new self();
}
return self::$instance;
}
/**
* @Notes: 消息生产
*/
public function publisher($message,$config=[]) {
//如果有配置就用新配置
$this->config ["vhost"] = $config["vhost"]?? $this->config ["vhost"];
$this->exchange = $config["exchange"]?? $this->exchange;
$this->queue = $config["queue"]?? $this->queue;
$this->consumer_tag = $config["consumer_tag"]?? $this->consumer_tag;
$this->route = $config["route"]?? $this->route;
$this->exchange_index = $config["exchange_index"]?? $this->exchange_index;
$cnn = new AMQPConnection($this->config);
if (!$cnn->connect()) {
echo "Cannot connect to the broker";
exit();
}
$channel = new AMQPChannel($cnn);
$ex = new AMQPExchange($channel);
$ex->setName($this->exchange);
$ex->setType(AMQP_EX_TYPE_DIRECT); //direct类型
$ex->setFlags(AMQP_DURABLE); //持久化
$ex->declareExchange();
return "Send Message:".$ex->publish($message, $this->route, AMQP_NOPARAM, array("delivery_mode" => 2))."
";
}
/**
* @note 消费
* @author: tata
* @since: 2019/11/13 16:10
*/
public function consumer() {
$exchange="router_visit"; //交换机
$queue ="visit_log"; //队列
$route ="router_visit"; //路由
//连接broker
$cnn = new AMQPConnection($this->config);
if (!$cnn->connect()) {
echo "Cannot connect to the broker";
exit();
}
$channel = new AMQPChannel($cnn);
$ex = new AMQPExchange($channel);
//设置交换机名称
$ex->setName($exchange);
//设置交换机类型
//AMQP_EX_TYPE_DIRECT:直连交换机
//AMQP_EX_TYPE_FANOUT:扇形交换机
//AMQP_EX_TYPE_HEADERS:头交换机
//AMQP_EX_TYPE_TOPIC:主题交换机
$ex->setType(AMQP_EX_TYPE_DIRECT);
//设置交换机持久
$ex->setFlags(AMQP_DURABLE);
//声明交换机
$ex->declareExchange();
//创建一个消息队列
$q = new AMQPQueue($channel);
//设置队列名称
$q->setName($queue);
//设置队列持久
$q->setFlags(AMQP_DURABLE);
//声明消息队列
//$q->declareQueue();
//交换机和队列通过$route进行绑定
$q->bind($exchange, $route);
$ret = $q->consume(function($envelope, $queue) {
// 取出消息主题转为数组
// $origin_data = json_decode($envelope->getBody(),true);
// dump($envelope->getBody());die;
/**对消息主题执行业务**/
$res = true;
/**对消息主题执行业务**/
// 业务处理完毕发送给MQ消费掉该消息
if ($res) $queue->ack($envelope->getDeliveryTag()); //手动发送ACK应答
});
dump($ret);die;
$cnn->disconnect();
}
}
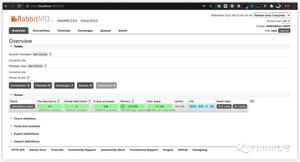
9. 每执行一次生产或消费代码,可以在Queue中的统计或图表中看到,测试代码是否成功。
以上是 PHP快速使用RabbitMQ实现项目中部分业务的解耦 的全部内容, 来源链接: utcz.com/z/516676.html