SpringCloudOpenFeign源码解析

0. 入门demo
- 此代码是
OpenFeign的示例代码,获取一个Github仓库的所有贡献者,创建一个issue。 建议由此开始DEBUG调试阅读源码
interface GitHub { @RequestLine("GET /repos/{owner}/{repo}/contributors")
List<contributor> contributors(@Param("owner") String owner, @Param("repo") String repo);
@RequestLine("POST /repos/{owner}/{repo}/issues")
void createIssue(Issue issue, @Param("owner") String owner, @Param("repo") String repo);
}
public static class Contributor {
String login;
int contributions;
}
public static class Issue {
String title;
String body;
List<string> assignees;
int milestone;
List<string> labels;
}
public class MyApp {
public static void main(String... args) {
GitHub github = Feign.builder()
.decoder(new GsonDecoder())
.target(GitHub.class, "https://api.github.com");
// Fetch and print a list of the contributors to this library.
List<contributor> contributors = github.contributors("OpenFeign", "feign");
for (Contributor contributor : contributors) {
System.out.println(contributor.login + " (" + contributor.contributions + ")");
}
}
}
Feign.build 注入依赖配置项
public Feign build() { SynchronousMethodHandler.Factory synchronousMethodHandlerFactory =
new SynchronousMethodHandler.Factory(client, retryer, requestInterceptors, logger,
logLevel, decode404, closeAfterDecode, propagationPolicy);
ParseHandlersByName handlersByName =
new ParseHandlersByName(contract, options, encoder, decoder, queryMapEncoder,
errorDecoder, synchronousMethodHandlerFactory);
return new ReflectiveFeign(handlersByName, invocationHandlerFactory, queryMapEncoder);
}
调用JDK动态代理生成接口代理类
动态代理生成接口对象
public class ReflectiveFeign extends Feign { @Override
public <t> T newInstance(Target<t> target) {
//使用Contract解析接口类上的方法和注解,转换单独MethodHandler处理
Map<string, methodhandler> nameToHandler = targetToHandlersByName.apply(target);
// 使用DK动态代理为接口生成代理对象,实际业务逻辑交给 InvocationHandler 处理,其实就是调用 MethodHandler
InvocationHandler handler = factory.create(target, methodToHandler);
T proxy = (T) Proxy.newProxyInstance(target.type().getClassLoader(), new Class<!--?-->[]{target.type()}, handler);
return proxy;
}
}
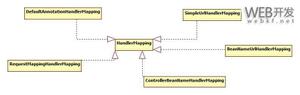
解析接口方法注解信息
- 如何解析上文 Demo 中
Github.contributors方法的注解信息呢。Feign中提供一个Contract解析协议,有如下实现。
默认支持解析逻辑
class Default extends Contract.BaseContract { protected void processAnnotationOnMethod(MethodMetadata data, Annotation methodAnnotation, Method method) {
Class<!--? extends Annotation--> annotationType = methodAnnotation.annotationType();
if (annotationType == RequestLine.class) {
//@RequestLine 注解处理逻辑
} else if (annotationType == Body.class) {
//@Body 注解处理逻辑
} else if (annotationType == Headers.class) {
//@Headers 注解处理逻辑
}
}
protected boolean processAnnotationsOnParameter(MethodMetadata data, Annotation[] annotations, int paramIndex) {
boolean isHttpAnnotation = false;
for (Annotation annotation : annotations) {
Class<!--? extends Annotation--> annotationType = annotation.annotationType();
if (annotationType == Param.class) {
Param paramAnnotation = (Param) annotation;
//@Param 注解处理逻辑
} else if (annotationType == QueryMap.class) {
//@QueryMap 注解处理逻辑
} else if (annotationType == HeaderMap.class) {
//@HeaderMap 注解处理逻辑
}
}
return isHttpAnnotation;
}
}
原生的常用注解
Annotation Interface Target
@RequestLine
Method
@Param
Parameter
@Headers
Method, Type
@QueryMap
Parameter
@HeaderMap
Parameter
@Body
Method
Spring MVC 扩展注解
- SpringMvcContract 为
spring-cloud-open-feign的扩展支持SpringMVC注解,现feign版本也已支持
public class SpringMvcContract { // 处理类上的 @RequestMapping
@Override
protected void processAnnotationOnClass(MethodMetadata data, Class<!--?--> clz) {
if (clz.getInterfaces().length == 0) {
RequestMapping classAnnotation = findMergedAnnotation(clz,
RequestMapping.class);
}
}
// 处理 @RequestMapping 注解,当然也支持衍生注解 @GetMapping @PostMapping 等处理
@Override
protected void processAnnotationOnMethod(MethodMetadata data,
Annotation methodAnnotation, Method method) {
if (!RequestMapping.class.isInstance(methodAnnotation) && !methodAnnotation
.annotationType().isAnnotationPresent(RequestMapping.class)) {
return;
}
RequestMapping methodMapping = findMergedAnnotation(method, RequestMapping.class);
// 获取请求方法
RequestMethod[] methods = methodMapping.method();
// produce处理
parseProduces(data, method, methodMapping);
// consumes处理
parseConsumes(data, method, methodMapping);
// headers头处理
parseHeaders(data, method, methodMapping);
data.indexToExpander(new LinkedHashMap<integer, param.expander>());
}
// 处理 请求参数 SpringMVC 原生注解
@Override
protected boolean processAnnotationsOnParameter(MethodMetadata data,
Annotation[] annotations, int paramIndex) {
Param.Expander expander = this.convertingExpanderFactory
.getExpander(typeDescriptor);
if (expander != null) {
data.indexToExpander().put(paramIndex, expander);
}
return isHttpAnnotation;
}
}
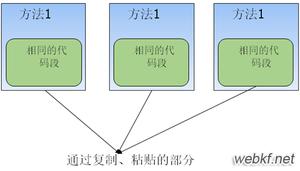
MethodHandler 请求处理逻辑
MethodHandler 路由
如上图, 根据不同的请求方法路由到不同的 MethodHandler 实现
final class SynchronousMethodHandler implements MethodHandler { @Override
public Object invoke(Object[] argv) throws Throwable {
// 获取请求模板
RequestTemplate template = buildTemplateFromArgs.create(argv);
// 参数处理
Options options = findOptions(argv);
// 默认的重试器
Retryer retryer = this.retryer.clone();
while (true) {
try {
// 执行请求拦截器
Request request = targetRequest(template);
// 输出请求报文
if (logLevel != Logger.Level.NONE) {
logger.logRequest(metadata.configKey(), logLevel, request);
}
Response response = client.execute(request, options);
// 根据返回的状态码 ,做 Decode 处理
...
return response;
} catch (RetryableException e) {
// 执行重试的相关逻辑
}
}
}
}
根据不同参数构建请求模板
- 表单提交 、还是直接body 提交
执行请求拦截器生成最终Request
// 获取全部的请求拦截器,一个个执行 Request targetRequest(RequestTemplate template) {
for (RequestInterceptor interceptor : requestInterceptors) {
interceptor.apply(template);
}
return target.apply(template);
}
请求日志处理
- 日志输出级别,配置
public enum Level { /**
* 不输出
*/
NONE,
/**
* 只记录输出Http 方法、URL、状态码、执行时间
*/
BASIC,
/**
* 输出请求头 和 Http 方法、URL、状态码、执行时间
*/
HEADERS,
/**
* 输出请求头、报文体 和 Http 方法、URL、状态码、执行时间
*/
FULL
}
Client 执行最终的Requst 请求
默认default 处理
- 通过JDK 的
java.net包 实现,没请求都会创建连接实现。可以配置成HttpClient或者OKHttp的高性能实现
class Default implements Client { private final SSLSocketFactory sslContextFactory;
private final HostnameVerifier hostnameVerifier;
@Override
public Response execute(Request request, Request.Options options) throws IOException {
HttpURLConnection connection = convertAndSend(request, options);
return convertResponse(connection, request);
}
」
Spring Cloud 的负载均衡处理
// Spring Cloud 的Client 实现public class FeignBlockingLoadBalancerClient {
@Override
public Response execute(Request request, Request.Options options) throws IOException {
// 例如请求: http://pig-auth-server/token/info
final URI originalUri = URI.create(request.url());
// 截取到serviceId: pig-auth-server
String serviceId = originalUri.getHost();
// 调用 loadBalancer API 获取到可以的服务实例
ServiceInstance instance = loadBalancerClient.choose(serviceId);
// 构建真实的请求URL http://172.17.0.110:8763/token/info
String reconstructedUrl = loadBalancerClient.reconstructURI(instance, originalUri)
.toString();
// 创建请求 并执行
Request newRequest = Request.create(request.httpMethod(), reconstructedUrl,
request.headers(), request.requestBody());
return delegate.execute(newRequest, options);
}
}
返回报文Decoder 处理
- 默认处理
class Default implements Encoder { @Override
public void encode(Object object, Type bodyType, RequestTemplate template) {
if (bodyType == String.class) {
template.body(object.toString());
} else if (bodyType == byte[].class) {
template.body((byte[]) object, null);
} else if (object != null) {
throw new EncodeException(
format("%s is not a type supported by this encoder.", object.getClass()));
}
}
}
- 若是返回报文报错处理
public static class Default implements ErrorDecoder { private final RetryAfterDecoder retryAfterDecoder = new RetryAfterDecoder();
@Override
public Exception decode(String methodKey, Response response) {
FeignException exception = errorStatus(methodKey, response);
Date retryAfter = retryAfterDecoder.apply(firstOrNull(response.headers(), RETRY_AFTER));
if (retryAfter != null) {
return new RetryableException(
response.status(),
exception.getMessage(),
response.request().httpMethod(),
exception,
retryAfter,
response.request());
}
return exception;
}
private <t> T firstOrNull(Map<string, collection<t>> map, String key) {
if (map.containsKey(key) && !map.get(key).isEmpty()) {
return map.get(key).iterator().next();
}
return null;
}
}
}
注入 自定义的 ErrorDecoder 比较常用。
以上内容为 OpenFeign 的请求处理流程,下面为扩展内容 spring-cloud-open-feign 是如何初始化及其运行的呢?
【扩展】 Spring Cloud OpenFeign
EnableFeignClients 解析
@Retention(RetentionPolicy.RUNTIME)@Target(ElementType.TYPE)
@Documented
@Import(FeignClientsRegistrar.class)
public @interface EnableFeignClients {
}
- 当我们在 Main 方法,加上
@EnableFeignClients注解,则开启了spring-cloud-open-feign的相关功能。 Import(FeignClientsRegistrar.class)导入FeignClientsRegistrar,扫描@FeignClient注入到容器
FeignClientsRegistrar
class FeignClientsRegistrar { @Override
public void registerBeanDefinitions(AnnotationMetadata metadata,
BeanDefinitionRegistry registry) {
registerFeignClients(metadata, registry);
}
public void registerFeignClients(AnnotationMetadata metadata,
BeanDefinitionRegistry registry) {
// 扫描配置注解中配置范围内的 @FeignClient
for (String basePackage : basePackages) {
// 注入IOC 容器
registerClientConfiguration(registry, name,
attributes.get("configuration"));
}
}
//feignclient <--> bean 构造
private void registerFeignClient(BeanDefinitionRegistry registry,
AnnotationMetadata annotationMetadata, Map<string, object> attributes) {
String className = annotationMetadata.getClassName();
BeanDefinitionBuilder definition = BeanDefinitionBuilder
.genericBeanDefinition(FeignClientFactoryBean.class);
validate(attributes);
definition.addPropertyValue("url", getUrl(attributes));
definition.addPropertyValue("path", getPath(attributes));
String name = getName(attributes);
definition.addPropertyValue("name", name);
String contextId = getContextId(attributes);
definition.addPropertyValue("contextId", contextId);
definition.addPropertyValue("type", className);
definition.addPropertyValue("decode404", attributes.get("decode404"));
definition.addPropertyValue("fallback", attributes.get("fallback"));
definition.addPropertyValue("fallbackFactory", attributes.get("fallbackFactory"));
definition.setAutowireMode(AbstractBeanDefinition.AUTOWIRE_BY_TYPE);
...
BeanDefinitionHolder holder = new BeanDefinitionHolder(beanDefinition, className,
new String[] { alias });
BeanDefinitionReaderUtils.registerBeanDefinition(holder, registry);
}
}
默认情况
public class FeignAutoConfiguration { // 未引入 feign-hystrix 模块,则还是注入 DefaultTargeter
@Configuration(proxyBeanMethods = false)
@ConditionalOnMissingClass("feign.hystrix.HystrixFeign")
protected static class DefaultFeignTargeterConfiguration {
@Bean
@ConditionalOnMissingBean
public Targeter feignTargeter() {
return new DefaultTargeter();
}
}
}
未引入 feign-hystrix 则还是上文的流程就同最初的流程一致 , 我们在调用 feignclient.method 会触发动态代理,执行 MethodHandler 的逻辑
HystrixFeign
- 首先,引入了
HystrixFeign,是不是意味逻辑变得更了呢
最初 0. 入门DemoFeign.builder(),就变成了 HystrixFeign.builder()
public final class HystrixFeign { public static Builder builder() {
return new Builder();
}
public static final class Builder extends Feign.Builder {
// 注入 HystrixInvocationHandler 的实现
Feign build(final FallbackFactory<!--?--> nullableFallbackFactory) {
super.invocationHandlerFactory(new InvocationHandlerFactory() {
@Override
public InvocationHandler create(Target target,
Map<method, methodhandler> dispatch) {
return new HystrixInvocationHandler(target, dispatch, setterFactory,
nullableFallbackFactory);
}
});
super.contract(new HystrixDelegatingContract(contract));
return super.build();
}
}
}
- 注入
HystrixInvocationHandler的实现,使用HystrixCommand 包装,最终还是使用methodhandler 去调用最终的接口
final class HystrixInvocationHandler implements InvocationHandler { @Override
public Object invoke(final Object proxy, final Method method, final Object[] args)
throws Throwable {
// 使用HystrixCommand 包装
HystrixCommand<object> hystrixCommand =
new HystrixCommand<object>(setterMethodMap.get(method)) {
@Override
protected Object run() throws Exception {
try {
// 调用 methodhandler 处理最终的请求
return HystrixInvocationHandler.this.dispatch.get(method).invoke(args);
} catch (Exception e) {
throw e;
} catch (Throwable t) {
throw (Error) t;
}
}
};
return hystrixCommand.execute();
}
}
SentinelFeign
- 先看类注释
like {@link HystrixFeign.Builder},"借鉴" HystrixFeign
/** * {@link Feign.Builder} like {@link HystrixFeign.Builder}.
*/
public final class SentinelFeign {
}
- 注入
SentinelInvocationHandler的实现,使用Sentinel包装,最终还是使用methodhandler 去调用最终的接口
public class SentinelInvocationHandler implements InvocationHandler { @Override
public Object invoke(final Object proxy, final Method method, final Object[] args)
throws Throwable {
// 使用sentinel 包装请求
try {
ContextUtil.enter(resourceName);
entry = SphU.entry(resourceName, EntryType.OUT, 1, args);
result = methodHandler.invoke(args);
}
catch (Throwable ex) {
// fallback 逻辑
}
finally {
ContextUtil.exit();
}
return result;
}
}
总结时序图
后续计划
欢迎关注我,后边更新 Ribbon、Hystrix、Sentinel、Nacos 等组件源码图文解析。
> 项目推荐: Spring Cloud 、Spring Security OAuth2的RBAC权限管理系统 欢迎关注
</object></object></method,></string,></string,></t></integer,></string,></t></t></contributor></string></string></contributor>
以上是 SpringCloudOpenFeign源码解析 的全部内容, 来源链接: utcz.com/z/513561.html