SpringSecurity默认表单登录页展示流程源码

1.准备工作(体验SpringSecurity默认表单认证)
1.1 创建SpringSecurity项目
先通过IDEA 创建一个SpringBoot项目 并且依赖SpringSecurity,Web依赖
此时pom.xml会自动添加
<dependency> <groupId>org.springframework.boot</groupId>
<artifactId>spring-boot-starter-security</artifactId>
</dependency>
1.2 提供一个接口
@RestControllerpublic class HelloController {
@RequestMapping("/hello")
public String hello() {
return "Hello SpringSecurity";
}
}
1.3 启动项目
直接访问 提供的接口
http://localhost:8080/hello会发现浏览器被直接重定向到了 /login 并且显示如下默认的表单登录页
http://localhost:8080/login1.4 登录
在启动项目的时候 控制台会打印一个 seuciryt password : xxx
Using generated security password: f520875f-ea2b-4b5d-9b0c-f30c0c17b90b直接登录
用户名:user 密码 :f520875f-ea2b-4b5d-9b0c-f30c0c17b90b 登录成功并且 浏览器又会重定向到 刚刚访问的接口
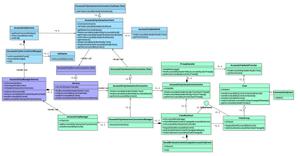
2.springSecurityFilterchain 过滤器链
如果你看过我另一篇关于SpringSecurity初始化源码的博客,那么你一定知道当SpringSecurity项目启动完成后会初始化一个 springSecurityFilterchain 它内部 additionalFilters属性初始化了很多Filter 如下
所有的请求都会经过这一系列的过滤器 Spring Security就是通过这些过滤器 来进行认证授权等
3.FilterSecurityInterceptor (它会判断这次请求能否通过)
FilterSecurityInterceptor是过滤器链中最后一个过滤器,主要用于判断请求能否通过,内部通过AccessDecisionManager 进行投票判断
当我们未登录访问
http://localhost:8080/hello请求会被 FilterSecurityInterceptor 拦截
public void doFilter(ServletRequest request, ServletResponse response, FilterChain chain) throws IOException, ServletException {
FilterInvocation fi = new FilterInvocation(request, response, chain);
invoke(fi);
}
重点看invoke方法
public void invoke(FilterInvocation fi) throws IOException, ServletException { if ((fi.getRequest() != null)
&& (fi.getRequest().getAttribute(FILTER_APPLIED) != null)
&& observeOncePerRequest) {
// filter already applied to this request and user wants us to observe
// once-per-request handling, so don"t re-do security checking
fi.getChain().doFilter(fi.getRequest(), fi.getResponse());
}
else {
// first time this request being called, so perform security checking
if (fi.getRequest() != null && observeOncePerRequest) {
fi.getRequest().setAttribute(FILTER_APPLIED, Boolean.TRUE);
}
InterceptorStatusToken token = super.beforeInvocation(fi);
try {
fi.getChain().doFilter(fi.getRequest(), fi.getResponse());
}
finally {
super.finallyInvocation(token);
}
super.afterInvocation(token, null);
}
}
源码中有这样一句,其实就是判断当前用户是否能够访问指定的接口,可以则执行 fi.getChain().doFilter 调用访问的接口
否则 内部会抛出异常
InterceptorStatusToken token = super.beforeInvocation(fi);beforeInvocation 方法内部是通过 accessDecisionManager 去做决定的
Spring Security已经内置了几个基于投票的AccessDecisionManager包括(AffirmativeBased ,ConsensusBased ,UnanimousBased)当然如果需要你也可以实现自己的AccessDecisionManager
使用这种方式,一系列的AccessDecisionVoter将会被AccessDecisionManager用来对Authentication是否有权访问受保护对象进行投票,然后再根据投票结果来决定是否要抛出AccessDeniedException
this.accessDecisionManager.decide(authenticated, object, attributes);AffirmativeBased的 decide的实现如下
public void decide(Authentication authentication, Object object, Collection<ConfigAttribute> configAttributes) throws AccessDeniedException { int deny = 0;
Iterator var5 = this.getDecisionVoters().iterator();
while(var5.hasNext()) {
AccessDecisionVoter voter = (AccessDecisionVoter)var5.next();
int result = voter.vote(authentication, object, configAttributes);
if (this.logger.isDebugEnabled()) {
this.logger.debug("Voter: " + voter + ", returned: " + result);
}
switch(result) {
case -1:
++deny;
break;
case 1:
return;
}
}
if (deny > 0) {
throw new AccessDeniedException(this.messages.getMessage("AbstractAccessDecisionManager.accessDenied", "Access is denied"));
} else {
this.checkAllowIfAllAbstainDecisions();
}
}
AffirmativeBased的逻辑是这样的:
(1)只要有AccessDecisionVoter的投票为ACCESS_GRANTED则同意用户进行访问; (2)如果全部弃权也表示通过;
(3)如果没有一个人投赞成票,但是有人投反对票,则将抛出AccessDeniedException。
当我们第一次访问的时候
http://localhost:8080/hello的时候 返回 result = -1 会抛出 AccessDeniedException 拒绝访问异常
4.ExceptionTranslationFilter (捕获AccessDeniedException异常)
该过滤器它会接收到FilterSecurityInterceptor抛出的 AccessDeniedException异常)并且进行捕获,然后发送重定向到/login请求
源码如下:
public void doFilter(ServletRequest req, ServletResponse res, FilterChain chain) throws IOException, ServletException {
HttpServletRequest request = (HttpServletRequest) req;
HttpServletResponse response = (HttpServletResponse) res;
try {
chain.doFilter(request, response);
logger.debug("Chain processed normally");
}
catch (IOException ex) {
throw ex;
}
catch (Exception ex) {
// Try to extract a SpringSecurityException from the stacktrace
Throwable[] causeChain = throwableAnalyzer.determineCauseChain(ex);
RuntimeException ase = (AuthenticationException) throwableAnalyzer
.getFirstThrowableOfType(AuthenticationException.class, causeChain);
if (ase == null) {
ase = (AccessDeniedException) throwableAnalyzer.getFirstThrowableOfType(
AccessDeniedException.class, causeChain);
}
if (ase != null) {
if (response.isCommitted()) {
throw new ServletException("Unable to handle the Spring Security Exception because the response is already committed.", ex);
}
handleSpringSecurityException(request, response, chain, ase);
}
else {
// Rethrow ServletExceptions and RuntimeExceptions as-is
if (ex instanceof ServletException) {
throw (ServletException) ex;
}
else if (ex instanceof RuntimeException) {
throw (RuntimeException) ex;
}
// Wrap other Exceptions. This shouldn"t actually happen
// as we"ve already covered all the possibilities for doFilter
throw new RuntimeException(ex);
}
}
}
当获取异常后 调用
handleSpringSecurityException(request, response, chain, ase);handleSpringSecurityException 源码如下:
private void handleSpringSecurityException(HttpServletRequest request, HttpServletResponse response, FilterChain chain, RuntimeException exception)
throws IOException, ServletException {
if (exception instanceof AuthenticationException) {
logger.debug(
"Authentication exception occurred; redirecting to authentication entry point",
exception);
sendStartAuthentication(request, response, chain,
(AuthenticationException) exception);
}
else if (exception instanceof AccessDeniedException) {
Authentication authentication = SecurityContextHolder.getContext().getAuthentication();
if (authenticationTrustResolver.isAnonymous(authentication) || authenticationTrustResolver.isRememberMe(authentication)) {
logger.debug(
"Access is denied (user is " + (authenticationTrustResolver.isAnonymous(authentication) ? "anonymous" : "not fully authenticated") + "); redirecting to authentication entry point",
exception);
sendStartAuthentication(
request,
response,
chain,
new InsufficientAuthenticationException(
messages.getMessage(
"ExceptionTranslationFilter.insufficientAuthentication",
"Full authentication is required to access this resource")));
}
else {
logger.debug(
"Access is denied (user is not anonymous); delegating to AccessDeniedHandler",
exception);
accessDeniedHandler.handle(request, response,
(AccessDeniedException) exception);
}
}
}
先判断获取的异常是否是AccessDeniedException 再判断是否是匿名用户,如果是则调用 sendStartAuthentication 重定向到登录页面
重定向登录页面之前会保存当前访问的路径,这就是为什么我们访问 /hello接口后 再登录成功后又会跳转到 /hello接口,因为在重定向到/login接口前 这里进行了保存 requestCache.saveRequest(request, response);
protected void sendStartAuthentication(HttpServletRequest request, HttpServletResponse response, FilterChain chain,
AuthenticationException reason) throws ServletException, IOException {
// SEC-112: Clear the SecurityContextHolder"s Authentication, as the
// existing Authentication is no longer considered valid
SecurityContextHolder.getContext().setAuthentication(null);
requestCache.saveRequest(request, response);
logger.debug("Calling Authentication entry point.");
authenticationEntryPoint.commence(request, response, reason);
}
authenticationEntryPoint.commence(request, response, reason);方法内部
调用LoginUrlAuthenticationEntryPoint 的 commence方法
LoginUrlAuthenticationEntryPoint 的commence方法内部有 构造重定向URL的方法
redirectUrl = buildRedirectUrlToLoginPage(request, response, authException);protected String buildRedirectUrlToLoginPage(HttpServletRequest request,
HttpServletResponse response, AuthenticationException authException) {
String loginForm = determineUrlToUseForThisRequest(request, response,
authException);
protected String determineUrlToUseForThisRequest(HttpServletRequest request,
HttpServletResponse response, AuthenticationException exception) {
return getLoginFormUrl();
}
最终会获取到需要重定向的URL /login
然后sendRedirect 既会重定向到 /login 请求
5.DefaultLoginPageGeneratingFilter (会捕获重定向的/login 请求)
DefaultLoginPageGeneratingFilter是过滤器链中的一个用于捕获/login请求,并且渲染出一个默认表单页面
public void doFilter(ServletRequest req, ServletResponse res, FilterChain chain) throws IOException, ServletException {
HttpServletRequest request = (HttpServletRequest) req;
HttpServletResponse response = (HttpServletResponse) res;
boolean loginError = isErrorPage(request);
boolean logoutSuccess = isLogoutSuccess(request);
if (isLoginUrlRequest(request) || loginError || logoutSuccess) {
String loginPageHtml = generateLoginPageHtml(request, loginError,
logoutSuccess);
response.setContentType("text/html;charset=UTF-8");
response.setContentLength(loginPageHtml.getBytes(StandardCharsets.UTF_8).length);
response.getWriter().write(loginPageHtml);
return;
}
chain.doFilter(request, response);
}
isLoginUrlRequest 判断请求是否是 loginPageUrl
private boolean isLoginUrlRequest(HttpServletRequest request) { return matches(request, loginPageUrl);
}
因为我们没有配置所以 默认的 loginPageUrl = /login
验证通过请求路径 能匹配 loginPageUrl
String loginPageHtml = generateLoginPageHtml(request, loginError, logoutSuccess);
generateLoginPageHtml 绘制默认的HTML 页面,到此我们默认的登录页面怎么来的就解释清楚了
private String generateLoginPageHtml(HttpServletRequest request, boolean loginError, boolean logoutSuccess) {
String errorMsg = "Invalid credentials";
if (loginError) {
HttpSession session = request.getSession(false);
if (session != null) {
AuthenticationException ex = (AuthenticationException) session
.getAttribute(WebAttributes.AUTHENTICATION_EXCEPTION);
errorMsg = ex != null ? ex.getMessage() : "Invalid credentials";
}
}
StringBuilder sb = new StringBuilder();
sb.append("<!DOCTYPE html>
"
+ "<html lang="en">
"
+ " <head>
"
+ " <meta charset="utf-8">
"
+ " <meta name="viewport" content="width=device-width, initial-scale=1, shrink-to-fit=no">
"
+ " <meta name="description" content="">
"
+ " <meta name="author" content="">
"
+ " <title>Please sign in</title>
"
+ " <link href="https://maxcdn.bootstrapcdn.com/bootstrap/4.0.0-beta/css/bootstrap.min.css" rel="stylesheet" integrity="sha384-/Y6pD6FV/Vv2HJnA6t+vslU6fwYXjCFtcEpHbNJ0lyAFsXTsjBbfaDjzALeQsN6M" crossorigin="anonymous">
"
+ " <link href="https://getbootstrap.com/docs/4.0/examples/signin/signin.css" rel="stylesheet" crossorigin="anonymous"/>
"
+ " </head>
"
+ " <body>
"
+ " <div class="container">
");
String contextPath = request.getContextPath();
if (this.formLoginEnabled) {
sb.append(" <form class="form-signin" method="post" action="" + contextPath + this.authenticationUrl + "">
"
+ " <h2 class="form-signin-heading">Please sign in</h2>
"
+ createError(loginError, errorMsg)
+ createLogoutSuccess(logoutSuccess)
+ " <p>
"
+ " <label for="username" class="sr-only">Username</label>
"
+ " <input type="text" id="username" name="" + this.usernameParameter + "" class="form-control" placeholder="Username" required autofocus>
"
+ " </p>
"
+ " <p>
"
+ " <label for="password" class="sr-only">Password</label>
"
+ " <input type="password" id="password" name="" + this.passwordParameter + "" class="form-control" placeholder="Password" required>
"
+ " </p>
"
+ createRememberMe(this.rememberMeParameter)
+ renderHiddenInputs(request)
+ " <button class="btn btn-lg btn-primary btn-block" type="submit">Sign in</button>
"
+ " </form>
");
}
if (openIdEnabled) {
sb.append(" <form name="oidf" class="form-signin" method="post" action="" + contextPath + this.openIDauthenticationUrl + "">
"
+ " <h2 class="form-signin-heading">Login with OpenID Identity</h2>
"
+ createError(loginError, errorMsg)
+ createLogoutSuccess(logoutSuccess)
+ " <p>
"
+ " <label for="username" class="sr-only">Identity</label>
"
+ " <input type="text" id="username" name="" + this.openIDusernameParameter + "" class="form-control" placeholder="Username" required autofocus>
"
+ " </p>
"
+ createRememberMe(this.openIDrememberMeParameter)
+ renderHiddenInputs(request)
+ " <button class="btn btn-lg btn-primary btn-block" type="submit">Sign in</button>
"
+ " </form>
");
}
if (oauth2LoginEnabled) {
sb.append("<h2 class="form-signin-heading">Login with OAuth 2.0</h2>");
sb.append(createError(loginError, errorMsg));
sb.append(createLogoutSuccess(logoutSuccess));
sb.append("<table class="table table-striped">
");
for (Map.Entry<String, String> clientAuthenticationUrlToClientName : oauth2AuthenticationUrlToClientName.entrySet()) {
sb.append(" <tr><td>");
String url = clientAuthenticationUrlToClientName.getKey();
sb.append("<a href="").append(contextPath).append(url).append("">");
String clientName = HtmlUtils.htmlEscape(clientAuthenticationUrlToClientName.getValue());
sb.append(clientName);
sb.append("</a>");
sb.append("</td></tr>
");
}
sb.append("</table>
");
}
if (this.saml2LoginEnabled) {
sb.append("<h2 class="form-signin-heading">Login with SAML 2.0</h2>");
sb.append(createError(loginError, errorMsg));
sb.append(createLogoutSuccess(logoutSuccess));
sb.append("<table class="table table-striped">
");
for (Map.Entry<String, String> relyingPartyUrlToName : saml2AuthenticationUrlToProviderName.entrySet()) {
sb.append(" <tr><td>");
String url = relyingPartyUrlToName.getKey();
sb.append("<a href="").append(contextPath).append(url).append("">");
String partyName = HtmlUtils.htmlEscape(relyingPartyUrlToName.getValue());
sb.append(partyName);
sb.append("</a>");
sb.append("</td></tr>
");
}
sb.append("</table>
");
}
sb.append("</div>
");
sb.append("</body></html>");
return sb.toString();
}
至此 SpringSecurity 默认表单登录页展示流程源码部分已经全部讲解完毕,会渲染出下面的页面,但是一定要有网的情况,否则样式可能会变化
6.总结
本篇主要讲解 SpringSecurity提供的默认表单登录页 它是如何展示的的流程,包括涉及这一流程中相关的 3个过滤器
1.FilterSecurityInterceptor,
2.ExceptionTranslationFilter ,
3.DefaultLoginPageGeneratingFilter 过滤器,
并且简单介绍了一下 AccessDecisionManager 它主要进行投票来判断该用户是否能够访问相应的 资源
AccessDecisionManager 投票机制我也没有深究 后续我会详细深入一下再展开
个人博客系统:https://www.askajohnny.com 欢迎访问!
本文由博客一文多发平台 OpenWrite 发布!
以上是 SpringSecurity默认表单登录页展示流程源码 的全部内容, 来源链接: utcz.com/z/512947.html