Mybatis原理之数据源和连接池

在Java工程项目中,我们常会用到Mybatis框架对数据库中的数据进行增删查改,其原理就是对 JDBC 做了一层封装,并优化数据源的连接。
我们先来回顾下 JDBC 操作数据库的过程。
JDBC操作数据库
JDBC 操作数据库的时候需要指定 连接类型、加载驱动、建立连接、最终执行 SQL 语句,代码如下:
public static final String url = "jdbc:mysql://127.0.0.1/somedb"; public static final String name = "com.mysql.jdbc.Driver";
public static final String user = "root";
public static final String password = "root";
public Connection conn = null;
public PreparedStatement pst = null;
public DBHelper(String sql) {
try {
//指定连接类型
Class.forName(name);
//建立连接
conn = DriverManager.getConnection(url, user, password);
//准备执行语句
pst = conn.prepareStatement(sql);
} catch (Exception e) {
e.printStackTrace();
}
}
public void close() {
try {
this.conn.close();
this.pst.close();
} catch (SQLException e) {
e.printStackTrace();
}
}
一个SQL的执行,如果使用JDBC进行处理,需要经过 加载驱动、建立连接、再执行SQL的一个过程,当下一个SQL到来的时候,还需要进行一次这个流程,这就造成不必要的性能损失,而且随着用户操作的逐渐增多,每次都和数据库建立连接对数据库本身来说也是一种压力。
为了减少这种不必要的消耗,可以对数据的操作进行拆分。在Mybatis中,数据库连接的建立和管理的部分叫做数据库连接池。
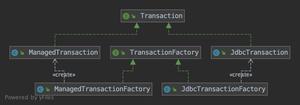
Mybatis数据源DateSource的分类
- UNPOOLED 不使用连接池的数据源
- POOLED 使用连接池的数据源
- JNDI 使用JNDI实现的数据
UNPOOLED
UNPOOLED不使用连接池的数据源,当dateSource的type属性被配置成了UNPOOLED,MyBatis首先会实例化一个UnpooledDataSourceFactory工厂实例,然后通过.getDataSource()方法返回一个UnpooledDataSource实例对象引用,我们假定为dataSource。 使用
UnpooledDataSource的getConnection(),每调用一次就会产生一个新的Connection实例对象。UnPooledDataSource的getConnection()方法实现如下:
public class UnpooledDataSource implements DataSource { private ClassLoader driverClassLoader;
private Properties driverProperties;
private static Map<String, Driver> registeredDrivers = new ConcurrentHashMap();
private String driver;
private String url;
private String username;
private String password;
private Boolean autoCommit;
private Integer defaultTransactionIsolationLevel;
public UnpooledDataSource() {
}
public UnpooledDataSource(String driver, String url, String username, String password){
this.driver = driver;
this.url = url;
this.username = username;
this.password = password;
}
public Connection getConnection() throws SQLException {
return this.doGetConnection(this.username, this.password);
}
private Connection doGetConnection(String username, String password) throws SQLException {
Properties props = new Properties();
if(this.driverProperties != null) {
props.putAll(this.driverProperties);
}
if(username != null) {
props.setProperty("user", username);
}
if(password != null) {
props.setProperty("password", password);
}
return this.doGetConnection(props);
}
private Connection doGetConnection(Properties properties) throws SQLException {
this.initializeDriver();
Connection connection = DriverManager.getConnection(this.url, properties);
this.configureConnection(connection);
return connection;
}
}
如上代码所示,UnpooledDataSource会做以下事情:
初始化驱动: 判断driver驱动是否已经加载到内存中,如果还没有加载,则会动态地加载
driver类,并实例化一个Driver对象,使用DriverManager.registerDriver()方法将其注册到内存中,以供后续使用。创建Connection对象: 使用
DriverManager.getConnection()方法创建连接。配置Connection对象: 设置是否自动提交
autoCommit和隔离级别isolationLevel。返回Connection对象
从上述的代码中可以看到,我们每调用一次
getConnection()方法,都会通过DriverManager.getConnection()返回新的java.sql.Connection实例,所以没有连接池。
- ###
POOLED数据源 连接池
PooledDataSource: 将java.sql.Connection对象包裹成PooledConnection对象放到了PoolState类型的容器中维护。 MyBatis将连接池中的PooledConnection分为两种状态: 空闲状态(idle)和活动状态(active),这两种状态的PooledConnection对象分别被存储到PoolState容器内的**idleConnections和activeConnections**两个List集合中:
idleConnections: 空闲(idle)状态PooledConnection对象被放置到此集合中,表示当前闲置的没有被使用的PooledConnection集合,调用PooledDataSource的getConnection()方法时,会优先从此集合中取PooledConnection对象。当用完一个java.sql.Connection对象时,MyBatis会将其包裹成PooledConnection对象放到此集合中。
activeConnections: 活动(active)状态的PooledConnection对象被放置到名为activeConnections的ArrayList中,表示当前正在被使用的PooledConnection集合,调用PooledDataSource的getConnection()方法时,会优先从idleConnections集合中取PooledConnection对象,如果没有,则看此集合是否已满,如果未满,PooledDataSource会创建出一个PooledConnection,添加到此集合中,并返回
现在让我们看一下popConnection()方法到底做了什么:
先看是否有空闲(idle)状态下的
PooledConnection对象,如果有,就直接返回一个可用的PooledConnection对象;否则进行第2步。查看活动状态的
PooledConnection池activeConnections是否已满;如果没有满,则创建一个新的PooledConnection对象,然后放到activeConnections池中,然后返回此PooledConnection对象;否则进行第三步;看最先进入
activeConnections池中的PooledConnection对象是否已经过期:如果已经过期,从activeConnections池中移除此对象,然后创建一个新的PooledConnection对象,添加到activeConnections中,然后将此对象返回;否则进行第4步。线程等待,循环2步
/* * 传递一个用户名和密码,从连接池中返回可用的PooledConnection
*/
private PooledConnection popConnection(String username, String password) throws SQLException
{
boolean countedWait = false;
PooledConnection conn = null;
long t = System.currentTimeMillis();
int localBadConnectionCount = 0;
while (conn == null)
{
synchronized (state)
{
if (state.idleConnections.size() > 0)
{
// 连接池中有空闲连接,取出第一个
conn = state.idleConnections.remove(0);
if (log.isDebugEnabled())
{
log.debug("Checked out connection " + conn.getRealHashCode() + " from pool.");
}
}
else
{
// 连接池中没有空闲连接,则取当前正在使用的连接数小于最大限定值,
if (state.activeConnections.size() < poolMaximumActiveConnections)
{
// 创建一个新的connection对象
conn = new PooledConnection(dataSource.getConnection(), this);
@SuppressWarnings("unused")
//used in logging, if enabled
Connection realConn = conn.getRealConnection();
if (log.isDebugEnabled())
{
log.debug("Created connection " + conn.getRealHashCode() + ".");
}
}
else
{
// Cannot create new connection 当活动连接池已满,不能创建时,取出活动连接池的第一个,即最先进入连接池的PooledConnection对象
// 计算它的校验时间,如果校验时间大于连接池规定的最大校验时间,则认为它已经过期了,利用这个PoolConnection内部的realConnection重新生成一个PooledConnection
//
PooledConnection oldestActiveConnection = state.activeConnections.get(0);
long longestCheckoutTime = oldestActiveConnection.getCheckoutTime();
if (longestCheckoutTime > poolMaximumCheckoutTime)
{
// Can claim overdue connection
state.claimedOverdueConnectionCount++;
state.accumulatedCheckoutTimeOfOverdueConnections += longestCheckoutTime;
state.accumulatedCheckoutTime += longestCheckoutTime;
state.activeConnections.remove(oldestActiveConnection);
if (!oldestActiveConnection.getRealConnection().getAutoCommit())
{
oldestActiveConnection.getRealConnection().rollback();
}
conn = new PooledConnection(oldestActiveConnection.getRealConnection(), this);
oldestActiveConnection.invalidate();
if (log.isDebugEnabled())
{
log.debug("Claimed overdue connection " + conn.getRealHashCode() + ".");
}
}
else
{
//如果不能释放,则必须等待有
// Must wait
try
{
if (!countedWait)
{
state.hadToWaitCount++;
countedWait = true;
}
if (log.isDebugEnabled())
{
log.debug("Waiting as long as " + poolTimeToWait + " milliseconds for connection.");
}
long wt = System.currentTimeMillis();
state.wait(poolTimeToWait);
state.accumulatedWaitTime += System.currentTimeMillis() - wt;
}
catch (InterruptedException e)
{
break;
}
}
}
}
//如果获取PooledConnection成功,则更新其信息
if (conn != null)
{
if (conn.isValid())
{
if (!conn.getRealConnection().getAutoCommit())
{
conn.getRealConnection().rollback();
}
conn.setConnectionTypeCode(assembleConnectionTypeCode(dataSource.getUrl(), username, password));
conn.setCheckoutTimestamp(System.currentTimeMillis());
conn.setLastUsedTimestamp(System.currentTimeMillis());
state.activeConnections.add(conn);
state.requestCount++;
state.accumulatedRequestTime += System.currentTimeMillis() - t;
}
else
{
if (log.isDebugEnabled())
{
log.debug("A bad connection (" + conn.getRealHashCode() + ") was returned from the pool, getting another connection.");
}
state.badConnectionCount++;
localBadConnectionCount++;
conn = null;
if (localBadConnectionCount > (poolMaximumIdleConnections + 3))
{
if (log.isDebugEnabled())
{
log.debug("PooledDataSource: Could not get a good connection to the database.");
}
throw new SQLException("PooledDataSource: Could not get a good connection to the database.");
}
}
}
}
}
if (conn == null)
{
if (log.isDebugEnabled())
{
log.debug("PooledDataSource: Unknown severe error condition. The connection pool returned a null connection.");
}
throw new SQLException("PooledDataSource: Unknown severe error condition. The connection pool returned a null connection.");
}
return conn;
}
java.sql.Connection对象的回收
当我们的程序中使用完Connection对象时,如果不使用数据库连接池,我们一般会调用 connection.close() 方法,关闭connection连接,释放资源
调用过close()方法的Connection对象所持有的资源会被全部释放掉,Connection对象也就不能再使用。那么,如果我们使用了连接池,我们在用完了Connection对象时,需要将它放在连接池中,该怎样做呢?
可能大家第一个在脑海里闪现出来的想法就是:我在应该调用con.close()方法的时候,不调用close()方法,将其换成将Connection对象放到连接池容器中的代码!
怎样实现Connection对象调用了close()方法,而实际是将其添加到连接池中
这是要使用代理模式,为真正的Connection对象创建一个代理对象,代理对象所有的方法都是调用相应的真正Connection对象的方法实现。当代理对象执行close()方法时,要特殊处理,不调用真正Connection对象的close()方法,而是将Connection对象添加到连接池中。
MyBatis的PooledDataSource的PoolState内部维护的对象是PooledConnection类型的对象,而PooledConnection则是对真正的数据库连接java.sql.Connection实例对象的包裹器。
PooledConnection对象内持有一个真正的数据库连接java.sql.Connection实例对象和一个java.sql.Connection的代理:
其源码如下:
class PooledConnection implements InvocationHandler { private static final String CLOSE = "close";
private static final Class<?>[] IFACES = new Class[]{Connection.class};
private int hashCode = 0;
private PooledDataSource dataSource;
private Connection realConnection;
private Connection proxyConnection;
private long checkoutTimestamp;
private long createdTimestamp;
private long lastUsedTimestamp;
private int connectionTypeCode;
private boolean valid;
public PooledConnection(Connection connection, PooledDataSource dataSource) {
this.hashCode = connection.hashCode();
this.realConnection = connection;
this.dataSource = dataSource;
this.createdTimestamp = System.currentTimeMillis();
this.lastUsedTimestamp = System.currentTimeMillis();
this.valid = true;
this.proxyConnection = (Connection)Proxy.newProxyInstance(Connection.class.getClassLoader(), IFACES, this);
}
public Object invoke(Object proxy, Method method, Object[] args) throws Throwable {
String methodName = method.getName();
//当close时候,会回收 connection , 不会真正的close
if("close".hashCode() == methodName.hashCode() && "close".equals(methodName)) {
this.dataSource.pushConnection(this);
return null;
} else {
try {
if(!Object.class.equals(method.getDeclaringClass())) {
this.checkConnection();
}
return method.invoke(this.realConnection, args);
} catch (Throwable var6) {
throw ExceptionUtil.unwrapThrowable(var6);
}
}
}
}
以上是 Mybatis原理之数据源和连接池 的全部内容, 来源链接: utcz.com/z/512822.html