如何在Ubuntu 20.04上安装MySQL
MySQL是最流行的开源关系数据库管理系统。 它快速,易于使用,可扩展,并且是流行的LAMP和LEMP栈的组成部分。随着MySQL的不断成熟,它也逐渐用于更多大规模网站和应用。
本教程介绍了如何在Ubuntu 20.04上安装和配置MySQL。包括使用apt安装mysql 8.0服务器,初始化mysql并配置mysql的验证方式,以root用户身份登录MySQL,解决MySQL root用户权限问题。
先决条件
确保您以具有sudo权限的用户登录。
安装MySQL
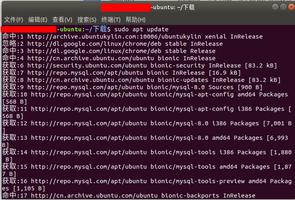
在撰写本文时,Ubuntu存储库中可用的MySQL的最新版本是MySQL版本是8.0。 我们将使用apt命令安装它:
sudo apt updatesudo apt install mysql-server
安装完成后,MySQL服务将自动启动。 要验证MySQL服务器是否正在运行,请输入:
sudo systemctl status mysql输出应显示该服务已启用并正在运行:
● mysql.service - MySQL Community Server Loaded: loaded (/lib/systemd/system/mysql.service; enabled; vendor preset: enabled)
Active: active (running) since Tue 2020-04-28 20:59:52 UTC; 10min ago
Main PID: 8617 (mysqld)
Status: "Server is operational"
...
配置MySQL
MySQL安装随附一个名为mysql_secure_installation的脚本,可让您轻松地提高数据库服务器的安全性。调用该脚本时不需要带任何参数:
sudo mysql_secure_installation将要求您配置VALIDATE PASSWORD PLUGIN,该工具用于测试MySQL用户密码的强度并提高安全性:
Securing the MySQL server deployment.Connecting to MySQL using a blank password.
VALIDATE PASSWORD COMPONENT can be used to test passwords
and improve security. It checks the strength of password
and allows the users to set only those passwords which are
secure enough. Would you like to setup VALIDATE PASSWORD component?
Press y|Y for Yes, any other key for No: y
密码验证策略分为三个级别:低,中和强。 如果要设置验证密码插件或任何其他键,请按y进入下一步:
There are three levels of password validation policy:LOW Length >= 8
MEDIUM Length >= 8, numeric, mixed case, and special characters
STRONG Length >= 8, numeric, mixed case, special characters and dictionary file
Please enter 0 = LOW, 1 = MEDIUM and 2 = STRONG: 2
在下一个提示符下,将要求您为MySQL root用户设置密码:
Please set the password for root here.New password:
Re-enter new password:
如果您设置了验证密码插件,该脚本将向您显示新密码的强度。 输入y确认密码:
Estimated strength of the password: 50 Do you wish to continue with the password provided?(Press y|Y for Yes, any other key for No) : y
接下来,系统会要求您删除匿名用户,限制root用户对本地计算机的访问,删除测试数据库并重新加载权限表。 您应该对所有问题回答y。
以root用户身份登录MySQL
要从命令行与MySQL服务器进行交互,请使用MySQL客户端程序,该程序是作为MySQL服务器软件包的依赖项安装的。
在MySQL 8.0上,默认情况下auth_socket插件对非root用户进行身份验证。auth_socket插件仅对从localhost连接到Unix socket文件用户进行身份验证。 这意味着您无法通过提供密码来以root用户身份进行身份验证。你只能像下面这样以root用户身份登录MySQL服务器:
sudo mysql此时你已经连接到MySQL Shell,如下所示:
Welcome to the MySQL monitor. Commands end with ; or \g.Your MySQL connection id is 12
Server version: 8.0.19-0ubuntu5 (Ubuntu)
Copyright (c) 2000, 2020, Oracle and/or its affiliates. All rights reserved.
Oracle is a registered trademark of Oracle Corporation and/or its
affiliates. Other names may be trademarks of their respective
owners.
Type 'help;' or '\h' for help. Type '\c' to clear the current input statement.
mysql>
如果您要使用外部程序(例如phpMyAdmin)以root用户身份登录MySQL服务器,则有两个选择。
第一个是将身份验证方法从auth_socket更改为mysql_native_password。 您可以通过运行以下命令来做到这一点:
ALTER USER 'root'@'localhost' IDENTIFIED WITH mysql_native_password BY '你的密码';第二个推荐的选项是创建一个新的专用管理用户,该用户可以访问所有数据库:
GRANT ALL PRIVILEGES ON *.* TO 'administrator'@'localhost' IDENTIFIED BY 'very_span_password';结论
我们向您展示了如何在Ubuntu 20.04上安装MySQL。 现在您的数据库服务器已启动并正在运行,下一步是学习如何管理MySQL用户帐户和数据库。
以上是 如何在Ubuntu 20.04上安装MySQL 的全部内容, 来源链接: utcz.com/z/507473.html