java多线程的四种实现方式

主要有四种:继承Thread类、实现Runnable接口、实现Callable接口通过FutureTask包装器来创建Thread线程、使用ExecutorService、Callable、Future实现有返回结果的多线程。
1、继承Thread类创建线程
Thread类本质上是实现了Runnable接口的一个实例,代表一个线程的实例。启动线程的唯一方法就是通过Thread类的start()实例方法。start()方法是一个native方法,它将启动一个新线程,并执行run()方法。这种方式实现多线程很简单,通过自己的类直接extend Thread,并复写run()方法,就可以启动新线程并执行自己定义的run()方法。例如:
1 public class MyThread extends Thread { 2 public void run() {
3 System.out.println("MyThread.run()");
4 }
5 }
6
7 MyThread myThread1 = new MyThread();
8 MyThread myThread2 = new MyThread();
9 myThread1.start();
10 myThread2.start();
2、实现Runnable接口创建线程
如果自己的类已经extends另一个类,就无法直接extends Thread,此时,可以实现一个Runnable接口,如下:
1 public class MyThread extends OtherClass implements Runnable { 2 public void run() {
3 System.out.println("MyThread.run()");
4 }
5 }
为了启动MyThread,需要首先实例化一个Thread,并传入自己的MyThread实例:
1 MyThread myThread = new MyThread(); 2 Thread thread = new Thread(myThread); 3 thread.start();
3.实现Callable接口通过FutureTask包装器来创建Thread线程
1 public class SomeCallable<V> extends OtherClass implements Callable<V> {2
3 @Override
4 public V call() throws Exception {
5 // TODO Auto-generated method stub
6 return null;
7 }
8
9 }
1 Callable<V> oneCallable = new SomeCallable<V>();2 //由Callable<Integer>创建一个FutureTask<Integer>对象:
3 FutureTask<V> oneTask = new FutureTask<V>(oneCallable);
4 //注释:FutureTask<Integer>是一个包装器,它通过接受Callable<Integer>来创建,它同时实现了Future和Runnable接口。
5 //由FutureTask<Integer>创建一个Thread对象:
6 Thread oneThread = new Thread(oneTask);
7 oneThread.start();
8 //至此,一个线程就创建完成了
4、使用ExecutorService、Callable、Future实现有返回结果的线程
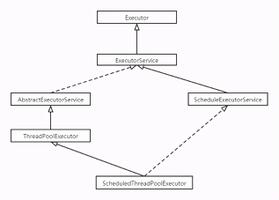
ExecutorService、Callable、Future三个接口实际上都是属于Executor框架。返回结果的线程是在JDK1.5中引入的新特征,有了这种特征就不需要再为了得到返回值而大费周折了。而且自己实现了也可能漏洞百出。
可返回值的任务必须实现Callable接口。类似的,无返回值的任务必须实现Runnable接口。
执行Callable任务后,可以获取一个Future的对象,在该对象上调用get就可以获取到Callable任务返回的Object了。
注意:get方法是阻塞的,即:线程无返回结果,get方法会一直等待。
再结合线程池接口ExecutorService就可以实现传说中有返回结果的多线程了。
下面提供了一个完整的有返回结果的多线程测试例子,在JDK1.5下验证过没问题可以直接使用。代码如下:
1 /**2 * 有返回值的线程
3 */
4 @SuppressWarnings("unchecked")
5 public class Test {
6 public static void main(String[] args) throws ExecutionException,
7 InterruptedException {
8 System.out.println("----程序开始运行----");
9 Date date1 = new Date();
10
11 int taskSize = 5;
12 // 创建一个线程池
13 ExecutorService pool = Executors.newFixedThreadPool(taskSize);
14 // 创建多个有返回值的任务
15 List<Future> list = new ArrayList<Future>();
16 for (int i = 0; i < taskSize; i++) {
17 Callable c = new MyCallable(i + " ");
18 // 执行任务并获取Future对象
19 Future f = pool.submit(c);
20 // System.out.println(">>>" + f.get().toString());
21 list.add(f);
22 }
23 // 关闭线程池
24 pool.shutdown();
25
26 // 获取所有并发任务的运行结果
27 for (Future f : list) {
28 // 从Future对象上获取任务的返回值,并输出到控制台
29 System.out.println(">>>" + f.get().toString());
30 }
31
32 Date date2 = new Date();
33 System.out.println("----程序结束运行----,程序运行时间【"
34 + (date2.getTime() - date1.getTime()) + "毫秒】");
35 }
36 }
37
38 class MyCallable implements Callable<Object> {
39 private String taskNum;
40
41 MyCallable(String taskNum) {
42 this.taskNum = taskNum;
43 }
44
45 public Object call() throws Exception {
46 System.out.println(">>>" + taskNum + "任务启动");
47 Date dateTmp1 = new Date();
48 Thread.sleep(1000);
49 Date dateTmp2 = new Date();
50 long time = dateTmp2.getTime() - dateTmp1.getTime();
51 System.out.println(">>>" + taskNum + "任务终止");
52 return taskNum + "任务返回运行结果,当前任务时间【" + time + "毫秒】";
53 }
54 }
以上是 java多线程的四种实现方式 的全部内容, 来源链接: utcz.com/z/391144.html

