React 小案例 订单列表评价

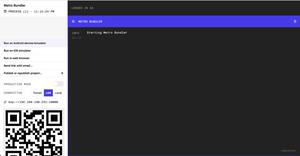
最终效果图:
1.功能:各功能组件的组合和渲染
2.点击评价按钮评论组件出现,可输入文字和打分,点击取消按钮关闭评论
3.点击提交按钮显示已评价
结构:
1.在src下创建components文件夹,用于存放几个组件,每个组件创建一个文件夹存放,
2.将视图展示的App.js移入components文件夹下,且创建App文件夹,
3.每个组件的js文件均命名为index,为引入方便,
4.OrderItem组件为渲染整个列表,
5.OrderList组件为单个列表内容,
6.Header为顶部红色部分,
src文件夹index.js所有内容:
1.改变了App.js的位置,引入index.js时的路径也要改变,
import React from 'react';import ReactDOM from 'react-dom';
import './index.css';
import App from './components/App/index';
ReactDOM.render(<App />, document.getElementById('root'));
复制代码
App文件夹下,index.js所有内容:
1.引入OrderList组件和Header组件,引入时无需添加index,index文件自动默认渲染
2.将两个组件视图渲染到该渲染的位置
import React, { Component } from 'react';import OrderList from '../OrderList'
import Header from '../Header'
import './style.css'
class App extends Component {
render() {
return (
<div className="App">
<Header/>
<OrderList/>
</div>
);
}
}
export default App;复制代码
顶部Header中所有内容:
index.js:
import React,{Component} from 'react'import './style.css'
class index extends Component{
render(){
return(
<header className="header">
我的订单
</header>
);
}
}
export default index复制代码
style.css:
.header{ background-color: #e9203d;
color: #fff;
padding: 15px 10px;
text-align: center;
font-size: 16px;
line-height: 1;
}复制代码
单个列表OrderItem中所有内容:
1.创建出单个商品列表界面,
2.判断评价按钮的红色灰色状态,在state中定义状态:editing默认为false,
3.在标签上定义逻辑,如果为true,那么为已评价,class设置为灰色,如果为false,则保持默认未评价,class设置为红色,
4.这时创建父组件OrderList,遍历渲染所有列表,
5.做完父组件的第8项,返回子组件绑定data数据,
6.定义一个const接收父组件props过来data数据的每项数据名,将数据直接绑定在相应位置,
7.创建renderEditArea()函数,为点击评价输入和评分部分的视图,
将评价视图绑定在列表下面,并定义state中editing判定,为true时显示渲染,为false时不渲染,
{this.state.editing ? this.renderEditArea() : null}复制代码8.给评价按钮增加onclick事件,handleOpenEidt(),点击时将editing状态改为true,评价部分渲染显示,
9.给评价部分文本域textarea绑定onChange让组件受控,设置文本域value值,在state中初始值设为‘’,然后绑定给textarea的value上,
在handleCommentChange()事件中,把state的value修改为用户当下输入,则可监听到用户输入,
10.给文本域的取消按钮绑定点击事件,在取消按钮事件中,修改state中的editing为false,comment为‘’,取消后清空文本域文字,并让评价部分消失,
11. 创建五角星视图函数,renderStars(),
创建span中间放置绘制的一个五角星,创建数组1-5遍历span,在state中定义一个数据为stars初始值为0,遍历中定义一个linghtClass,判断当stars大于等于当下的五角星个数时,输入一个新calss名,用于点亮背景色设置,如果不是则不设置,然后将linghtClass绑定在span的calssName中,
12.给span这个五角星绑定点击事件 onClick={this.handleClickStars.bind(this,item)}
因为要判断当前点击,所以要给函数绑定item参数,
13.定义五角星点击事件,函数接收一个参数为当前点击的stars,修改state中初始stars的数据为当前点击的数据,
14.给提交按钮绑定事件,提交时需要提交至父组件所有商品列表中,所以父组件需要接收哪条
商品的id信息,该商品文本域内容,和打分情况,
将这些所需信息数据,作为参数定义onSubmit提交事件的参数传递给父组件
15.此时去父组件接收
import React, {Component} from 'react'import './style.css'
class OrderItem extends Component {
constructor(props) {
super(props);
this.state = {
editing: false,
stars: props.data.stars || 0,
comment:props.data.comment || '',
}
}
//商品列表
render() {
const {shop, product, price, picture, ifCommented} = this.props.data;
return (
<div className="OrderItem">
<div className="orderItem_picContainer">
<img className="orderItem_pic" src={picture} alt=""/>
</div>
<div className="orderItem_content">
<div className="orderItem_product">{product}</div>
<div className="orderItem_shop">{shop}</div>
<div className="orderItem_detail">
<div className="orderItem_price">{price}</div>
<div>
{
ifCommented ? (
<button className="orderItem_btn orderItem_btn_grey">
已评价</button>
) : (
<button className="orderItem_btn orderItem_btn_red" onClick={this.handleOpenEidt}>
评价</button>
)
}
</div>
</div>
</div>
{/*当state中editing为true时渲染*/}
{this.state.editing ? this.renderEditArea() : null}
</div>
);
}
//评价部分输入
renderEditArea() {
return (
<div className="orderItem_commentContainer">
<textarea onChange={this.handleCommentChange} value={this.state.comment} className="orderItem_comment"/>
{this.renderStars()}
<button className="orderItem_btn orderItem_btn_red" onClick={this.handleSubmitComment}>提交</button>
<button className="orderItem_btn orderItem_btn_grey" onClick={this.handleCancelComment}>取消</button>
</div>
)
}
// 五角星打分
renderStars() {
const {stars} = this.state;
return (
<div>
{
[1, 2, 3, 4, 5].map((item, index) => {
const lightClass = stars >= item ?
'orderItem_star_linght' : '';
return (
<span className={"orderItem_star "+ lightClass} key={index} onClick={this.handleClickStars.bind(this,item)}>★</span>
)
})
}
</div>
)
}
//是否出现评价框
handleOpenEidt =()=>{
this.setState({
editing :true
})
}
//让输入框受控
handleCommentChange =(e)=>{
this.setState({
comment:e.target.value
})
}
//点亮五角星
handleClickStars =(stars)=>{
this.setState({
stars:stars
})
}
//取消按钮
handleCancelComment=()=>{
this.setState({
editing:false,
stars: this.props.data.stars || 0,
comment:this.props.data.comment || ''
})
}
//提交按钮
handleSubmitComment=()=>{
const {id} =this.props.data;
const {comment,stars} = this.state;
this.setState({
editing:false,
})
this.props.onSubmit(id, comment, stars )
}
}
export default OrderItem复制代码
父组件所有列表OrderList组件所有代码:
1.首先模拟一个从后端获取的data数据,
在public文件夹中,创建mock文件夹,mock文件夹中创建orders.json文件用于存放data数据,
3.在钩子函数componentDidMount()中,用fetch请求获取地址为‘/mock/orders.json’的数据,
4.在state里初始化data,
5.在钩子函数componentDidMount()中将state中初始化的data变为获取到的data数据,
6.将子组件OrderItem引入,并渲染,
7.将获取到的data数据遍历子组件<OrderItem/>,将数据中的id作为唯一的key值,
8.将data数据传给子组件,用于绑在子组件列表的数据相应位置,此时去子组件,
9.在父组件的子组件标签中,接收onSubmit事件,同时定义事件函数handleSubmit(),
10.handleSubmit中接收到id,comment,stars三个参数,
定义一个newData,接收改变后的新数据,遍历旧数据,判断,当下id和data中的id为同一条时,将所有item接收为子组件的新值和状态,不是当下这条id,内容不变,
11.将newData更新至data中,
import React, {Component} from 'react'import OrderItem from '../OrderItem'
class OrderList extends Component {
constructor(props) {
super(props);
this.state = {data: []};
}
//用获取json数据渲染至列表
componentDidMount() {
//因为public文件下的资源可以直接被获取,所以直接写路径即可
fetch('/mock/orders.json').then(res => {
if (res.ok) {
res.json().then(data => {
this.setState({
data
})
})
}
})
}
render() {
return (
<div>
{
this.state.data.map(item => {
return <OrderItem key={item.id} data={item} onSubmit={this.handleSubmit}/>
})
}
</div>
);
}
//改变订单状态
handleSubmit = (id, comment, stars) => {
//真实项目中,要将评论信息保存在服务器中再操作
fetch('/saveComment').then(()=>{
//以下修改要在这里执行,但由于现在没有服务器
})
const newData = this.state.data.map(item => {
return item.id === id ?
{
...item, comment, stars, ifCommented: true
} : item;
});
//将newData更新至data中
this.setState({
data: newData
})
}
}
export default OrderList复制代码
orders.json文件中所有内容:
1.提取列表视图中所有动态数据,存放在orders.json文件中,
用id区分每条数据,
[ {
"id":1,
"shop":"肯德基",
"picture":"http://02.imgmini.eastday.com/mobile/20180405/20180405042401_0e8c94915ba80f288e2aba04de54ce5e_1.jpeg",
"product":"肯德基全家桶",
"price":59.9,
"ifCommented":false
},
{
"id":2,
"shop":"牛排王子",
"picture":"http://www.vx001.com/uploads/allimg/170805/1-1FP510551I62.jpg",
"product":"西冷牛排套餐",
"price":98,
"ifCommented":false
},
{
"id":3,
"shop":"必胜客",
"picture":"http://imgsrc.baidu.com/imgad/pic/item/c995d143ad4bd1131a9ef8c450afa40f4afb05f0.jpg",
"product":"匹萨",
"price":120,
"ifCommented":false
},
{
"id":4,
"shop":"潮人餐厅",
"picture":"http://imgsrc.baidu.com/imgad/pic/item/0d338744ebf81a4c2956133cdd2a6059242da6db.jpg",
"product":"鸡排饭",
"price":25,
"ifCommented":false
}
]复制代码
OrderItem中的所有css:
.OrderItem{ display: block;
padding:11px 10px 11px 15px;
}
.orderItem_picContainer{
padding-right: 10px;
display: inline-block;
}
.orderItem_pic{
width: 90px;
height: 90px;
}
.orderItem_content{
display: inline-block;
width: calc(100% - 100px);
}
.orderItem_product{
max-width: 237px;
font-size: 17px;
font-weight: 700;
color: #111;
padding-right: 8px;
box-sizing: border-box;
overflow: hidden;
text-overflow: ellipsis;
white-space: nowrap;
}
.orderItem_shop{
overflow: hidden;
text-overflow: ellipsis;
white-space: nowrap;
font-size: 13px;
color: #777;
padding-top: 9px;
padding-bottom: 13px;
}
.orderItem_detail{
display: flex;
justify-content: space-between;
height: 22px;
line-height: 22px;
padding-right: 4px;
}
.orderItem_price{
font-size: 13px;
color: #777;
vertical-align: 1px;
margin-left: 10px;
}
.orderItem_price::before{
content: "\A5";
margin-right: 1px;
}
.orderItem_btn{
width: 80px;
height: 22px;
text-align: center;
color: #fff;
border:0;
font-size: 14px;
}
.orderItem_btn_red{
background-color: #e9203d;
}
.orderItem_btn_grey{
background-color: #999;
}
.orderItem_comment{
width: 100%;
resize:none;
margin-top: 10px;
height: 50px;
}
.orderItem_star{
font-size: 25px;
cursor: pointer;
color: #777777;
}
.orderItem_star_linght{
color: #e9203d;
}
以上是 React 小案例 订单列表评价 的全部内容, 来源链接: utcz.com/z/383904.html