linux内网(无法连接外网)服务器安装nginx并部署vue网站

nginx" title="安装nginx">安装nginx并部署vue网站">内网(无法连接外网)服务器安装nginx并部署vue网站
1:解决缺少gcc、pre-devel、openssl-devel、zlib-devel等依赖的问题
在无法连接外网的内网中或服务器不能连接网络的环境下,因为缺少gcc、pre-devel、openssl-devel、zlib-devel等依赖,所以无法使用yum等方式安装,所以本文给出一种适用于内网环境或离线环境的Nginx安装方法。
1、查看自己想要安装Nginx的linux服务器的版本号
cat /etc/redhat-release
2、下载相同版本的linux.iso文件
镜像下载地址:http://vault.centos.org/7.7.1908/isos/x86_64/
下载完成后,按如下图所示在iso文件中找到Packages文件夹中的文件
在Packages文件夹中找出以下文件(共25个)
autogen-libopts-5.18-5.el7.x86_64.rpmcpp-4.8.2-16.el7.x86_64.rpm
gcc-4.8.2-16.el7.x86_64.rpm
glibc-devel-2.17-55.el7.x86_64.rpm
glibc-headers-2.17-55.el7.x86_64.rpm
kernel-headers-3.10.0-123.el7.x86_64.rpm
keyutils-libs-devel-1.5.8-3.el7.x86_64.rpm
krb5-devel-1.11.3-49.el7.x86_64.rpm
libcom_err-devel-1.42.9-4.el7.x86_64.rpm
libmpc-1.0.1-3.el7.x86_64.rpm
libselinux-devel-2.2.2-6.el7.x86_64.rpm
libsepol-devel-2.1.9-3.el7.x86_64.rpm
libverto-devel-0.2.5-4.el7.x86_64.rpm
mpfr-3.1.1-4.el7.x86_64.rpm
ntp-4.2.6p5-18.el7.centos.x86_64.rpm
ntpdate-4.2.6p5-18.el7.centos.x86_64.rpm
openssl098e-0.9.8e-29.el7.centos.x86_64.rpm
openssl-1.0.1e-34.el7.x86_64.rpm
openssl-devel-1.0.1e-34.el7.x86_64.rpm
openssl-libs-1.0.1e-34.el7.x86_64.rpm
pcre-devel-8.32-12.el7.x86_64.rpm
pkgconfig-0.27.1-4.el7.x86_64.rpm
tcl-8.5.13-4.el7.x86_64.rpm
zlib-1.2.7-13.el7.x86_64.rpm
zlib-devel-1.2.7-13.el7.x86_64.rpm
找出以上25个rpm包后将其上传至linux服务器,执行以下代码
rpm -Uvh ./*.rpm --nodeps --force在上传以上25个rpm包的文件夹中执行以上代码,便可以安装以上rpm包
至此,gcc、pre-devel、openssl-devel、zlib-devel等依赖缺失的问题解决。
安装完成后可以使用gcc -v 和 g++ -v 指令查看环境是否安装成功。
2:安装nginx
因为内网和离线状态等无法使用yum等指令,所以需要下载nginx安装包至本地,再上传至linux服务器,
可以在http://nginx.org/en/download.html
下载Nginx相关版本至本地,之后上传至linux服务器root文件夹下(我将安装包放在了 /usr/local 目录下)
之后在存放安装包的文件夹下,执行以下代码解压压缩包
例:tar -zxvf nginx-1.14.2.tar.gz进入解压的目录中
cd 文件名例:cd nginx-1.14.2
执行文件,检查配置文件是否生效
./configure执行以下两行代码分别进行编译和安装依赖
makemake install
启动nginx
进入cd /usr/local/nginx/sbin
执行ls 可以看到nginx
执行 ./nginx 便可启动nginx
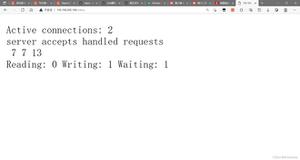
查看nginx是否启动
ps -aux | grep nginx
若nginx已启动,那么确认防火墙关闭后,便可以访问nginx了 (一般初始地址为 http://localhost:80 还要确认本服务器上没有其他已经安装的程序在占用80端口,如果已经占用,则需要更改成其他端口)
systemctl status firewalld 查看防火墙状态systemctl stop firewalld 关闭防火墙
systemctl start firewalld 开启防火墙
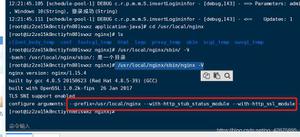
验证nginx配置文件是否正确,
进入nginx安装目录sbin下,输入命令./nginx -t,即以下三行命令cd /usr/local/nginx/sbin
ls
./nginx -t
重启nginx服务
方法一:进入nginx可执行目录sbin下,输入命令./nginx -s reload 即可
cd /usr/local/nginx/sbin./nginx -s reload
方法二:查找当前nginx进程号,然后输入命令:kill -HUP 进程号 实现重启nginx服务
ps -ef|grep nginxkill -HUP 进程号
3:将网站部署至linux服务器
1:将vue前端项目build好, 一般是dist文件夹,将dist文件夹压缩成tar格式的压缩包后上传至linux服务器(7-zip可以打包成这种格式),并记住压缩包的存放路径
2:将第一步上传的压缩包解压
tar -xvf home_wh.tar
3:修改nginx.conf配置文件
进入相应文件夹cd /usr/local/nginx/conf
编辑nginx.conf
vim nginx.conf
即可进入nginx.conf中,其中:
i 进入编辑模式
Esc 退出编辑模式
摁方向键中的 上 下 左 右 可以移动光标(滚珠和鼠标不管用)
每行前面有“#”的代表注释
进入编辑模式后 shift+wq! 之后再摁enter即可保存并退出
以下为nginx中原始代码(去掉注释的版本见下面)
user nobody; worker_processes 1;
#error_log logs/error.log;
#error_log logs/error.log notice;
#error_log logs/error.log info;
#pid logs/nginx.pid;
events {
worker_connections 1024;
}
http {
include mime.types;
default_type application/octet-stream;
#log_format main \'$remote_addr - $remote_user [$time_local] "$request" \'
# \'$status $body_bytes_sent "$http_referer" \'
# \'"$http_user_agent" "$http_x_forwarded_for"\';
#access_log logs/access.log main;
sendfile on;
#tcp_nopush on;
#keepalive_timeout 0;
keepalive_timeout 65;
#gzip on;
server {
listen 80;
server_name localhost;
charset utf-8;
#access_log logs/host.access.log main;
location / {
root /root/www/; ## 设置的地方
index index.html index.htm;
}
#error_page 404 /404.html;
# redirect server error pages to the static page /50x.html
#
error_page 500 502 503 504 /50x.html;
location = /50x.html {
root html;
}
# proxy the PHP scripts to Apache listening on 127.0.0.1:80
#
#location ~ \.php$ {
# proxy_pass http://127.0.0.1;
#}
# pass the PHP scripts to FastCGI server listening on 127.0.0.1:9000
#
#location ~ \.php$ {
# root html;
# fastcgi_pass 127.0.0.1:9000;
# fastcgi_index index.php;
# fastcgi_param SCRIPT_FILENAME /scripts$fastcgi_script_name;
# include fastcgi_params;
#}
# deny access to .htaccess files, if Apache\'s document root
# concurs with nginx\'s one
#
#location ~ /\.ht {
# deny all;
#}
}
}
去注释版
user nobody; #初始一般为nobody,改为root即可worker_processes 1;
events {
worker_connections 1024;
}
http {
include mime.types;
default_type application/octet-stream;
sendfile on;
keepalive_timeout 65;
server {
listen 80; #监听的端口,默认为80,如果其他程序也在使用80端口,则会产生冲突,将这里的80改为其他端口即可解决。如:8082
server_name localhost; #默认为localhost,也可改为服务器的ip地址
charset utf-8;
#access_log logs/host.access.log main;
location / {
root /root/www/; ## 上传的dist的文件的位置
index index.html index.htm; #启动的文件位置,可以是一个,也可以是多个
}
error_page 500 502 503 504 /50x.html;
location = /50x.html {
root html;
}
}
}
修改完后重启nginx服务,即可更新。
以上是 linux内网(无法连接外网)服务器安装nginx并部署vue网站 的全部内容, 来源链接: utcz.com/z/379281.html