vue系列生命周期(四)

生命周期" title="vue生命周期">vue生命周期,是指vue实例从创建到销毁的一个过程,掌握了这个过程中各个阶段的状态,就能合理使用,是我们的程序性能更高,开发更合理,减少bug。
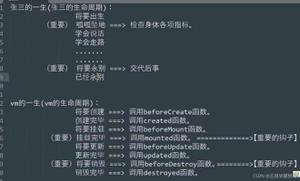
我们先看一张官方的vue的生命周期的图:
可以看到,vue实例生命周期分为:beforeCreate,created,beforeMount,mounted,beforeUpdate,updated,activated,deactivated,beforeDestroy,destroyed,errorCaptured。下面我们再看看各个周期的含义,及平常我们的用途。
这里说明一下,
created和mounted2个阶段的区别。created的时候,dome节点并没有加载,如果做一些dome从操作,如document.getElementById时是获取不到元素的。mounted能获取到dome节点,但也不完全加载完,完全加载完可以放到this.$nextTick()的回调里面。
下面看一个完整的实例,来表明各个周期的执行情况。
<!doctype html><html lang="en">
<head>
<title>vue生命周期测试</title>
</head>
<body>
<div id="test">
<h3>单组件</h3>
<span>{{testData}}</span>
<button @click="testData += 1">更新data里面的值</button>
<button @click="destroyVue">销毁VUE实例</button>
</div>
</body>
<script src="https://cdnjs.cloudflare.com/ajax/libs/vue/2.5.17-beta.0/vue.js"></script>
<script>
new Vue({
el: "#test",
data() {
return {
testData: 0
}
},
beforeCreate() {
console.log("beforeCreate")
},
created() {
console.log("created")
},
beforeMount() {
console.log("beforeMount")
},
mounted() {
console.log("mounted")
},
beforeUpdate() {
console.log("beforeUpdate")
},
updated() {
console.log("updated")
},
beforeDestroy() {
console.log("beforeDestroy")
},
destroyed() {
console.log("destroyed")
},
methods: {
destroyVue() {
this.$destroy()
}
}
})
</script>
</html>
可以看到vue实例创建时,马上执行了:
我们点击按钮,更新data里面的数据是,执行了下面的钩子:
我们再销毁vue实例,执行情况如下:
上面的实例可以看到各种钩子的执行情况,了解各个钩子的作用和执行时机,合理运用,有助于我们的合理开发。
想看更多文章,可以关注我的个人公众号:
以上是 vue系列生命周期(四) 的全部内容, 来源链接: utcz.com/z/376549.html