从零开始开发一个简易的类vue-cli构建工具

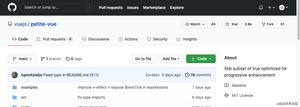
代码地址:https://github.com/cheer4chai/webpack-learning
仿照vue-cli开发这个工具的目的是了解webpack的基本设置,以及vue-cli的工作原理
Series1.简单的打包构建功能
webpack的配置很简单:
设置好入口文件:entry,输出文件:output
// webpack.config.js
module.exports = {entry: {
bundle1: \'./main1.js\',
bundle2: \'./main2.js\'
},
output: {
filename: \'[name].js\'
},
module: {
loaders: [{
test: /\.css$/,
loader: \'style-loader!css-loader\'
}]
}
}
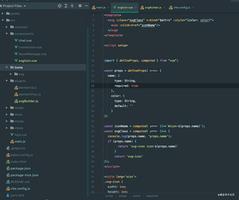
最终文件目录:
我们发现webpack把main1.js和main2.js分别打包为了bundle1和bundle2,main.css也打包到了bundle文件中,这样我们就初步打包成功了。
Series2.使用loader将less/css文件打包
如果在webpack中需要将less/css等一些非js文件打包至目标文件时,我们就需要用到webpack的特性之一:loader
其实只要在webpack的配置文件中加入module字段就可以了,代码如下
let path = require(\'path\')let webpack = require(\'webpack\');
module.exports = {
entry: \'./src/entry.js\',
devtool: \'inline-source-map\',
output: {
path: path.join(__dirname, \'/dist\'),
filename: \'bundle.js\',
publicPath: \'/dist/\'
},
devServer: {
contentBase: path.join(__dirname, "./"),
hot: true,
},
module: {
loaders: [{
test: /\.css$/,
loader: "style-loader!css-loader"
},
{
test: /\.less$/,
loader: "style-loader!css-loader!less-loader"
}
]
}
}
另外值得一提的是loader是从右到左的链式操作,如上的css文件,是先经过css-loader处理,再经过style-loader处理,才能转化为所需要的打包格式
Series3.使用webpack-dev-server在线浏览效果
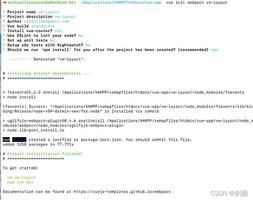
当使用vue-cli的时候我们会想,当运行npm run dev的时候他是怎么生成一个本地的文件的呢,其实就是用了webpack-dev-server这一个插件,在本地用nodejs生成了一个服务器,代理了在内存中自动生成的静态页面。话不多说,安装了这个插件之后(yarn add webpack-dev-server),只要在项目目录下执行webpack-dev-server命令,访问本地localhost:8080就可以看到这个页面了。
但是这个时候当我们修改了一个文件之后还需要重新用webpack编译,再刷新页面再能看到更改内容,那么有什么可以解决这个问题吗?没错,这个时候我们就需要热重载插件:HotModuleReplacementPlugin。其实也很简单,只要在webpack的plugins内加入这个组件,另外在devServer中配置hot为true(或者运行的时候执行--hot命令),就可以实现热重载了。
还需要一提的是HtmlWebpackPlugin插件,这个插件可以自动生成一个HTML文件,vue-cli最终的html文件就是该文件生成的,因此我们还需要这个插件去自动生成一个html文件引用output的js文件,并打开
让我们来看一下如何配置这几个东西:
let path = require(\'path\')let webpack = require(\'webpack\');
let HtmlWebpackPlugin = require(\'html-webpack-plugin\');
module.exports = {
entry: \'./src/entry.js\',
devtool: \'inline-source-map\',
output: {
path: path.join(__dirname, \'dist\'),
filename: \'bundle.js\',
publicPath: \'/\'
},
devServer: {
hot: true,
compress: true,
publicPath: \'/\'
},
module: {
loaders: [{
test: /\.css$/,
loader: "style-loader!css-loader"
},
{
test: /\.less$/,
loader: "style-loader!css-loader!less-loader"
}
]
},
plugins: [
new webpack.HotModuleReplacementPlugin(), // 热加载
new HtmlWebpackPlugin(),
]
}
文件目录如下:
在根目录下运行webpack-dev-server,我们就可以在本地看到已经打包后的页面了
Series4.使用webpack-merge分别设置webpack的dev及prod模式
因为在日常开发中,我们往往会需要开发和生产两种环境,而这两个环境的webpack配置有相同的地方,又有不同的地方,这个时候我们需要用的webpack-merge来将wepack的配置分成两个模式,类似于vue-cli那样,分为三个文件:base/dev/build,分别保存共用设置、开发用设置和生产设置。
文件如下:
//webpack.base.configlet path = require(\'path\')
module.exports = {
entry: {
index: \'./src/main.js\'
},
devtool: \'inline-source-map\',
output: {
path: path.join(__dirname, \'dist\'),
filename: \'bundle.js\',
publicPath: \'/\'
},
resolve: {
extensions: [\'.js\', \'.vue\', \'.json\'],
alias: {
\'vue$\': \'vue/dist/vue.esm.js\'
}
},
module: {
loaders: [{
test: /\.vue$/,
loader: \'vue-loader\'
}, {
test: /\.css$/,
loader: "style-loader!css-loader"
},
{
test: /\.less$/,
loader: "style-loader!css-loader!less-loader"
}
]
}
}
//webpack.dev.configlet path = require(\'path\')
let webpack = require(\'webpack\');
const merge = require(\'webpack-merge\')
const baseWebpackConfig = require(\'./webpack.base.config\')
let HtmlWebpackPlugin = require(\'html-webpack-plugin\');
module.exports = merge(baseWebpackConfig, {
devServer: {
hot: true,
compress: true,
publicPath: \'/\'
},
plugins: [
new webpack.HotModuleReplacementPlugin(), // 热加载
new HtmlWebpackPlugin({
filename: \'index.html\',
template: \'index.html\',
inject: true
})
]
})
在生产模式中,为了可以生成更小的文件,已经实现js的按需引用,我们配置webpack的CommonsChunkPlugin以及UglifyJsPlugin,其中chunk可以将页面中引用的第三方库单独打包,而uglify顾名思义,则是压缩代码需要的插件,详细的配置如下:
//webpack.build.configlet path = require(\'path\')
let webpack = require(\'webpack\');
const merge = require(\'webpack-merge\')
const baseWebpackConfig = require(\'./webpack.base.config\')
const HtmlWebpackPlugin = require(\'html-webpack-plugin\');
module.exports = merge(baseWebpackConfig, {
entry: {
index: \'./src/main.js\',
vendor: [\'jquery\', \'vue\']
},
output: {
path: path.join(__dirname, \'dist\'),
filename: path.join(\'static\', \'js/[name].[chunkhash].js\'),
chunkFilename: path.join(\'static\', \'js/[id].[chunkhash].js\')
},
plugins: [
new webpack.optimize.UglifyJsPlugin({
compress: {
warnings: false
},
sourceMap: false,
parallel: true
}),
new HtmlWebpackPlugin({
filename: \'index.html\',
template: \'index.html\',
inject: true,
minify: {
removeComments: true,
collapseWhitespace: true,
removeAttributeQuotes: true
// more options:
// https://github.com/kangax/html-minifier#options-quick-reference
},
}),
new webpack.optimize.CommonsChunkPlugin({
name: \'ventor\',
minChunks: Infinity
})
]
})
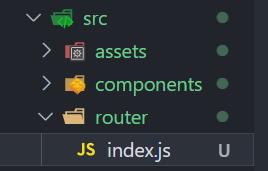
目录结构如下图:
Series4.配置vue文件编译
当我们需要向vue-cli一样,将vue都编译成最终的js文件的时候,我们需要一个新的loader:vue-loader,另外为了让webpack可以引入template,我们还需要在webpack中配置resolve字段
改动的代码如下:
//webpack.dev.configlet path = require(\'path\')
let webpack = require(\'webpack\');
const merge = require(\'webpack-merge\')
const baseWebpackConfig = require(\'./webpack.base.config\')
let HtmlWebpackPlugin = require(\'html-webpack-plugin\');
module.exports = merge(baseWebpackConfig, {
devServer: {
hot: true,
compress: true,
publicPath: \'/\'
},
plugins: [
new webpack.HotModuleReplacementPlugin(), // 热加载
new HtmlWebpackPlugin({
filename: \'index.html\',
template: \'index.html\',
inject: true
})
]
})
//webpack.build.configlet path = require(\'path\')
let webpack = require(\'webpack\');
const merge = require(\'webpack-merge\')
const baseWebpackConfig = require(\'./webpack.base.config\')
const HtmlWebpackPlugin = require(\'html-webpack-plugin\');
module.exports = merge(baseWebpackConfig, {
entry: {
index: \'./src/main.js\',
vendor: [\'jquery\', \'vue\']
},
output: {
path: path.join(__dirname, \'dist\'),
filename: path.join(\'static\', \'js/[name].[chunkhash].js\'),
chunkFilename: path.join(\'static\', \'js/[id].[chunkhash].js\')
},
plugins: [
new webpack.optimize.UglifyJsPlugin({
compress: {
warnings: false
},
sourceMap: false,
parallel: true
}),
new HtmlWebpackPlugin({
filename: \'index.html\',
template: \'index.html\',
inject: true,
minify: {
removeComments: true,
collapseWhitespace: true,
removeAttributeQuotes: true
// more options:
// https://github.com/kangax/html-minifier#options-quick-reference
},
}),
new webpack.optimize.CommonsChunkPlugin({
name: \'ventor\',
minChunks: Infinity
})
]
})
项目目录如下图:
如图,我们已经实现了一个简单的类vue-cli构建工具。详细的代码可以去我的github看:https://github.com/cheer4chai/webpack-learning,如果能帮助到你,烦请点个star~
以上是 从零开始开发一个简易的类vue-cli构建工具 的全部内容, 来源链接: utcz.com/z/375090.html