vue源码解读之 双向数据绑定(二)

介绍
上一节中,我们说到了一些简单的概念,大家可能看的云里雾里还觉得废话一大堆,这一节我们话不多说,直接上代码。
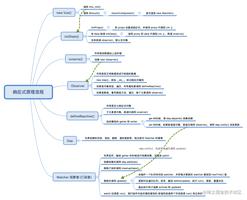
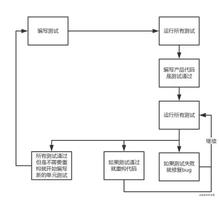
以上的思维导图即双向数据绑定的原理。为本人个人看法。下面将通过我的心路历程来进行编写。
html部分
以下是html部分,我们模仿vue设置一个大的id=‘app’包裹我们要展示的部分,里面一个输入框充当(号角)的作用,h1标签充当 战士要做的事,即要展示我们输入框里输入的内容。
<div id='app'> <input type="text" v-model='valueone' class='input'
<h1 v-html='valueone'></h1>
</div>
JS部分
1、首先,我们先把js一开始加载的部分做好,看如下代码会发现,和我们平时使用的vue是一样的。el代表我们的dom元素,data就是绑定的数据值。
window.function(){
var getVue=new Vue({
el:’#app’,
data:{valueone:‘xixi’,valuetwo:‘num 2’},
})
}
2、Vue构造函数的编写
function Vue(options){
this.
this.el=document.querySelector(options.el);this.data=options.data;
this.bindingList={};
this.Observer(this.
this.Compile(this.data);this.Compile(this.el);
}
以上代码的意思就是我们我们将new得到的东西挂到this上,其中Observer 的作用就是进行数据的拦截工作。ComPile 就是解析我们的html代码。这个this.bindingList={}是什么意思我们先不管他。2 操作就是我们写的vue构造函数。
3、Observer
Vue.prototype.observe=function(dataObj){ Object.keys(dataObj).forEach((key)=>{
var value=dataObj[key] //data里的数据
this.bindingList[key]=[] // bindingList:{modelValue:[watcher1,watcher2]}
Object.defineProperty(this.$data,key,{
enumerable: true,
configurable: true,
get:function(){
return value;
},
set:(value2)=>{
if(value2!=value){
value=value2
this.bindingList[key].forEach(item=>{ //这部分一下的代码内容先不要看。
console.log('去执行更新操作')
item.update()
})
}
this.bindingList[key].forEach(item=>{
console.log('去执行更新操作')
item.update()
})
}
})
});
}
这一步,我们做到了数据劫持,有些人说你这啥也没做,劫持了啥,不要急,各位看官。暂时让大家知道我们的数据setter和getter的概念。下面就是我们Watcher的编写。
4、Watcher
function Watcher(name,dom,vm,shuxing){ this.namevalue=name; //data里面的属性 这里是valueone
this.domvalue=dom; //要操作的dom元素
this.vmvalue=vm; //vm 实例的vue
this.shuxing=shuxing; //要设置的dom中的属性,如input中的value h span 等的innerhtml
this.update() //这一步一开始我也没懂,后来知道了,当我们一加载js给我们data初值时就要渲染到我们的页面中,所以一开始就要update
}
//这里是当检测到了变化,我们要做的操作,即update函数的编写,我们是通过原型链的方式
Watcher.prototype.update=function(){
this.domvalue[this.shuxing]=this.vmvalue.$data[this.namevalue]; //拿我们data里的数据来重新渲染我们的dom元素
}
以上可能有些人已经开始懵13了,不明白什么意思,意思就是这个watcher会绑定在每一个本文中的v-model中,他和v-model死死抱住,当observer变化及data变化,我就做我自己函数里的事,起到一个监听的作用。本文的作用就是更新我抱住的这个dom元素 做什么,就是update的事 这里update是改变元素属性值。下面是Compile函数。
5、Compile
Vue.prototype.compile=function(dom){ var domList=Array.from(dom.children); //这是一个dom的数组。我们遍历这个数组 对拿到的数组进行属性遍历,如果有v-model的,我们就进行下一步操作
for(let i in domList){
if(domList[i].hasAttribute('v-model')){
var modelAttr=domList[i].getAttribute('v-model');
this.bindingList[modelAttr].push(new Watcher(modelAttr,domList[i],this,'value' )) //????
domList[i].addEventListener('input',(e)=>{
this.$data[modelAttr]=e.target.value
})
};
if(domList[i].hasAttribute('v-html')){
var modelAttr2=domList[i].getAttribute('v-html');
this.bindingList[modelAttr2].push(new Watcher( modelAttr2,domList[i],this,'innerHTML' //????
))
}
}
}
以上打四个**????** 的大家可能就不有点蒙了 this.bindlist是什么 从头到尾又不说。我一开始也很蒙,百度的话大家的答案都千篇一律,说是什么订阅器。我来给大家捋一捋,我们先去看看上一节中说到了买房卖房的案例。假如我现在有房了,是不是要打电话告诉之前我们要买房的人。这时候这个花名册就是我们的订阅器。每个data中的属性都有一个订阅器。每个订阅器都有很多个Watcher,每个Wather都有自己要做的事,前提是要拿到这个data属性。比如我们去买房,很多人要排队,此时我们本人就是watcher,我们需要房子,房子就是data。 至于有了房做什么,每个人都可以不同,有的住,有得炒。而我们这些排队的人都在花名册里。当我们选的哪一栋开盘了,就通过花名册告诉我们 我们再去买。(累死我了 ,感觉越解释越解释不清了。难受。。。)
我想说的就是很多人都会卡在这个bindingList上 。上文中的compile就是对遍历过后的v-model再看看他绑定的是哪个data 如果一样,就把我们这个watcher加入到bindingList的对象数组中。
流程回顾
首先,我们通过data劫持,来加入一个订阅器,一个data中的属性一个空订阅器,本人data就两个属性,valueone,valuetwo 我们的订阅器就叫 binddingList 加完就是 bingingList:{ valueone:[ //存放无数个需要用到这个valueone的watcher] } 里面存放的都是所有要用到这个valueone的订阅者。 当我们进行set操作时,如果和以前的data比较不同,则就update 所有的wathcer数组 ,update什么,每个watcher里面都有定义。本文是通过几个参数 比如(name,dom,vm,shuxing) 不明白这几个参数的意思的到上文代码中找。
<!DOCTYPE html><head>
<title>myVue</title>
</head>
<style>
#app {
text-align: center;
}
</style>
<body>
<div id="app">
<form>
<input type="text" v-model="number">
<button type="button" v-click="increment">增加</button>
</form>
<h3 v-bind="number"></h3>
<form>
<input type="text" v-model="count">
<button type="button" v-click="incre">增加</button>
</form>
<h3 v-bind="count"></h3>
</div>
</body>
<script>
function myVue(options) {
this._init(options);
}
myVue.prototype._init = function (options) {
this.$options = options;
this.$el = document.querySelector(options.el);
this.$data = options.data;
this.$methods = options.methods;
this._binding = {};
this._obverse(this.$data);
this._complie(this.$el);
}
myVue.prototype._obverse = function (obj) { //{number:0} this.binding.number={directives:[]}
var _this = this;
Object.keys(obj).forEach(function (key) {
if (obj.hasOwnProperty(key)) {
_this._binding[key] = {
_directives: []
};
console.log(_this._binding[key])
var value = obj[key];
if (typeof value === 'object') {
_this._obverse(value);
}
var binding = _this._binding[key];
Object.defineProperty(_this.$data, key, {
enumerable: true,
configurable: true,
get: function () {
console.log(`${key}获取${value}`);
return value;
},
set: function (newVal) {
console.log(`${key}更新${newVal}`);
if (value !== newVal) {
value = newVal;
binding._directives.forEach(function (item) {
item.update();
})
}
}
})
}
})
}
myVue.prototype._complie = function (root) {
var _this = this;
var nodes = root.children;
for (var i = 0; i < nodes.length; i++) {
var node = nodes[i];
if (node.children.length) {
this._complie(node);
}
if (node.hasAttribute('v-click')) {
node.onclick = (function () {
var attrVal = nodes[i].getAttribute('v-click');
return _this.$methods[attrVal].bind(_this.$data);
})();
}
if (node.hasAttribute('v-model') && (node.tagName == 'INPUT' || node.tagName == 'TEXTAREA')) {
node.addEventListener('input', (function(key) {
var attrVal = node.getAttribute('v-model');
_this._binding[attrVal]._directives.push(new Watcher(
'input',
node,
_this,
attrVal,
'value'
))
return function() {
_this.$data[attrVal] = nodes[key].value;
}
})(i));
}
if (node.hasAttribute('v-bind')) {
var attrVal = node.getAttribute('v-bind');
_this._binding[attrVal]._directives.push(new Watcher(
'text',
node,
_this,
attrVal,
'innerHTML'
))
}
}
}
function Watcher(name, el, vm, exp, attr) {
this.name = name; //指令名称,例如文本节点,该值设为"text"
this.el = el; //指令对应的DOM元素
this.vm = vm; //指令所属myVue实例
this.exp = exp; //指令对应的值,本例如"number"
this.attr = attr; //绑定的属性值,本例为"innerHTML"
this.update();
}
Watcher.prototype.update = function () {
this.el[this.attr] = this.vm.$data[this.exp];
}
window.onload = function() {
var app = new myVue({
el:'#app',
data: {
number: 0,
count: 0,
},
methods: {
increment: function() {
this.number ++;
},
incre: function() {
this.count ++;
}
}
})
}
</script>
最后
最后,我想说的是,本人也是一名前端爱好者,当你百度vue源码的时候说明你已经再往更深的地方去进步了。希望我的这点绵薄之力能祝你飞上去。嘻嘻
以上是 vue源码解读之 双向数据绑定(二) 的全部内容, 来源链接: utcz.com/z/375017.html

