Spring----工厂注入和bean的生命周期
本文内容纲要:
- 独立的集合bean- P名空间
- 静态工厂注入
- 实例工厂注入
- bean之间的依赖关系
- 生命周期" title="bean的生命周期">bean的生命周期
- 使用注解配置:
独立的集合bean
在多个bean之间可共享该独立bean。
示例:
<bean id="car1" class="com.entity.Car"> <property name="brand" value="BMW"/>
<property name="color" value="白色"/>
</bean>
<bean id="car2" class="com.entity.Car">
<property name="brand" value="BENZ"/>
<property name="color" value="红色"/>
</bean>
<bean id="car3" class="com.entity.Car">
<property name="brand" value="AUDI"/>
<property name="color" value="黑色"/>
</bean>
<util:list id="mycars">
<ref bean="car1"/>
<ref bean="car2"/>
<ref bean="car3"/>
</util:list>
在其他bean中即可共享该mycars--bean。
<bean name="stu,s1,s2" class="com.entity.Students"> <property name="cars">
<ref bean="mycars"/>
</property>
</bean>
P名空间
使用p命名空间时需要先声明使用对应的命名空间,即在beans元素上加入:
xmlns:p="http://www.springframework.org/schema/p"使用p命名空间的好处是简化配置信息。
示例:
<bean id="car1" class="com.entity.Car" p:brand="BMW" p:color="白色"/> <bean id="car2" class="com.entity.Car" p:brand="BENZ" p:color="红色"/>
<bean id="car3" class="com.entity.Car" p:brand="AUDI" p:color="黑色"/>
静态工厂注入
使用的是工厂中的静态方法。
在service层引用的dao,1.可以使用原始的方式注入,2.也可以使用静态工厂注入,自己编写一个工厂类,里面静态方法返回一个dao的实现类对象。
静态工厂BinessDAOFactory:
package com.factory;import com.dao.CarDAO;
import com.dao.StudentsDAO;
import com.dao.impl.CarDAOImpl;
import com.dao.impl.StudentsDAOImpl;
public class BinessDAOFactory {
//获得学生的DAO实例
public static StudentsDAO getStudentsDAOImplInstance(){
return new StudentsDAOImpl();
}
//获得汽车的DAO实例、
public static CarDAO getCarDAOImplInstance(){
return new CarDAOImpl();
}
//获得用户的DAO实例
/*public static UsersDAO getUsersDAOImplInstance(){
return new UsersDAOImpl();
}*/
}
applicationContext.xml:
<!-- 一个学生bean --> <bean id="s" class="com.entity.Students" p:sid="s0001" p:name="金泰妍" p:gender="女" p:birthday="1989-03-09" p:address="韩国"/>
<!-- 学生dao bean -->
<bean id="sDao" class="com.factory.BinessDAOFactory"
factory-method="getStudentsDAOImplInstance">//静态方法
</bean>
<!-- 学生service bean -->
<bean id="sService" class="com.service.impl.StudentsServiceImpl">
<property name="studentsDAO" ref="sDao"></property>
</bean>
测试:
@Test public void fun1(){
ApplicationContext ctx=new ClassPathXmlApplicationContext("applicationContext.xml");
Students s=(Students) ctx.getBean("s");
//System.out.println(s);
StudentsServiceImpl sService=(StudentsServiceImpl) ctx.getBean("sService");
sService.add(s);
}
实例工厂注入
工厂:
public class BinessDAOFactory { //获得学生的DAO实例
public StudentsDAO getStudentsDAOImplInstance(){
return new StudentsDAOImpl();
}
}
applicationContext.xml:
<!-- 工厂bean的注入 --> <bean id="businessFactory" class="com.factory.BinessDAOFactory"></bean>
<!-- 实例工厂注入--得到dao的bean -->
<bean id="sDao1" factory-bean="businessFactory" factory-method="getStudentsDAOImplInstance">
</bean>
<!-- 学生service bean -->
<bean id="sService" class="com.service.impl.StudentsServiceImpl">
<property name="studentsDAO" ref="sDao1"></property>
</bean>
测试:
public class StudentServiceImplTest { @Test
public void fun1(){
ApplicationContext ctx=new ClassPathXmlApplicationContext("applicationContext.xml");
Students s=(Students) ctx.getBean("s");
//System.out.println(s);
StudentsServiceImpl sService=(StudentsServiceImpl) ctx.getBean("sService");
sService.add(s);
}
}
bean之间的依赖关系
在Students类中加上Car car这个属性字段。
<!-- 一个学生bean --> <bean id="s" class="com.entity.Students" p:sid="s0001" p:name="金泰妍" p:gender="女" p:birthday="1989-03-09" p:address="韩国" p:car-ref="c" depends-on="c"/>
<bean id="c" class="com.entity.Car" p:brand="BWM" p:color="白色"/>
学生bean依赖汽车bean,在初始化的时候会先初始化Car。
bean的生命周期
1.懒加载,在用到该bean的时候,才会去初始化它,加载它。
Students.java:
package com.entity;import java.io.Serializable;
import java.text.ParseException;
import java.text.SimpleDateFormat;
import java.util.Date;
import java.util.List;
import javax.annotation.PostConstruct;
import javax.annotation.Resource;
import org.springframework.beans.factory.annotation.Value;
import org.springframework.context.annotation.Bean;
import org.springframework.stereotype.Component;
//加注解注入,起一个别名s1
@Component("haha")
public class Students implements Serializable {
private String sid;// 学号
private String name;// 姓名
private String gender;// 性别
private Date birthday;// 生日
private String address;// 住址
private Car car;// 学生拥有的车的引用
// private List<Car> cars;
//初始化方法,在构造方法之后调用
public void initStudents(){
System.out.println("执行学生的initStudents()方法");
}
//在ApplicationContext对象被销毁的时候执行
public void destroyStudents(){
System.out.println("执行学生的destroyStudents()方法");
}
public Students(String sid, String name, String gender, Date birthday,
String address) {
super();
this.sid = sid;
this.name = name;
this.gender = gender;
this.birthday = birthday;
this.address = address;
}
public Students(String sid, String name, String gender, Date birthday,
String address, Car car) {
super();
this.sid = sid;
this.name = name;
this.gender = gender;
this.birthday = birthday;
this.address = address;
this.car = car;
}
public Car getCar() {
return car;
}
public void setCar(Car car) {
this.car = car;
}
public Students(String sid, String name, String gender, String address) {
this.sid = sid;
this.name = name;
this.gender = gender;
this.address = address;
}
/*//解决方法1:
//在构造方法之后执行一些初始化的操作
@PostConstruct
public void init(){
//在调用完构造函数之后,birthday还为null,然后使用这个直接赋值
try {
this.setBirthday(new SimpleDateFormat("yyyy-MM-dd").parse("2000-05-17"));
} catch (ParseException e) {
// TODO Auto-generated catch block
e.printStackTrace();
}
}*/
public Students() {
System.out.println("一个学生创建啦...");
}
public String getSid() {
return sid;
}
// @Value("s0006")
public void setSid(String sid) {
this.sid = sid;
}
public String getName() {
return name;
}
// @Value("IU")
public void setName(String name) {
System.out.println("执行了setName()方法");
this.name = name;
}
public String getGender() {
return gender;
}
// @Value("女")
public void setGender(String gender) {
this.gender = gender;
}
public Date getBirthday() {
return birthday;
}
// @Value("1998-07-15")
public void setBirthday(Date birthday) {
this.birthday = birthday;
}
public String getAddress() {
return address;
}
// @Value("韩国首尔")
public void setAddress(String address) {
this.address = address;
}
@Override
public String toString() {
return "Students [sid=" + sid + ", name=" + name + ", gender=" + gender
+ ", birthday=" + birthday + ", address=" + address + ", car="
+ car + "]";
}
}
applicationContext.xml:
<!-- 一个学生bean --> <bean id="s" class="com.entity.Students" p:sid="s0001" p:name="金泰妍" p:gender="女" p:birthday="1989-03-09" p:address="韩国" p:car-ref="c" depends-on="c" lazy-init="true" init-method="initStudents" destroy-method="destroyStudents" scope="prototype"/>
<bean id="c" class="com.entity.Car" p:brand="BWM" p:color="白色"/>
测试:
public class StudentServiceImplTest { @Test
public void fun1(){
ApplicationContext ctx=new ClassPathXmlApplicationContext("applicationContext.xml");
Students s=(Students) ctx.getBean("s");
Students ss=(Students) ctx.getBean("s");
System.out.println(s==ss);//单例:true prototype:false
//System.out.println(s);
StudentsServiceImpl sService=(StudentsServiceImpl) ctx.getBean("sService");
sService.add(s);
((ClassPathXmlApplicationContext)ctx).close();
}
}
使用注解配置:
Students.java:
package com.entity;import java.io.Serializable;
import java.text.ParseException;
import java.text.SimpleDateFormat;
import java.util.Date;
import java.util.List;
import javax.annotation.PostConstruct;
import javax.annotation.PreDestroy;
import javax.annotation.Resource;
import org.springframework.beans.factory.annotation.Value;
import org.springframework.context.annotation.Bean;
import org.springframework.context.annotation.DependsOn;
import org.springframework.context.annotation.Scope;
import org.springframework.stereotype.Component;
//加注解注入,起一个别名s1
@Component("s")
@DependsOn(value="car")//依赖关系
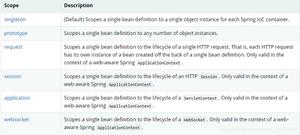
@Scope("prototype")//得到的bean对象是否为单例的singleton,prototype
public class Students implements Serializable {
private String sid;// 学号
private String name;// 姓名
private String gender;// 性别
private Date birthday;// 生日
private String address;// 住址
private Car car;// 学生拥有的车的引用
// private List<Car> cars;
//初始化方法,在构造方法之后调用
@PostConstruct//初始化方法
public void initStudents(){
System.out.println("执行学生的initStudents()方法");
}
//在ApplicationContext对象被销毁的时候执行
@PreDestroy//销毁方法
public void destroyStudents(){
System.out.println("执行学生的destroyStudents()方法");
}
public Students(String sid, String name, String gender, Date birthday,
String address) {
super();
this.sid = sid;
this.name = name;
this.gender = gender;
this.birthday = birthday;
this.address = address;
}
public Students(String sid, String name, String gender, Date birthday,
String address, Car car) {
super();
this.sid = sid;
this.name = name;
this.gender = gender;
this.birthday = birthday;
this.address = address;
this.car = car;
}
public Car getCar() {
return car;
}
@Resource(name="car")
public void setCar(Car car) {
this.car = car;
}
public Students(String sid, String name, String gender, String address) {
this.sid = sid;
this.name = name;
this.gender = gender;
this.address = address;
}
/*//解决方法1:
//在构造方法之后执行一些初始化的操作
@PostConstruct
public void init(){
//在调用完构造函数之后,birthday还为null,然后使用这个直接赋值
try {
this.setBirthday(new SimpleDateFormat("yyyy-MM-dd").parse("2000-05-17"));
} catch (ParseException e) {
// TODO Auto-generated catch block
e.printStackTrace();
}
}*/
public Students() {
System.out.println("一个学生创建啦...");
}
public String getSid() {
return sid;
}
@Value("s0006")
public void setSid(String sid) {
this.sid = sid;
}
public String getName() {
return name;
}
@Value("IU")
public void setName(String name) {
System.out.println("执行了setName()方法");
this.name = name;
}
public String getGender() {
return gender;
}
@Value("女")
public void setGender(String gender) {
this.gender = gender;
}
public Date getBirthday() {
return birthday;
}
@Value("1998-07-15")
public void setBirthday(Date birthday) {
this.birthday = birthday;
}
public String getAddress() {
return address;
}
@Value("韩国首尔")
public void setAddress(String address) {
this.address = address;
}
@Override
public String toString() {
return "Students [sid=" + sid + ", name=" + name + ", gender=" + gender
+ ", birthday=" + birthday + ", address=" + address + ", car="
+ car + "]";
}
}
Car.java:
package com.entity;import java.io.Serializable;
import org.springframework.beans.factory.annotation.Value;
import org.springframework.stereotype.Component;
//注解注入,,之后的实例名称叫car
@Component("car")
public class Car implements Serializable{
private String brand;// 品牌
private String color;// 颜色
public Car() {
System.out.println("一辆汽车诞生啦...");
}
public Car(String brand, String color) {
super();
this.brand = brand;
this.color = color;
}
public String getBrand() {
return brand;
}
@Value("BMW")
public void setBrand(String brand) {
this.brand = brand;
}
public String getColor() {
return color;
}
@Value("黑色")
public void setColor(String color) {
this.color = color;
}
@Override
public String toString() {
return "Car [brand=" + brand + ", color=" + color + "]";
}
}
<?xml version="1.0" encoding="UTF-8"?>
<beans xmlns="http://www.springframework.org/schema/beans"
xmlns:xsi="http://www.w3.org/2001/XMLSchema-instance"
xmlns:context="http://www.springframework.org/schema/context"
xmlns:aop="http://www.springframework.org/schema/aop"
xmlns:tx="http://www.springframework.org/schema/tx"
xmlns:util="http://www.springframework.org/schema/util"
xmlns:cache="http://www.springframework.org/schema/cache"
xmlns:p="http://www.springframework.org/schema/p"
xsi:schemaLocation="http://www.springframework.org/schema/beans
http://www.springframework.org/schema/beans/spring-beans-4.0.xsd
http://www.springframework.org/schema/aop
http://www.springframework.org/schema/aop/spring-aop-4.0.xsd
http://www.springframework.org/schema/util
http://www.springframework.org/schema/util/spring-util-4.0.xsd
http://www.springframework.org/schema/context
http://www.springframework.org/schema/context/spring-context-4.0.xsd
http://www.springframework.org/schema/tx
http://www.springframework.org/schema/tx/spring-tx-4.0.xsd
http://www.springframework.org/schema/cache
http://www.springframework.org/schema/cache/spring-cache-4.0.xsd">
<!-- 表示使用注解 -->
<context:annotation-config/>
<!-- 扫描带注解的包 -->
<context:component-scan base-package="com.entity"/>
<!-- 实现类型转换的bean -->
<!-- id的名字必须是这个 -->
<bean id="customEditorConfigurer" class="org.springframework.beans.factory.config.CustomEditorConfigurer">
<property name="propertyEditorRegistrars">
<list>
<bean class="com.convert.MyCustomDateEditorRegister">
<property name="format" value="yyyy-MM-dd"></property>
</bean>
</list>
</property>
</bean>
<bean id="dateFormat" class="java.text.SimpleDateFormat">
<constructor-arg value="yyyy-MM-dd"/>
</bean>
<!-- 一个学生bean -->
<!-- <bean id="s" class="com.entity.Students" p:sid="s0001" p:name="金泰妍" p:gender="女" p:birthday="1989-03-09" p:address="韩国" p:car-ref="c" depends-on="c" lazy-init="true" init-method="initStudents" destroy-method="destroyStudents" scope="prototype"/>
<bean id="c" class="com.entity.Car" p:brand="BWM" p:color="白色"/> -->
<!-- 静态工厂注入 学生dao bean -->
<!-- <bean id="sDao" class="com.factory.BinessDAOFactory"
factory-method="getStudentsDAOImplInstance">
</bean> -->
<!-- 工厂bean的注入 -->
<bean id="businessFactory" class="com.factory.BinessDAOFactory"></bean>
<!-- 实例工厂注入##得到dao的bean -->
<bean id="sDao1" factory-bean="businessFactory" factory-method="getStudentsDAOImplInstance">
</bean>
<!-- 学生service bean -->
<bean id="sService" class="com.service.impl.StudentsServiceImpl">
<property name="studentsDAO" ref="sDao1"></property>
</bean>
</beans>
测试:
package com.service.impl;import org.junit.Test;
import org.springframework.context.ApplicationContext;
import org.springframework.context.support.AbstractApplicationContext;
import org.springframework.context.support.ClassPathXmlApplicationContext;
import com.entity.Students;
public class StudentServiceImplTest {
@Test
public void fun1(){
ApplicationContext ctx=new ClassPathXmlApplicationContext("applicationContext.xml");
Students s=(Students) ctx.getBean("s");
Students ss=(Students) ctx.getBean("s");
System.out.println(s==ss);//单例:true prototype:false
//System.out.println(s);
StudentsServiceImpl sService=(StudentsServiceImpl) ctx.getBean("sService");
sService.add(s);
((ClassPathXmlApplicationContext)ctx).close();
}
}
本文内容总结:独立的集合bean,P名空间,静态工厂注入,实例工厂注入,bean之间的依赖关系,bean的生命周期,使用注解配置:,
原文链接:https://www.cnblogs.com/xjs1874704478/p/11202876.html
以上是 Spring----工厂注入和bean的生命周期 的全部内容, 来源链接: utcz.com/z/362482.html

