Spring Bean生命周期的各阶段介绍
本文内容纲要:
- 一. xml方式配置Bean- 1.1 创建Student类
- 1.2 创建配置文件
- 1.3 测试
- 二.Aware接口
- 2.1 BeanNameAware
- 2.2 BeanFactoryAware
- 2.3 ApplicationContextAware
- 2.4 Aware各接口执行的先后顺序
- 2.4 Aware接口总结
- 三.BeanPostProcessor接口
- 四.InitializingBean接口
- 五.init-method
- 六.DestructionAwareBeanPostProcessor接口
- 七.DisposableBean接口
- 八.destroy-method方法
- 九.声明周期大杂烩
- 9.1 实现多接口的Student类
- 9.2 BeanPostProcessor前后置处理
- 9.3 DestructionAwareBeanPostPrecessor接口
- 9.4 配置xml文件
- 9.5 测试代码
- 9.6 输出结果
- 十.总结
一.xml方式配置bean
二.Aware接口
2.1 BeanNameAware
2.2 BeanFactoryAware
2.3 ApplicationContextAware
2.4 Aware各接口的执行顺序
2.4 Aware接口总结
三.BeanPostProcessor接口
四.InitializingBean接口
五.init-method方法
六.DestructionAwareBeanPostProcessor接口
七.DisposableBean接口
八.destory-method方法
九.生命周期大杂烩
9.1 实现多接口的Student类
9.2 BeanPostProcessor前后置处理
9.3 DestructionAwareBeanPostPrecessor接口
9.4 配置xml文件
9.5 测试代码
9.6 输出结果
十.总结
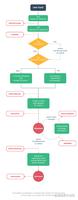
Spring Bean的生命周期是一个老生常谈的问题了,网上一搜一大把,无非就是画一幅流程图(比如下面这幅图),然后用语言介绍创建bean后执行各Aware接口,然后BeanPostProcessor.....最终Bean创建成功了,就可以使用这个Bean了,然后在容器销毁的时候,又会执行一些操作。
其实对于上面的提到的流程图,注意上面的图只是Spring Bean的大概流程(省略了一部分),主要涉及到了5个接口,分别是XxxAware、BeanPostProcessor、InitiailizingBean、Destruction、DisposableBean接口,本文将会对这几个接口,以及init-method、destroy-method做相关的使用介绍,在明白怎么使用后,再把他们串起来,这样的话,对于Spring Bean的生命周期就差不多知道咋回事了,而不用死记硬背。
一. xml方式配置Bean
在说Aware、BeanPostProcessor、InitiailizingBean、Destruction、DisposableBean这些接口前,先简单回顾一下使用xml配置并获取一个Student类的bean过程,后面介绍各个接口的使用方式时时,也是按照这个形式;
1.1 创建Student类
平淡无奇的Student类:
package cn.ganlixin.entity;import lombok.Data;
import lombok.extern.slf4j.Slf4j;
@Data
@Slf4j
public class Student {
private Integer id;
private String name;
}
1.2 创建配置文件
平淡无奇的applicationContext.xml配置文件,创建一个student bean,利用setter方式设置初始值:
<?xml version="1.0" encoding="UTF-8"?><beans xmlns="http://www.springframework.org/schema/beans"
xmlns:xsi="http://www.w3.org/2001/XMLSchema-instance"
xsi:schemaLocation="http://www.springframework.org/schema/beans
http://www.springframework.org/schema/beans/spring-beans.xsd">
<bean class="cn.ganlixin.entity.Student" id="student">
<property name="id" value="99"/>
<property name="name" value="张三"/>
</bean>
</beans>
1.3 测试
创建一个Main类,用于测试
package cn.ganlixin;import cn.ganlixin.entity.Student;
import lombok.extern.slf4j.Slf4j;
import org.springframework.beans.factory.BeanFactory;
import org.springframework.beans.factory.xml.XmlBeanFactory;
import org.springframework.core.io.ClassPathResource;
@Slf4j
public class Test {
public static void main(String[] args) {
BeanFactory beanFactory = new XmlBeanFactory(new ClassPathResource("applicationContext.xml"));
Student student = beanFactory.getBean("student", Student.class);
log.info("测试程序获取到的student bean:{}", student);
}
}
下面是运行程序的输出,可以看到和预期相符,创建一个Student的bean,id和name默认值为99、张三;
INFO [main] cn.ganlixin.Test - 测试程序获取到的student bean:Student(id=99, name=张三)
二.Aware接口
Aware接口有很多实现类,本文只介绍BeanNameAware、BeanFactoryAware、ApplicationContextAware,关系如下:
2.1 BeanNameAware
创建一个Student类,让该类实现BeanNameAware接口,并且重写setBeanName方法
@Data@Slf4j
public class Student implements BeanNameAware {
private Integer id;
private String name;
/**
* 实现了BeanNameAware接口后,需重写setBeanName方法,接收的参数就是bean的id
*
* @param s bean的id
*/
@Override
public void setBeanName(String s) {
log.info("beanName:{}, student bean:{}", s, this);
this.id = 100;
log.info("将beanName:{}的id改为100", s);
}
}
配置文件和测试程序都不改变,运行测试程序,输出内容如下:
INFO [main] cn.ganlixin.entity.Student - beanName:student, student bean:Student(id=99, name=张三)INFO [main] cn.ganlixin.entity.Student - 将beanName:student的id改为100
INFO [main] cn.ganlixin.Test - 测试程序获取到的student bean:Student(id=100, name=张三)
可以看到,实现BeanNameAware接口后,重写setBeanName的方法中,获取到的student bean,是已经初始化的bean(属性都已经有值了),并且setBeanName方法中可以对当前的bean进行各种操作,包括修改bean的某些属性,最后获取到的bean是已经修改后的bean。
这里只是简单介绍了一下BeanNameAware接口的用法,使用BeanNameAware接口,可以对当前Bean进行操作。
2.2 BeanFactoryAware
创建Student类,实现BeanFactoryAware接口,并且重写setBeanFactory方法
@Data@Slf4j
public class Student implements BeanFactoryAware {
private Integer id;
private String name;
/**
* 实现BeanFactoryAware接口后,需重写setBeanFactroy方法
*
* @param beanFactory 创建该bean的beanFactory
*/
@Override
public void setBeanFactory(BeanFactory beanFactory) throws BeansException {
// 可以在setBeanFactory方法中获取、修改beanFactory中的所有bean
log.info("student this bean:{}", this);
Student student = beanFactory.getBean("student", Student.class);
log.info("通过beanFactory获取student bean:{}", student);
// 将name设置为李四
this.name = "李四";
}
}
运行输出如下:
INFO [main] cn.ganlixin.entity.Student - student this bean:Student(id=99, name=张三)INFO [main] cn.ganlixin.entity.Student - 通过beanFactory获取student bean:Student(id=99, name=张三)
INFO [main] cn.ganlixin.Test - 测试程序获取到的student bean:Student(id=99, name=李四)
通过上面的代码输出结果可以看出,实现BeanFactoryAware接口后,可以在setBeanFactory方法中操作BeanFactory的所有bean,操作的范围要比BeanNameAware要大。
2.3 ApplicationContextAware
ApplicationContext,有多种称呼,比如“应用容器”、“环境”、“上线文”...
创建Student类,实现ApplicationContextAware接口,并且重写setApplicationContext接口:
@Data@Slf4j
public class Student implements ApplicationContextAware {
private Integer id;
private String name;
/**
* 实现ApplicationContextAware接口后,徐重写setApplicationContext方法
*
* @param applicationContext 该bean所在的上下文(applicationContext、容器)
*/
@Override
public void setApplicationContext(ApplicationContext applicationContext) throws BeansException {
log.info("Student this:{}", this);
final Student student = applicationContext.getBean("student", Student.class);
final Environment environment = applicationContext.getEnvironment();
log.info("student bean:{}", student);
log.info("env -> user.dir:{}", environment.getProperty("user.dir"));
}
}
需要修改一下测试程序,测试程序中加载配置时使用的XmlBeanFactory,而XmlBeanFactory不会回调ApplicationContextAware接口的setApplicationContext方法,下面使用ClassPathXmlApplicationContext类来加载配置:
@Slf4jpublic class Test {
public static void main(String[] args) {
//BeanFactory beanFactory = new XmlBeanFactory(new ClassPathResource("applicationContext.xml"));
// 使用ApplicationContext来加载配置
ApplicationContext context = new ClassPathXmlApplicationContext("applicationContext.xml");
Student student = context.getBean("student", Student.class);
log.info("测试程序获取到的student bean:{}", student);
}
}
运行测试程序:
INFO [main] cn.ganlixin.entity.Student - Student this:Student(id=99, name=张三)INFO [main] cn.ganlixin.entity.Student - student bean:Student(id=99, name=张三)
INFO [main] cn.ganlixin.entity.Student - env -> user.dir:/Users/ganlixin/code/java-code-all/spring
INFO [main] cn.ganlixin.Test - 测试程序获取到的student bean:Student(id=99, name=张三)
实现ApplicationContextAware接口后,在setApplicationContext方法中,入参是当前的applicationContext,也就是说,可以在该方法中对Spring容器进行设置,操作的范围又要比BeanFactoryAware的setBeanFactory要广得多。
2.4 Aware各接口执行的先后顺序
既然有这几个Aware接口,如果一个类同时实现了这3个接口,那么执行顺序是怎样的呢?下面就来测试一下。
创建Student类,分别实现BeanNameAware、BeanFactoryAware、ApplicationContextAware接口,并重写其接口的方法:
@Data@Slf4j
public class Student implements BeanNameAware, BeanFactoryAware, ApplicationContextAware {
private Integer id;
private String name;
/**
* 实现了BeanNameAware接口后,需重写setBeanName方法,接收的参数就是bean的id
*
* @param s bean的id
*/
@Override
public void setBeanName(String s) {
log.info("call BeanNameAware.setBeanName()");
}
/**
* 实现BeanFactoryAware接口后,需重写setBeanFactroy
*
* @param beanFactory 创建该bean的bean工厂
*/
@Override
public void setBeanFactory(BeanFactory beanFactory) throws BeansException {
log.info("call BeanFactoryAware.setBeanFactory()");
}
/**
* 实现ApplicationContextAware接口后,徐重写setApplicationContext方法
*
* @param applicationContext 该bean所在的上下文(applicationContext、容器)
*/
@Override
public void setApplicationContext(ApplicationContext applicationContext) throws BeansException {
log.info("call ApplicationContextAware.setApplicationContext()");
}
}
仍旧使用ClassPathXmlApplicationContext类来加载配置,运行输出结果如下:
INFO [main] cn.ganlixin.entity.Student - call BeanNameAware.setBeanName()INFO [main] cn.ganlixin.entity.Student - call BeanFactoryAware.setBeanFactory()
INFO [main] cn.ganlixin.entity.Student - call ApplicationContextAware.setApplicationContext()
INFO [main] cn.ganlixin.Test - 测试程序获取到的student bean:Student(id=99, name=张三)
2.4 Aware接口总结
上面演示了Spring中几个Aware接口的用法和特点,下面总结一下:
1.实现BeanNameAware接口后,重写setBeanName方法,可以对单个Bean进行扩展修改;
2.实现BeanFactoryAware接口后,重写setBeanFactory方法,可以对bean工厂中的所有Bean进行扩展修改;
3.实现ApplicationContextAware接口后,重写setApplicationContext方法后,可以对整个容器进行扩展修改;
4.这几个接口的执行顺序分别是BeanNameAware->BeanFactoryAware->ApplicationContextAware;
三.BeanPostProcessor接口
BeanPostProcessor和前面的Aware接口有些区别,通过下面的例子就能看出区别在哪里!
下面举个例子,创建MyBeanPostProcessor类,实现BeanPostProcessor接口,注意,这里没有在Student类上实现BeanPostProcessor接口。
@Slf4jpublic class MyBeanPostProcessor implements BeanPostProcessor {
/**
* 实现了BeanPostProcessor接口后,重写postProcessBeforeInitialization,在各种Aware接口执行完毕后执行该方法
*
* @param bean 本次处理的bean
* @param beanName 本次处理的beanName(bean id)
* @return 返回的是在本方法中处理后的bean
*/
@Override
public Object postProcessBeforeInitialization(Object bean, String beanName) throws BeansException {
log.info("MyBeanPostProcessor.postProcessBeforeInitialization, beanName:{}, bean:{}", beanName, bean);
return bean;
}
/**
* 实现了BeanPostProcessor接口后,重写postProcessBeforeInitialization,在initMethod方法执行完毕后执行该方法
*
* @param bean 本次处理的bean
* @param beanName 本次处理的beanName(bean id)
* @return 返回的是在本方法中处理后的bean
*/
@Override
public Object postProcessAfterInitialization(Object bean, String beanName) throws BeansException {
log.info("MyBeanPostProcessor.postProcessAfterInitialization, beanName:{}, bean:{}", beanName, bean);
return bean;
}
}
创建两个类,分别是Student和User类,其中Use类没有实现Aware接口,Student类实现了前面提到的3个Aware接口
@Datapublic class User {
private Integer id;
private String name;
}
@Data@Slf4j
public class Student implements BeanNameAware, BeanFactoryAware, ApplicationContextAware {
private Integer id;
private String name;
/**
* 实现了BeanNameAware接口后,需重写setBeanName方法,接收的参数就是bean的id
*
* @param s bean的id
*/
@Override
public void setBeanName(String s) {
log.info("call BeanNameAware.setBeanName()");
}
/**
* 实现BeanFactoryAware接口后,需重写setBeanFactroy
*
* @param beanFactory 创建该bean的bean工厂
*/
@Override
public void setBeanFactory(BeanFactory beanFactory) throws BeansException {
log.info("call BeanFactoryAware.setBeanFactory()");
}
/**
* 实现ApplicationContextAware接口后,徐重写setApplicationContext方法
*
* @param applicationContext 该bean所在的上下文(applicationContext、容器)
*/
@Override
public void setApplicationContext(ApplicationContext applicationContext) throws BeansException {
log.info("call ApplicationContextAware.setApplicationContext()");
}
}
xml配置文件:
<?xml version="1.0" encoding="UTF-8"?><beans xmlns="http://www.springframework.org/schema/beans"
xmlns:xsi="http://www.w3.org/2001/XMLSchema-instance"
xsi:schemaLocation="http://www.springframework.org/schema/beans
http://www.springframework.org/schema/beans/spring-beans.xsd">
<bean class="cn.ganlixin.entity.Student" id="student">
<property name="id" value="99"/>
<property name="name" value="张三"/>
</bean>
<bean class="cn.ganlixin.entity.User" id="user">
<property name="id" value="88"/>
<property name="name" value="王五"/>
</bean>
<!-- 将实现了BeanPostProcessor接口的类也声明为bean -->
<bean class="cn.ganlixin.processor.MyBeanPostProcessor"/>
</beans>
测试:
INFO [main] cn.ganlixin.entity.Student - call BeanNameAware.setBeanName()INFO [main] cn.ganlixin.entity.Student - call BeanFactoryAware.setBeanFactory()
INFO [main] cn.ganlixin.entity.Student - call ApplicationContextAware.setApplicationContext()
INFO [main] cn.ganlixin.processor.MyBeanPostProcessor - MyBeanPostProcessor.postProcessBeforeInitialization, beanName:student1, bean:Student(id=99, name=张三)
INFO [main] cn.ganlixin.processor.MyBeanPostProcessor - MyBeanPostProcessor.postProcessAfterInitialization, beanName:student1, bean:Student(id=99, name=张三)
INFO [main] cn.ganlixin.processor.MyBeanPostProcessor - MyBeanPostProcessor.postProcessBeforeInitialization, beanName:user, bean:User(id=88, name=王五)
INFO [main] cn.ganlixin.processor.MyBeanPostProcessor - MyBeanPostProcessor.postProcessAfterInitialization, beanName:user, bean:User(id=88, name=王五)
INFO [main] cn.ganlixin.Test - 测试程序获取到的student bean:Student(id=99, name=张三)
从上面的运行结果可以得出以下结论:
1.因为只有Student实现了Aware接口,所以创建student bean的时候会调用对应的Aware接口方法,而User类没有实现Aware接口,所以并没有调用Aware接口方法;
2.Student和User类都没有继承BeanPostProcessor接口,但是在创建student和user bean的时候,都掉用了MyBeanPostProcessor类中的前置和后置处理(继承自BeanPostProcessor接口);
3.BeanPostProcessor接口的前置和后置处理,是在Aware接口之后调用;
4.很重要的一点,需要将BeanPostProcessor接口实现类声明为bean,使用
四.InitializingBean接口
创建Student类,实现InitializingBean接口,然后重写afterPropertiesSet方法:
@Data@Slf4j
public class Student implements InitializingBean {
private Integer id;
private String name;
@Override
public void afterPropertiesSet() throws Exception {
// 同样可以在这里修改bean的属性值
log.info("InitialingBean.afterPropertiesSet, this:{}", this);
}
}
修改xml配置文件,创建student bean,测试:
INFO [main] cn.ganlixin.entity.Student - InitialingBean.afterPropertiesSet, this:Student(id=99, name=张三)INFO [main] cn.ganlixin.Test - 测试程序获取到的student bean:Student(id=99, name=张三)
五.init-method
创建Student类,增加一个额外的方法display()
@Data@Slf4j
public class Student {
private Integer id;
private String name;
public void display() {
log.info("Student.display call, this:{}", this);
}
}
修改配置文件,在
<?xml version="1.0" encoding="UTF-8"?><beans xmlns="http://www.springframework.org/schema/beans"
xmlns:xsi="http://www.w3.org/2001/XMLSchema-instance"
xsi:schemaLocation="http://www.springframework.org/schema/beans
http://www.springframework.org/schema/beans/spring-beans.xsd">
<bean class="cn.ganlixin.entity.Student" id="student" init-method="display">
<property name="id" value="99"/>
<property name="name" value="张三"/>
</bean>
</beans>
运行测试:
INFO [main] cn.ganlixin.entity.Student - Student.display call, this:Student(id=99, name=张三)INFO [main] cn.ganlixin.Test - 测试程序获取到的student bean:Student(id=99, name=张三)
上面,输出了display中的内容,这是在设置bean的时候调用的。
六.DestructionAwareBeanPostProcessor接口
DestructionAwareBeanPostProcessor接口,从名称上可以看出来是DestructionAware + BeanPostProcessor的组合,其实也的确是这样,但是需要注意的就是,spring并没有提供DestructionAware接口!!
下面是DestructionAwareBeanPostProcessor接口的定义:
public interface DestructionAwareBeanPostProcessor extends BeanPostProcessor { /**
* Destruction执行的操作
*
* @param bean 处理的bean
* @param beanName bean的名称
* @throws BeansException
*/
void postProcessBeforeDestruction(Object bean, String beanName) throws BeansException;
/**
* 是否需要执行postProcessBeforeDestruction方法
*
* @param bean 执行Destruction的bean
* @return 是否需要执行postProcessBeforeDestruction方法
*/
default boolean requiresDestruction(Object bean) {
return true;
}
}
DestructionAwareBeanPostProceesor继承自BeanPostProcessor接口,所以也可以重写前值和后置处理。
下面介绍使用示例,创建MyDestructionAwareBeanPostProceesor,继承DestructionAwareBeanPostProceesor接口:
@Slf4jpublic class MyDestructionAwareBeanPostProcessor implements DestructionAwareBeanPostProcessor {
@Override
public void postProcessBeforeDestruction(Object bean, String beanName) throws BeansException {
log.info("DestructionAwareBeanPostProcessor.postProcessBeforeDestruction, \n\tbeanName:{}, bean:{}", beanName, bean);
}
@Override
public boolean requiresDestruction(Object bean) {
return true; // 返回true,一律执行postProcessBeforeDestruction方法
// 如果返回false,则不执行postProcessBeforeDestruction方法
}
}
修改配置文件:
<?xml version="1.0" encoding="UTF-8"?><beans xmlns="http://www.springframework.org/schema/beans"
xmlns:xsi="http://www.w3.org/2001/XMLSchema-instance"
xsi:schemaLocation="http://www.springframework.org/schema/beans
http://www.springframework.org/schema/beans/spring-beans.xsd">
<bean class="cn.ganlixin.entity.Student" id="student">
<property name="id" value="99"/>
<property name="name" value="张三"/>
</bean>
<bean class="cn.ganlixin.entity.User" id="user">
<property name="id" value="88"/>
<property name="name" value="王五"/>
</bean>
<!-- 将实现了DestructionAwareBeanPostProcessor接口的实现类声明为bean> -->
<bean class="cn.ganlixin.processor.MyDestructionAwareBeanPostProcessor"/>
</beans>
测试程序:
@Slf4jpublic class Test {
public static void main(String[] args) {
// 使用ApplicationContext来加载配置
ApplicationContext context = new ClassPathXmlApplicationContext("applicationContext.xml");
Student student = context.getBean("student", Student.class);
User user = context.getBean("user", User.class);
log.info("测试程序获取到的student bean:{}", student);
// 获取bean工厂,然后调用destroyBean销毁bean
AutowireCapableBeanFactory factory = context.getAutowireCapableBeanFactory();
factory.destroyBean(student);
}
}
运行测试程序,输出如下:
INFO [main] cn.ganlixin.Test - 测试程序获取到的student bean:Student(id=99, name=张三)INFO [main] cn.ganlixin.processor.MyDestructionAwareBeanPostProcessor - DestructionAwareBeanPostProcessor.postProcessBeforeDestruction,
beanName:cn.ganlixin.entity.Student, bean:Student(id=99, name=张三)
可以看到,在手动调用destroyBean方法来销毁student bean的时候,调用了MyDestructionAwareBeanPostProcessor中定义的方法。
需要注意的是,虽然这里使用destroyBean来销毁了student bean,如果又通过getBean来获取student bean,则会重新创建student bean。
七.DisposableBean接口
前面介绍了DestructionAwareBeanPostProcessor接口,可以对所有的bean设置销毁(destruction)后的处理操作。
而这里介绍的DisposableBean接口,就是对单独的Bean进行destrction后的处理,也就是说不是应用到所有的bean上。
简单介绍一下用法,创建Student类和User类,User类正常(不实现任何接口),Student类实现DisposableBean接口,然后重写destroy方法:
@Data@Slf4j
public class Student implements DisposableBean {
private Integer id;
private String name;
@Override
public void destroy() throws Exception {
log.info("DisposableBean.destroy, this:{}", this);
}
}
@Data
public class User {
private Integer id;
private String name;
}
创建配置文件:
<?xml version="1.0" encoding="UTF-8"?><beans xmlns="http://www.springframework.org/schema/beans"
xmlns:xsi="http://www.w3.org/2001/XMLSchema-instance"
xsi:schemaLocation="http://www.springframework.org/schema/beans
http://www.springframework.org/schema/beans/spring-beans.xsd">
<bean class="cn.ganlixin.entity.Student" id="student">
<property name="id" value="99"/>
<property name="name" value="张三"/>
</bean>
<bean class="cn.ganlixin.entity.User" id="user">
<property name="id" value="88"/>
<property name="name" value="王五"/>
</bean>
</beans>
测试程序:
@Slf4jpublic class Test {
public static void main(String[] args) {
// 使用ApplicationContext来加载配置
ApplicationContext context = new ClassPathXmlApplicationContext("applicationContext.xml");
Student student = context.getBean("student", Student.class);
User user = context.getBean("user", User.class);
log.info("测试程序获取到的student bean:{}", student);
log.info("测试程序获取到的user bean:{}",user);
// 获取bean工厂,然后调用destroyBean销毁bean
AutowireCapableBeanFactory factory = context.getAutowireCapableBeanFactory();
factory.destroyBean(student);
factory.destroyBean(user);
}
}
运行输出:
INFO [main] cn.ganlixin.Test - 测试程序获取到的student bean:Student(id=99, name=张三)INFO [main] cn.ganlixin.Test - 测试程序获取到的user bean:User(id=88, name=王五)
INFO [main] cn.ganlixin.entity.Student - DisposableBean.destroy, this:Student(id=99, name=张三)
可以看到,虽然测试代码中destroy了student和user两个bean,但是只有student bean在销毁时触发了DisposableBean的destory方法。
八.destroy-method方法
和init-method相对应的就是destory-method方法了,创建Student类,增加clean方法(自定义):
@Data@Slf4j
public class Student {
private Integer id;
private String name;
public void clean() {
log.info("Student.clean, this:{}", this);
}
}
修改配置文件,
<bean class="cn.ganlixin.entity.Student" id="student" destroy-method="clean"> <property name="id" value="99"/>
<property name="name" value="张三"/>
</bean>
测试程序:
@Slf4jpublic class Test {
public static void main(String[] args) {
// 使用ApplicationContext来加载配置
ApplicationContext context = new ClassPathXmlApplicationContext("applicationContext.xml");
Student student = context.getBean("student", Student.class);
log.info("测试程序获取到的student bean:{}", student);
// 删除bean
BeanDefinitionRegistry registry = (BeanDefinitionRegistry) context.getAutowireCapableBeanFactory();
registry.removeBeanDefinition("student");
}
}
输出:
INFO [main] cn.ganlixin.Test - 测试程序获取到的student bean:Student(id=99, name=张三)INFO [main] cn.ganlixin.entity.Student - Student.clean, this:Student(id=99, name=张三)
九.声明周期大杂烩
上面对每一种接口都做了介绍,这里就将所有接口都做一下整合,尝试在一个测试程序中测试所有接口,这个过程中就会对Bean的生命周期有清晰的认识:
9.1 实现多接口的Student类
创建Student类,实现Aware、InitializingBean、DisposableBean接口,并且增加display、clean方法,作为init-method和destory-method。
package cn.ganlixin.entity;import lombok.Data;
import lombok.extern.slf4j.Slf4j;
import org.springframework.beans.BeansException;
import org.springframework.beans.factory.*;
import org.springframework.context.ApplicationContext;
import org.springframework.context.ApplicationContextAware;
@Data
@Slf4j
public class Student implements BeanNameAware, BeanFactoryAware, ApplicationContextAware, InitializingBean, DisposableBean {
private Integer id;
private String name;
@Override
public void setBeanName(String s) {
log.info("BeanNameAware.setBeanName, this:{}", this);
}
@Override
public void setBeanFactory(BeanFactory beanFactory) throws BeansException {
log.info("BeanFactoryAware.setBeanFactory, this:{}", this);
}
@Override
public void setApplicationContext(ApplicationContext applicationContext) throws BeansException {
log.info("ApplicationContextAware.setApplicationContext, this:{}", this);
}
@Override
public void afterPropertiesSet() throws Exception {
log.info("InitialingBean.afterPropertiesSet, this:{}", this);
}
@Override
public void destroy() throws Exception {
log.info("DisposableBean.destory, this:{}", this);
}
public void display() {
log.info("init-method, Student.display, this:{}", this);
}
public void clean() {
log.info("destroy-method, Student.clean, this:{}", this);
}
}
9.2 BeanPostProcessor前后置处理
创建MyBeanPostProcessor接口实现类,并重写前置和后置处理方法:
package cn.ganlixin.processor;import lombok.extern.slf4j.Slf4j;
import org.springframework.beans.BeansException;
import org.springframework.beans.factory.config.BeanPostProcessor;
@Slf4j
public class MyBeanPostProcessor implements BeanPostProcessor {
@Override
public Object postProcessBeforeInitialization(Object bean, String beanName) throws BeansException {
log.info("MyBeanPostProcessor.postProcessBeforeInitialization, beanName:{}, bean:{}", beanName, bean);
return bean;
}
@Override
public Object postProcessAfterInitialization(Object bean, String beanName) throws BeansException {
log.info("MyBeanPostProcessor.postProcessAfterInitialization, beanName:{}, bean:{}", beanName, bean);
return bean;
}
}
9.3 DestructionAwareBeanPostPrecessor接口
创建MyDestructionAwareBeanPostProcessor类,并重写其中的方法(不重写BeanPostProcessor的前后置处理方法):
package cn.ganlixin.processor;import lombok.extern.slf4j.Slf4j;
import org.springframework.beans.BeansException;
import org.springframework.beans.factory.config.DestructionAwareBeanPostProcessor;
@Slf4j
public class MyDestructionAwareBeanPostProcessor implements DestructionAwareBeanPostProcessor {
@Override
public void postProcessBeforeDestruction(Object bean, String beanName) throws BeansException {
log.info("DestructionAwareBeanPostProcessor.postProcessBeforeDestruction, \n\tbeanName:{}, bean:{}", beanName, bean);
}
@Override
public boolean requiresDestruction(Object bean) {
return true; // 返回true,一律执行postProcessBeforeDestruction方法
// 如果返回false,则不执行postProcessBeforeDestruction方法
}
}
9.4 配置xml文件
<?xml version="1.0" encoding="UTF-8"?><beans xmlns:xsi="http://www.w3.org/2001/XMLSchema-instance"
xmlns="http://www.springframework.org/schema/beans"
xsi:schemaLocation="http://www.springframework.org/schema/beans
http://www.springframework.org/schema/beans/spring-beans.xsd">
<!-- 创建student bean,指定init-method和destroy-method -->
<bean class="cn.ganlixin.entity.Student" id="student" init-method="display" destroy-method="clean">
<property name="id" value="99"/>
<property name="name" value="张三"/>
</bean>
<!-- 将实现了DestructionAwareBeanPostProcessor接口的实现类声明为bean-->
<bean class="cn.ganlixin.processor.MyDestructionAwareBeanPostProcessor"/>
<!-- 将实现了BeanPostProcessor接口的类也声明为bean-->
<bean class="cn.ganlixin.processor.MyBeanPostProcessor"/>
</beans>
9.5 测试代码
package cn.ganlixin;import cn.ganlixin.entity.Student;
import lombok.extern.slf4j.Slf4j;
import org.springframework.beans.factory.support.BeanDefinitionRegistry;
import org.springframework.context.ApplicationContext;
import org.springframework.context.support.ClassPathXmlApplicationContext;
@Slf4j
public class Test {
public static void main(String[] args) {
// 使用ApplicationContext来加载配置
ApplicationContext context = new ClassPathXmlApplicationContext("applicationContext.xml");
Student student = context.getBean("student", Student.class);
log.info("测试程序获取到的student bean:{}", student);
// 删除bean
BeanDefinitionRegistry factory = (BeanDefinitionRegistry) context.getAutowireCapableBeanFactory();
factory.removeBeanDefinition("student");
}
}
9.6 输出结果
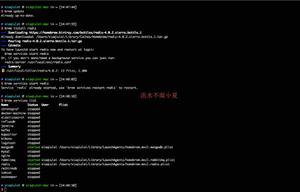
INFO [main] cn.ganlixin.entity.Student - BeanNameAware.setBeanName, this:Student(id=99, name=张三)INFO [main] cn.ganlixin.entity.Student - BeanFactoryAware.setBeanFactory, this:Student(id=99, name=张三)
INFO [main] cn.ganlixin.entity.Student - ApplicationContextAware.setApplicationContext, this:Student(id=99, name=张三)
INFO [main] cn.ganlixin.processor.MyBeanPostProcessor - MyBeanPostProcessor.postProcessBeforeInitialization, beanName:student, bean:Student(id=99, name=张三)
INFO [main] cn.ganlixin.entity.Student - InitialingBean.afterPropertiesSet, this:Student(id=99, name=张三)
INFO [main] cn.ganlixin.entity.Student - init-method, Student.display, this:Student(id=99, name=张三)
INFO [main] cn.ganlixin.processor.MyBeanPostProcessor - MyBeanPostProcessor.postProcessAfterInitialization, beanName:student, bean:Student(id=99, name=张三)
INFO [main] cn.ganlixin.Test - 测试程序获取到的student bean:Student(id=99, name=张三)
INFO [main] cn.ganlixin.processor.MyDestructionAwareBeanPostProcessor - DestructionAwareBeanPostProcessor.postProcessBeforeDestruction,
beanName:student, bean:Student(id=99, name=张三)
INFO [main] cn.ganlixin.entity.Student - DisposableBean.destory, this:Student(id=99, name=张三)
INFO [main] cn.ganlixin.entity.Student - destroy-method, Student.clean, this:Student(id=99, name=张三)
十.总结
看了上面这个输出结果,再结合下面这个图,基本就能掌握Bean的大致生命周期了。
原文地址:https://www.cnblogs.com/-beyond/p/13188675.html
本文内容总结:一. xml方式配置Bean,1.1 创建Student类,1.2 创建配置文件,1.3 测试,二.Aware接口,2.1 BeanNameAware,2.2 BeanFactoryAware,2.3 ApplicationContextAware,2.4 Aware各接口执行的先后顺序,2.4 Aware接口总结,三.BeanPostProcessor接口,四.InitializingBean接口,五.init-method,六.DestructionAwareBeanPostProcessor接口,七.DisposableBean接口 ,八.destroy-method方法,九.声明周期大杂烩,9.1 实现多接口的Student类,9.2 BeanPostProcessor前后置处理,9.3 DestructionAwareBeanPostPrecessor接口,9.4 配置xml文件 ,9.5 测试代码,9.6 输出结果,十.总结,
原文链接:https://www.cnblogs.com/-beyond/p/13188675.html
以上是 Spring Bean生命周期的各阶段介绍 的全部内容, 来源链接: utcz.com/z/362449.html