Java实现后台发送及接收json数据的方法示例
本文实例讲述了Java实现后台发送及接收json数据的方法。分享给大家供大家参考,具体如下:
本篇博客试用于编写java后台接口以及两个项目之间的接口对接功能;
具体的内容如下:
1.java后台给指定接口发送json数据
package com.utils;
import java.io.BufferedReader;
import java.io.InputStreamReader;
import java.io.OutputStreamWriter;
import java.net.HttpURLConnection;
import java.net.URL;
import net.sf.json.JSONObject;
public class testOne {
public static void main(String[] args) {
JSONObject jsobj1 = new JSONObject();
JSONObject jsobj2 = new JSONObject();
jsobj2.put("deviceID", "112");
jsobj2.put("channel", "channel");
jsobj2.put("state", "0");
jsobj1.put("item", jsobj2);
jsobj1.put("requestCommand", "control");
post(jsobj1,"http://192.168.3.4:8080/HSDC/test/authentication");
}
public static String post(JSONObject json,String path) {
String result="";
try {
HttpClient client=new DefaultHttpClient();
HttpPost post=new HttpPost(url);
post.setHeader("Content-Type", "appliction/json");
post.addHeader("Authorization", "Basic YWRtaW46");
StringEntity s=new StringEntity(json.toString(), "utf-8");
s.setContentEncoding(new BasicHeader(HTTP.CONTENT_TYPE, "appliction/json"));
post.setEntity(s);
HttpResponse httpResponse=client.execute(post);
InputStream in=httpResponse.getEntity().getContent();
BufferedReader br=new BufferedReader(new InputStreamReader(in, "utf-8"));
StringBuilder strber=new StringBuilder();
String line=null;
while ((line=br.readLine())!=null) {
strber.append(line+"\n");
}
in.close();
result=strber.toString();
if(httpResponse.getStatusLine().getStatusCode()!=HttpStatus.SC_OK){
result="服务器异常";
}
} catch (Exception e) {
System.out.println("请求异常");
throw new RuntimeException(e);
}
System.out.println("result=="+result);
return result;
}
}
2.java后台接收json数据
package com.controller;
import java.io.IOException;
import java.io.InputStreamReader;
import java.io.UnsupportedEncodingException;
import java.util.HashMap;
import java.util.Map;
import org.springframework.http.MediaType;
import org.springframework.web.bind.annotation.RequestMapping;
import org.springframework.web.bind.annotation.RequestMethod;
import org.springframework.web.bind.annotation.RestController;
import javax.annotation.Resource;
import javax.servlet.http.HttpServletRequest;
@RestController
@RequestMapping("test")
public class TestConttroller{
@Resource
protected HttpServletRequest request;
@RequestMapping(value="authentication",produces = MediaType.APPLICATION_JSON_VALUE,method = RequestMethod.POST)
public Map<String,Object> getString() throws UnsupportedEncodingException, IOException{
System.out.println("进入=====================");
//后台接收
InputStreamReader reader=new InputStreamReader(request.getInputStream(),"UTF-8");
char [] buff=new char[1024];
int length=0;
while((length=reader.read(buff))!=-1){
String x=new String(buff,0,length);
System.out.println(x);
}
//响应
Map<String,Object> jsonObject = new HashMap<String, Object>(); //创建Json对象
jsonObject.put("username", "张三"); //设置Json对象的属性
jsonObject.put("password", "123456");
return jsonObject;
}
}
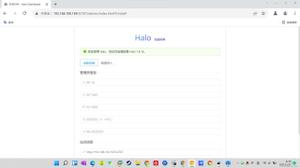
运行testOne之后将json数据发送到authentication接口,接收的数据如图:
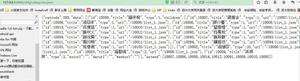
testOne中main方法返回的数据如图:
至此java后台发送及接收json数据代码也就完成了
PS:关于json操作,这里再为大家推荐几款比较实用的json在线工具供大家参考使用:
在线JSON代码检验、检验、美化、格式化工具:
http://tools.jb51.net/code/json
JSON在线格式化工具:
http://tools.jb51.net/code/jsonformat
在线XML/JSON互相转换工具:
以上是 Java实现后台发送及接收json数据的方法示例 的全部内容, 来源链接: utcz.com/z/356294.html