微信jssdk逻辑在vue中的运用详解
微信 jssdk 在 vue 中的简单使用
import wx from 'weixin-js-sdk';
wx.config({
debug: true,
appId: '',
timestamp: ,
nonceStr: '',
signature: '',
jsApiList: []
});
wx.ready(() => {
// do something...
});
wx.error((err) => {
// do something...
});
以上是微信官方给出的示例代码,但是对于实际项目使用,还需要进一步对代码进行封装。本文基于 vue 进行示范,其余类框架同理。
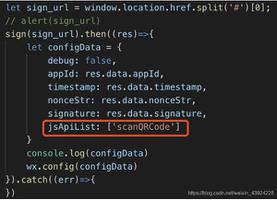
在微信公众平台的官方文档中已经指出,由于安全性考虑,需要将签名逻辑放在后端处理,所以签名原理不在此赘述,主要讲讲如何使用后端返回后的签名调用 jssdk。在逻辑层面,由于 wx.config 方法是调用任何接口前所必须的,所以我们可以尽可能将其抽离出来单独放置。
# utils/
.
├── common.js # 通用函数
└── lib
└── wechat # 微信相关代码
├── auth # 微信用户登陆获取信息相关代码
│ ├── auth.js
│ └── index.js
├── config # jssdk 初始化相关代码
│ └── index.js
├── helper.js # 微信相关操作
└── share # 分享接口相关代码
└── index.js
import sdk from 'weixin-js-sdk';
export function initSdk({ appid, timestamp, noncestr, signature, jsApiList }) { // 从后端获取
sdk.config({
debug: process.env.VUE_APP_ENV !== 'production',
appId: appid,
timestamp: timestamp,
nonceStr: noncestr,
signature: signature,
jsApiList: jsApiList
});
}
这样就可以完成对 jssdk 的初始化,之后可以进行分享接口的初始化。最初的时候我想分享接口既然是可能对应每一个 url 页面(SPA 应用中的 view),那么就应该在 view 中使用 mixin 混入来书写,所以产生了第一版实现。
// example.vue
export default {
name: 'example',
wechatShareConfig() {
return {
title: 'example',
desc: 'example desc',
imgUrl: 'http://xxx/example.png',
link: window.location.href.split('#')[0]
};
}
}
// wechatMixin.js
import { share } from '@/utils/lib/wechat/share';
// 获取 wechat 分享接口配置
function getWechatShareConfig(vm) {
const { wechatShareConfig } = vm.$options;
if (wechatShareConfig) {
return typeof wechatShareConfig === 'function'
? wechatShareConfig.call(vm)
: wechatShareConfig;
}
}
const wechatShareMixin = {
created() {
const wechatShareConfig = getWechatShareConfig(this);
if (wechatShareConfig) {
share({ ...wechatShareConfig });
}
}
};
export default wechatShareMixin;
// utils/lib/wechat/share
import { getTicket } from '@/utils/lib/wechat/helper'; // 签名接口
import { initSdk } from '@/utils/lib/wechat/config';
import sdk from 'weixin-js-sdk';
// 接口清单
const JS_API_LIST = ['onMenuShareAppMessage', 'onMenuShareTimeline'];
// 消息分享
function onMenuShareAppMessage(config) {
const { title, desc, link, imgUrl } = config;
sdk.onMenuShareAppMessage({ title, desc, link, imgUrl });
}
// 朋友圈分享
function onMenuShareTimeline(config) {
const { title, link, imgUrl } = config;
sdk.onMenuShareTimeline({ title, link, imgUrl });
}
export function share(wechatShareConfig) {
if (!wechatShareConfig.link) return false;
// 签名验证
getTicket(wechatShareConfig.link).then(res => {
// 初始化 `jssdk`
initSdk({
appid: res.appid,
timestamp: res.timestamp,
noncestr: res.noncestr,
signature: res.signature,
jsApiList: JS_API_LIST
});
sdk.ready(() => {
// 初始化目标接口
onMenuShareAppMessage(wechatShareConfig);
onMenuShareTimeline(wechatShareConfig);
});
});
}
写完之后乍一看似乎没什么毛病,但是每个 view 文件夹下的 .vue 都有一份微信配置显得很是臃肿,所以第二版实现则是将 jssdk 初始化放在 vue-router 的 beforeEach 钩子中进行,这样可以实现分享配置的统一配置,更加直观一些。
// router.js
//...
routes: [
{
path: '/',
component: Example,
meta: {
wechat: {
share: {
title: 'example',
desc: 'example desc',
imgUrl: 'https://xxx/example.png'
}
}
}
}
]
//...
// 初始化分享接口
function initWechatShare (config) {
if (config) {
share(config);
}
}
router.beforeEach((to, from, next) => {
const { shareConfig } = to.meta && to.meta.wechat;
const link = window.location.href;
if (!shareConfig) next();
initWechatShare({ ...shareConfig, link });
switchTitle(shareConfig.title); // 切换标题
next();
});
这样一来,会显得 .vue 清爽很多,不会有太多业务逻辑之外的代码。
以上是 微信jssdk逻辑在vue中的运用详解 的全部内容, 来源链接: utcz.com/z/355377.html