Angular 4 指令快速入门教程
本系列教程的开发环境及开发语言:
- Angular 4 +
- Angular CLI
- TypeScript
基础知识
Angular CLI 基本使用
安装 Angular CLI (可选)
npm install -g @angular/cli
创建新的项目
ng new PROJECT-NAME
启动本地服务器
cd PROJECT-NAME
ng serve
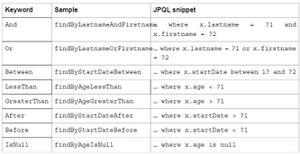
Angular 指令简介
Angular 的指令分为三种:
- 组件(Component directive):用于构建UI组件,继承于 Directive 类
- 属性指令(Attribute directive):用于改变组件的外观或行为
- 结构指令(Structural directive):用于动态添加或删除 DOM 元素来改变 DOM 布局
Angular 指令分类图
Angular 组件组成图
第一节 - 创建指令
在 Angular 中,我们可以使用 HostBinding 装饰器,实现元素的属性绑定。
指令的作用
该指令用于演示如何利用 HostBinding 装饰器,设置元素的 innerText 属性。
指令的实现
import { Directive, HostBinding} from '@angular/core';
@Directive({
selector: '[greet]'
})
export class GreetDirective {
@HostBinding() innerText = 'Hello, Everyone!';
}
指令的应用
import { Component } from '@angular/core';
@Component({
selector: 'app-root',
template: `
<h2>Hello, Angular</h2>
<h2 greet>Hello, Angular</h2>
`,
})
export class AppComponent { }
第二节 - 定义输入属性
为了能够让用户自定义 GreetDirective 指令的问候内容,我们需要使用 Input 装饰器去定义指令的输入属性。
指令的作用
该指令用于演示如何利用 Input 装饰器,定义指令的输入属性,从而实现让用户自定义问候内容。
指令的实现
import { Directive, HostBinding, Input } from '@angular/core';
@Directive({
selector: '[greet]'
})
export class GreetDirective {
@Input() greet: string;
@HostBinding() get innerText() {
return this.greet;
}
}
指令的应用
import { Component } from '@angular/core';
@Component({
selector: 'app-root',
template: `
<h2>Hello, Angular</h2>
<h2 [greet]="'Hello, Semlinker!'">Hello, Angular</h2>
`,
})
export class AppComponent { }
第三节 - 事件处理
在 Angular 中,我们可以使用 HostListener 属性装饰器,实现元素的事件绑定。
指令的作用
该指令用于演示如何利用 HostListener 装饰器,监听用户的点击事件。
指令的实现
import { Directive, HostBinding, HostListener, Input } from '@angular/core';
@Directive({
selector: '[greet]'
})
export class GreetDirective {
@Input() greet: string;
@HostBinding() get innerText() {
return this.greet;
}
@HostListener('click',['$event'])
onClick(event) {
this.greet = 'Clicked!';
}
}
指令的应用
import { Component } from '@angular/core';
@Component({
selector: 'app-root',
template: `
<h2>Hello, Angular</h2>
<h2 [greet]="'Hello, Semlinker!'">Hello, Angular</h2>
`,
})
export class AppComponent { }
第四节 - 获取宿主元素属性值
在 Angular 中,我们可以通过 Attribute 装饰器来获取指令宿主元素的属性值。
指令的作用
该指令用于演示如何利用 Attribute 装饰器,获取指令宿主元素上的自定义属性 author 的值。
指令的实现
import { Directive, HostBinding, HostListener, Input, Attribute } from '@angular/core';
@Directive({
selector: '[greet]'
})
export class GreetDirective {
@Input() greet: string;
@HostBinding() get innerText() {
return this.greet;
}
@HostListener('click',['$event'])
onClick(event) {
this.greet = 'Clicked!';
console.dir(event);
}
constructor(@Attribute('author') public author: string) {
console.log(author);
}
}
指令的应用
import { Component } from '@angular/core';
@Component({
selector: 'app-root',
template: `
<h2>Hello, Angular</h2>
<h2 [greet]="'Hello, Semlinker!'"
author="semlinker">Hello, Angular</h2>
`,
})
export class AppComponent { }
第五节 - 使用 <ng-template> 元素
在 Angular 中,我们可以通过 ViewChild 装饰器来获取视图中定义的模板元素,然后利用 ViewContainerRef 对象的 createEmbeddedView() 方法,创建内嵌视图。
import { Component, TemplateRef, ViewContainerRef, ViewChild,
AfterViewInit } from '@angular/core';
@Component({
selector: 'app-root',
template: `
<ng-template #tpl>
Hello, Semlinker!
</ng-template>
`,
})
export class AppComponent implements AfterViewInit{
@ViewChild('tpl')
tplRef: TemplateRef<any>;
constructor(private vcRef: ViewContainerRef) {}
ngAfterViewInit() {
this.vcRef.createEmbeddedView(this.tplRef);
}
}
第六节 - 使用 ngTemplateOutlet 指令
ngTemplateOutlet 的作用
该指令用于基于已有的 TemplateRef 对象,插入对应的内嵌视图。在应用 NgTemplateOutlet 指令时,我们可以通过 [ngTemplateOutletContext] 属性来设置 EmbeddedViewRef 的上下文对象。绑定的上下文应该是一个对象,此外可通过 let语法来声明绑定上下文对象属性名。
ngTemplateOutlet 的使用
import { Component } from '@angular/core';
@Component({
selector: 'app-root',
template: `
<ng-template #stpl>
Hello, Semlinker!
</ng-template>
<ng-template #atpl>
Hello, Angular!
</ng-template>
<div [ngTemplateOutlet]="atpl"></div>
<div [ngTemplateOutlet]="stpl"></div>
`,
})
export class AppComponent { }
ngOutletContext 的使用
import { Component } from '@angular/core';
@Component({
selector: 'app-root',
template: `
<ng-template #stpl let-message="message">
<p>{{message}}</p>
</ng-template>
<ng-template #atpl let-msg="message">
<p>{{msg}}</p>
</ng-template>
<ng-template #otpl let-msg>
<p>{{msg}}</p>
</ng-template>
<div [ngTemplateOutlet]="atpl"
[ngOutletContext]="context">
</div>
<div [ngTemplateOutlet]="stpl"
[ngOutletContext]="context">
</div>
<div [ngTemplateOutlet]="otpl"
[ngOutletContext]="context">
</div>
`,
})
export class AppComponent {
context = { message: 'Hello ngOutletContext!',
$implicit: 'Hello, Semlinker!' };
}
第七节 - 创建结构指令
指令的功能
该指令实现 ngIf 指令相反的效果,当指令的输入条件为 Falsy 值时,显示DOM元素。
指令的实现
import { Directive, Input, TemplateRef, ViewContainerRef } from '@angular/core';
@Directive({
selector: '[exeUnless]'
})
export class UnlessDirective {
@Input('exeUnless')
set condition(newCondition: boolean) {
if (!newCondition) {
this.viewContainer.createEmbeddedView(this.templateRef);
} else {
this.viewContainer.clear();
}
}
constructor(private templateRef: TemplateRef<any>,
private viewContainer: ViewContainerRef) {
}
}
指令的应用
import { Component } from '@angular/core';
@Component({
selector: 'app-root',
template: `
<h2 *exeUnless="condition">Hello, Semlinker!</h2>
`,
})
export class AppComponent {
condition: boolean = false;
}
我有话说
Angular 中指令与组件有什么关系?
组件继承于指令,并扩展了与 UI 视图相关的属性,如 template、styles、animations、encapsulation 等。
结构指令中的 TemplateRef 与 ViewContainerRef 有什么作用?
TemplateRef:用于表示内嵌的 template 模板元素,通过 TemplateRef 实例,我们可以方便创建内嵌视图(Embedded Views),且可以轻松地访问到通过 ElementRef 封装后的 nativeElement。需要注意的是组件视图中的 template 模板元素,经过渲染后会被替换成 comment 元素。
ViewContainerRef:用于表示一个视图容器,可添加一个或多个视图。通ViewContainerRef 实例,我们可以基于 TemplateRef 实例创建内嵌视图,并能指定内嵌视图的插入位置,也可以方便对视图容器中已有的视图进行管理。简而言之,ViewContainerRef 的主要作用是创建和管理内嵌视图或组件视图。
以上是 Angular 4 指令快速入门教程 的全部内容, 来源链接: utcz.com/z/351124.html