python 将Excel转Word的示例
在日常工作中,Python在办公自动化领域应用非常广泛,如批量将多个Excel中的数据进行计算并生成图表,批量将多个Excel按固定格式转换成Word,或者定时生成文件并发送邮件等场景。本文主要以一个简单的小例子,简述Python在Excel和Word方面进行相互转换的相关知识点,谨供学习分享使用,如有不足之处,还请指正。
相关知识点
本文主要是将Excel文件通过一定规则转换成Word文档,涉及知识点如下所示:
xlrd模块:主要用于Excel文件的读取,相关内容如下:
- xlrd.open_workbook(self.excel_file) 打开Excel文件并返回文档对象,参数为Excel的完整路径
- book.sheet_by_name(self.sheet_name) 通过名称获取对应的sheet页,并返回sheet对象
- sheet.nrows sheet页的有效行数
- sheet.ncols sheet页的有效列数
- sheet.row_values(0) 返回Excel中对应sheet页的第一行的值,以数组返回
- sheet.cell_value(row, col) 返回某一个单元格的值
python-docx模块:主要操作Word文档,如:表格,段落等相关,相关内容如下所示:
- Document word的文档对象,代表整个word文档
- doc.sections[0] 获取章节
- doc.add_section(start_type=WD_SECTION_START.CONTINUOUS) 添加连续章节
- doc.add_heading(third, level=2) 增加标题,level表示级别,如二级标题,返回标题对象
- doc.add_paragraph(text='', style=None) 增加段落,返回段落对象
- doc.add_table(rows=4, cols=5) 增加表格,并返回表格对象
- doc_table.style = "Table Grid" 设置表格样式
- doc_table.rows[0].cells[1].merge(doc_table.rows[0].cells[4]) 合并单元格
- doc_table.rows[3].cells 获取表格某一行所有单元格,以数组形式返回
- head_cells[0].width = Cm(1.9) 设置列宽,单位cm
- doc_table.rows[i].cells[j].vertical_alignment = WD_CELL_VERTICAL_ALIGNMENT.CENTER 表格内容垂直居中
- doc_table.add_row() 新增行,并返回行对象
插件安装
插件可以在pycharm的terminal面板下进行安装。python-docx安装命令为:pip install python-docx
xlrd安装命令为:pip install xlrd 如下所示:
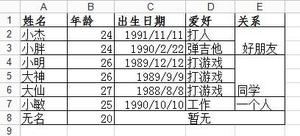
数据源文件
数据源是一系列格式相同的Excel文件,共七列,其中第1列要按【/】进行截取拆分,格式如下:
核心代码
本文核心源码,主要分三部分:
导入相关模块包,如下所示:
import xlrd
from docx import Document
from docx.enum.section import WD_ORIENTATION
from docx.enum.text import WD_PARAGRAPH_ALIGNMENT
from docx.shared import Pt, Cm, RGBColor
from docx.oxml.ns import qn
from docx.enum.table import WD_CELL_VERTICAL_ALIGNMENT
读取Excel,如下所示:
def read_excel(self):
"""读取Excel"""
book = xlrd.open_workbook(self.excel_file)
sheet = book.sheet_by_name(self.sheet_name)
nrows = sheet.nrows # 行数
ncols = sheet.ncols # 列数
datas = [] # 存放数据
# 第一列 标题
keys = sheet.row_values(0)
for row in range(1, nrows):
data = {} # 每一行数据
for col in range(0, ncols):
value = sheet.cell_value(row, col) # 取出每一个单元格的数据
# 替换到特殊字符
value = value.replace('<', '').replace('>', '').replace('$', '')
data[keys[col]] = value
# 截取第一列元素
if col == 0:
first = '' # 截取元素 第1
second = '' # 截取元素 第2
third = '' # 截取元素 第3
arrs = value.lstrip('/').split('/') # 去掉第一个/ 然后再以/分组
if len(arrs) > 0:
if len(arrs) == 1:
first = arrs[0]
second = first
third = second
elif len(arrs) == 2:
first = arrs[0]
second = arrs[1]
third = second
elif len(arrs) == 3:
first = arrs[0]
second = arrs[1]
third = arrs[2]
else:
first = arrs[0]
second = arrs[1]
third = arrs[2]
else:
first = value.ltrip('/')
second = first
third = second
data['first'] = first
data['second'] = second
data['third'] = third
# 截取第一列结束
datas.append(data)
return datas
生成Word部分:
def write_word(self, datas):
"""生成word文件"""
if len(datas) < 1:
print('Excel没有内容')
return
# 定义word文档对象
doc = Document()
# 添加横向
section = doc.sections[0] # doc.add_section(start_type=WD_SECTION_START.CONTINUOUS) # 添加横向页的连续节
section.orientation = WD_ORIENTATION.LANDSCAPE
page_h, page_w = section.page_width, section.page_height
section.page_width = page_w # 设置横向纸的宽度
section.page_height = page_h # 设置横向纸的高度
# 设置字体
doc.styles['Normal'].font.name = u'宋体'
doc.styles['Normal']._element.rPr.rFonts.set(qn('w:eastAsia'), u'宋体')
# 获取第3部分(部门) 并去重
data_third = []
for data in datas:
third = data['third']
if data_third.count(third) == 0:
data_third.append(third)
for third in data_third:
h2 = doc.add_heading(third, level=2) # 写入部门,二级标题
run = h2.runs[0] # 可以通过add_run来设置文字,也可以通过数组来获取
run.font.color.rgb = RGBColor(0, 0, 0)
run.font.name = u'宋体'
doc.add_paragraph(text='', style=None) # 增加空白行 换行
# 开始获取模板
data_template = []
for data in datas:
if data['third'] == third:
template = {'first': data['first'], '模板名称': data['模板名称']}
if data_template.count(template) == 0:
data_template.append(template)
# 获取模板完成
# 遍历模板
for template in data_template:
h3 = doc.add_heading(template['模板名称'], level=3) # 插入模板名称,三级标题
run = h3.runs[0] # 可以通过add_run来设置文字,也可以通过数组来获取
run.font.color.rgb = RGBColor(0, 0, 0)
run.font.name = u'宋体'
doc.add_paragraph(text='', style=None) # 换行
data_table = filter(
lambda data: data['third'] == third and data['模板名称'] == template['模板名称'] and data['first'] ==
template['first'], datas)
data_table = list(data_table)
# 新增表格 4行5列
doc_table = doc.add_table(rows=4, cols=5)
doc_table.style = "Table Grid"
doc_table.style.font.size = Pt(9)
doc_table.style.font.name = '宋体'
# 合并单元格 赋值
doc_table.rows[0].cells[1].merge(doc_table.rows[0].cells[4])
doc_table.rows[1].cells[1].merge(doc_table.rows[1].cells[4])
doc_table.rows[2].cells[1].merge(doc_table.rows[2].cells[4])
doc_table.rows[0].cells[0].text = '流程名称:'
doc_table.rows[0].cells[1].text = data_table[0]['模板名称']
doc_table.rows[1].cells[0].text = '使用人:'
doc_table.rows[1].cells[1].text = data_table[0]['first']
doc_table.rows[2].cells[0].text = '流程说明:'
doc_table.rows[2].cells[1].text = data_table[0]['流程说明']
# 设置标题
head_cells = doc_table.rows[3].cells # 前面还有三行,特殊处理
head_cells[0].text = '节点'
head_cells[1].text = '节点名'
head_cells[2].text = '处理人员'
head_cells[3].text = '处理方式'
head_cells[4].text = '跳转信息'
# 设置列宽
head_cells[0].width = Cm(1.9)
head_cells[1].width = Cm(4.83)
head_cells[2].width = Cm(8.25)
head_cells[3].width = Cm(2.54)
head_cells[4].width = Cm(5.64)
# 第1 列水平居中,并设置行高,所有单元格内容垂直居中
for i in range(0, 4):
# 水平居中
p = doc_table.rows[i].cells[0].paragraphs[0]
p.alignment = WD_PARAGRAPH_ALIGNMENT.CENTER
doc_table.rows[i].height = Cm(0.6) # 行高
# 垂直居中
for j in range(0, 5):
doc_table.rows[i].cells[j].vertical_alignment = WD_CELL_VERTICAL_ALIGNMENT.CENTER
# 生成表格并填充内容
row_num = 0
for data in data_table:
row = doc_table.add_row()
row_cells = row.cells
row_cells[0].text = str(row_num + 1) # 序号,需要转换成字符串
row_cells[1].text = data['节点名称']
row_cells[2].text = data['审批人员']
row_cells[3].text = data['审批方式']
row_cells[4].text = ''
# 水平居中
p = row_cells[0].paragraphs[0]
p.alignment = WD_PARAGRAPH_ALIGNMENT.CENTER
row.height = Cm(0.6) # 行高
# 垂直居中
for j in range(0, 5):
row_cells[j].vertical_alignment = WD_CELL_VERTICAL_ALIGNMENT.CENTER
row_num = row_num + 1
doc.add_paragraph(text='', style=None) # 换行
doc.save(self.word_file)
以上是 python 将Excel转Word的示例 的全部内容, 来源链接: utcz.com/z/338898.html