iOS图片拉伸的4种方法
假如下面的一张图片,是用来做按钮的背景图片的,原始尺寸是(128 * 112)
按钮背景图片.png
我们通过代码将这张图片设置为按钮的背景图片,假如我们将创建好的按钮的宽高设置为:(W=200, H=50)代码如下:
//
// ViewController.m
// iOS图片拉伸总结
//
// Created by Sunshine on 15/6/29.
// Copyright (c) 2015年 YotrolZ. All rights reserved.
//
#import "ViewController.h"
@interface ViewController ()
@end
@implementation ViewController
- (void)viewDidLoad {
[super viewDidLoad];
// 创建一个按钮
UIButton *btn = [UIButton buttonWithType:UIButtonTypeCustom];
// 设置按钮的frame
btn.frame = CGRectMake(100, 300, 200, 50);
// 加载图片
UIImage *image = [UIImage imageNamed:@"chat_send_nor"];
// 设置按钮的背景图片
[btn setBackgroundImage:image forState:UIControlStateNormal];
// 将按钮添加到控制器的view
[self.view addSubview:btn];
}
- (void)didReceiveMemoryWarning {
[super didReceiveMemoryWarning];
// Dispose of any resources that can be recreated.
}
@end
这是你发现运行的结果完全出乎你的意料(搓的无极限),如图:
运行效果图1.png
原因分析:是将原是尺寸为W=128 * H=112的图片拉伸成了W=200, H=50;
解决方案:
1.找美工MM重做一张较大的图片,这样的话就会出现软件包将来会变大,占用空间更大;如果我们要经常修改按钮的frame,你是想让MM杀你的节奏~~,显然不可行;
2.苹果为我们提供了关于图片拉伸的API,我们可以直接利用代码实现,是不是很牛X;
利用苹果提供的API来拉伸图片(目前发现的有四种):
方式一(iOS5之前):
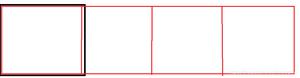
如下图:设置topCapHeight、leftCapWidth、bottomCapHeight、lerightCapWidth,图中的黑色区域就是图片拉伸的范围,也就是说边上的不会被拉伸.
通过下面的方法我们可以设置:
// 官方API说明
// - stretchableImageWithLeftCapWidth:topCapHeight:(iOS 5.0)
// Creates and returns a new image object with the specified cap values.
说明:这个方法只有2个参数,leftCapWidth代表左端盖宽度,topCapHeight代表上端盖高度。系统会自动计算出右端盖宽度rightCapWidth和底端盖高度bottomCapHeight,算法如下:
// 系统会自动计算rightCapWidth
rightCapWidth = image.width - leftCapWidth - 1;
// 系统会自动计算bottomCapHeight
bottomCapHeight = image.height - topCapHeight - 1
这样一来,其实我们图片的可拉伸范围只有1 * 1,所以再怎么拉伸都不会影响图片的外观;
具体代码如下:
// 加载图片
UIImage *image = [UIImage imageNamed:@"chat_send_nor"];
// 设置左边端盖宽度
NSInteger leftCapWidth = image.size.width * 0.5;
// 设置上边端盖高度
NSInteger topCapHeight = image.size.height * 0.5;
UIImage *newImage = [image stretchableImageWithLeftCapWidth:leftCapWidth topCapHeight:topCapHeight];
// 设置按钮的背景图片
[btn setBackgroundImage:newImage forState:UIControlStateNormal];
运行效果:
运行效果图2.png
方式二:(iOS5)
利用下面的方法:
// 官方API说明
- (UIImage *)resizableImageWithCapInsets:(UIEdgeInsets)capInsets NS_AVAILABLE_IOS(5_0);
// create a resizable version of this image. the interior is tiled when drawn.
typedef struct UIEdgeInsets {
CGFloat top, left, bottom, right;
// specify amount to inset (positive) for each of the edges. values can be negative to 'outset'
} UIEdgeInsets;
说明:UIEdgeInsets中的CGFloat top, left, bottom, right就是用来设置上端盖、左端盖、下端盖、右端盖的尺寸(逆时针方向);
具体代码如下:
// 加载图片
UIImage *image = [UIImage imageNamed:@"chat_send_nor"];
// 设置端盖的值
CGFloat top = image.size.height * 0.5;
CGFloat left = image.size.width * 0.5;
CGFloat bottom = image.size.height * 0.5;
CGFloat right = image.size.width * 0.5;
UIEdgeInsets edgeInsets = UIEdgeInsetsMake(top, left, bottom, right);
// 拉伸图片
UIImage *newImage = [image resizableImageWithCapInsets:edgeInsets];
// 设置按钮的背景图片
[btn setBackgroundImage:newImage forState:UIControlStateNormal];
运行效果:
运行效果图3.png
方式三:(iOS6)
利用下面的方法:
- (UIImage *)resizableImageWithCapInsets:(UIEdgeInsets)capInsets resizingMode:(UIImageResizingMode)resizingMode NS_AVAILABLE_IOS(6_0);// the interior is resized according to the resizingMode
说明:相比iOS5中的方法多了一个resizingMode参数
typedef NS_ENUM(NSInteger, UIImageResizingMode) {
UIImageResizingModeTile, // 平铺模式,通过重复显示UIEdgeInsets指定的矩形区域来填充图片
UIImageResizingModeStretch, // 拉伸模式,通过拉伸UIEdgeInsets指定的矩形区域来填充图片
};
具体代码如下:
// 加载图片
UIImage *image = [UIImage imageNamed:@"chat_send_nor"];
// 设置端盖的值
CGFloat top = image.size.height * 0.5;
CGFloat left = image.size.width * 0.5;
CGFloat bottom = image.size.height * 0.5;
CGFloat right = image.size.width * 0.5;
// 设置端盖的值
UIEdgeInsets edgeInsets = UIEdgeInsetsMake(top, left, bottom, right);
// 设置拉伸的模式
UIImageResizingMode mode = UIImageResizingModeStretch;
// 拉伸图片
UIImage *newImage = [image resizableImageWithCapInsets:edgeInsets resizingMode:mode];
// 设置按钮的背景图片
[btn setBackgroundImage:newImage forState:UIControlStateNormal];
运行效果:
运行效果图4.png
方式4:(最简单的一种方式)
设置slicing属性.png
设置后.png
是不是So easy~~
运行效果:
运行效果5.png
备注:上面所有通过代码来拉伸图片的方法都是返回一个拉伸后的新图片。
以上是 iOS图片拉伸的4种方法 的全部内容, 来源链接: utcz.com/z/337204.html