Spring实战之依赖关系注入之后的行为示例
本文实例讲述了Spring实战之依赖关系注入之后的行为。分享给大家供大家参考,具体如下:
一 配置
<?xml version="1.0" encoding="GBK"?>
<beans xmlns:xsi="http://www.w3.org/2001/XMLSchema-instance"
xmlns="http://www.springframework.org/schema/beans"
xsi:schemaLocation="http://www.springframework.org/schema/beans
http://www.springframework.org/schema/beans/spring-beans-4.0.xsd">
<bean id="steelAxe" class="org.crazyit.app.service.impl.SteelAxe"/>
<!-- 配置chinese Bean,使用init-method="init"
指定该Bean所有属性设置完成后,自动执行init方法 -->
<bean id="chinese" class="org.crazyit.app.service.impl.Chinese"
init-method="init">
<property name="axe" ref="steelAxe"/>
</bean>
</beans>
二 接口
1 Axe
package org.crazyit.app.service;
public interface Axe
{
public String chop();
}
2 Person
package org.crazyit.app.service;
public interface Person
{
public void useAxe();
}
三 Bean
1 Chinese
package org.crazyit.app.service.impl;
import org.springframework.beans.factory.InitializingBean;
import org.springframework.beans.factory.*;
import org.springframework.context.*;
import org.crazyit.app.service.*;
public class Chinese implements Person , InitializingBean
, BeanNameAware, ApplicationContextAware
{
private Axe axe;
public void setBeanName(String beanName)
{
System.out.println("===setBeanName===");
}
public void setApplicationContext(ApplicationContext ctx)
{
System.out.println("===setApplicationContext===");
}
public Chinese()
{
System.out.println("Spring实例化主调bean:Chinese实例...");
}
// axe的setter方法
public void setAxe(Axe axe)
{
System.out.println("Spring调用setAxe()执行依赖注入...");
this.axe = axe;
}
public void useAxe()
{
System.out.println(axe.chop());
}
// 测试用的初始化方法
public void init()
{
System.out.println("正在执行初始化方法 init...");
}
// 实现InitializingBean接口必须实现的方法
public void afterPropertiesSet() throws Exception
{
System.out.println("正在执行初始化方法 afterPropertiesSet...");
}
}
2 SteelAxe
package org.crazyit.app.service.impl;
import org.crazyit.app.service.*;
public class SteelAxe
implements Axe
{
public SteelAxe()
{
System.out.println("Spring实例化依赖bean:SteelAxe实例...");
}
public String chop()
{
return "钢斧砍柴真快";
}
}
四 测试类
package lee;
import org.springframework.context.*;
import org.springframework.context.support.*;
import org.crazyit.app.service.*;
public class BeanTest
{
public static void main(String[] args)throws Exception
{
ApplicationContext ctx = new
ClassPathXmlApplicationContext("beans.xml");
Person p = ctx.getBean("chinese" , Person.class);
p.useAxe();
}
}
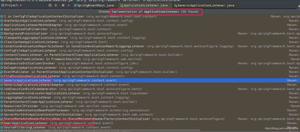
五 测试结果
Spring实例化依赖bean:SteelAxe实例...
Spring实例化主调bean:Chinese实例...
Spring调用setAxe()执行依赖注入...
===setBeanName===
===setApplicationContext===
正在执行初始化方法 afterPropertiesSet...
正在执行初始化方法 init...
钢斧砍柴真快
更多关于java相关内容感兴趣的读者可查看本站专题:《Spring框架入门与进阶教程》、《Java数据结构与算法教程》、《Java操作DOM节点技巧总结》、《Java文件与目录操作技巧汇总》和《Java缓存操作技巧汇总》
希望本文所述对大家java程序设计有所帮助。
以上是 Spring实战之依赖关系注入之后的行为示例 的全部内容, 来源链接: utcz.com/z/336119.html