spring AOP的注解实例
本文内容纲要:spring AOP的注解实例
上一篇写了spring AOP 的两种代理,这里开始AOP的实现了,个人喜欢用注解方式,原因是相对于XML方式注解方式更灵活,更强大,更可扩展。所以XML方式的AOP实现就被我抛弃了。
实现Spring AOP需要导入四个包,这里用maven引入jar包,颜色标注处的jar包,上一篇已经介绍了
cglib-nodep
aopalliance
aspectjrt
aspectjweaver
在applicationContext-mvc.xml(或spring-mvc.xml)中加入下面两句话,意思是:声明XML Schema 实例
xmlns:aop="http://www.springframework.org/schema/aop"
xsi:schemaLocation="http://www.springframework.org/schema/aop
http://www.springframework.org/schema/aop/spring-aop-3.2.xsd
然后开启@AspectJ注解
在applicationContext-mvc.xml配置如下:
<aop:aspectj-autoproxy proxy-target-class="true"/>
<context:annotation-config />
其中要注意的是这两个不能少,在applicationContext-mvc.xml文件中开始时指定
<mvc:annotation-driven />
<context:component-scan base-package="com.gcx" />
下面开始定义切面,先了解下其基本知识要点
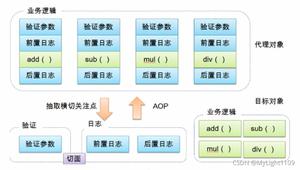
* 连接点(Joinpoint) :程序执行过程中的某一行为(方法),例如,UserService.get()的调用或者UserService.delete()抛出异常等行为。
* 通知(Advice) :“切面”对于某个“连接点”所产生的动作,例如,TestAspect中对com.spring.service包下所有类的方法进行日志记录的动作就是一个Advice。其中,一个“切面”可以包含多个“Advice”,例如ServiceAspect。
* 切入点(Pointcut) :匹配连接点的断言,在AOP中通知和一个切入点表达式关联。例如,TestAspect中的所有通知所关注的连接点,都由切入点表达式execution(* com.spring.service.impl..*.*(..))来决定。
* 目标对象(Target Object) :被一个或者多个切面所通知的对象。例如,AServcieImpl和BServiceImpl,在实际运行时,Spring AOP采用代理实现,实际AOP操作的是TargetObject的代理对象。
* AOP代理(AOP Proxy) :在Spring AOP中有两种代理方式,JDK动态代理和CGLIB代理。默认情况下,TargetObject实现了接口时,则采用JDK动态代理,例如,AServiceImpl;反之,采用CGLIB代理,例如,BServiceImpl。强制使用CGLIB代理需要将 aop:config的 proxy-target-class属性设为true 。
通知(Advice)类型
*前置通知(Before advice) :在某连接点(JoinPoint)之前执行的通知,但这个通知不能阻止连接点前的执行。
*后通知(After advice) :当某连接点退出的时候执行的通知(不论是正常返回还是异常退出)。
*返回后通知(After return advice) :在某连接点正常完成后执行的通知,不包括抛出异常的情况。
*环绕通知(Around advice) :包围一个连接点的通知,类似Web中Servlet规范中的Filter的doFilter方法。可以在方法的调用前后完成自定义的行为,也可以选择不执行。
*抛出异常后通知(After throwing advice) : 在方法抛出异常退出时执行的通知。
定义一个接口,并编写实现类:
public interface UserService {
public void addUser(String userName, String password);
}
@Service("userService")
public class UserServiceImpl implements UserService {
@Override
public void addUser(String userName, String password) {
System.out.println("--------------User addUser-------------");
}
}
定义切面类
@Aspect//定义切面
@Component//声明这是一个组件
public class Interceptor {
private final static Log log = LogFactory.getLog(Interceptor.class);
/**
* 这句话是方法切入点
* 1 execution (* com.wangku.spring.service.impl..*.*(..))
* 2 execution : 表示执行
* 3 第一个*号 : 表示返回值类型, *可以是任意类型
* 4 com.spring.service.impl : 代表扫描的包
* 5 .. : 代表其底下的子包也进行拦截
* 6 第二个*号 : 代表对哪个类进行拦截,*代表所有类
* 7 第三个*号 : 代表方法 *代表任意方法
* 8 (..) : 代表方法的参数有无都可以
*/
//配置切入点,该方法无方法体,主要为方便同类中其他方法使用此处配置的切入点
@Pointcut("execution (* com.gcx.service.impl..*.*(..))")
private void aspect() {
System.out.println("============进入aspect方法==============");
}
//配置环绕通知,使用在方法aspect()上注册的切入点
@Around("aspect()")
public void around(JoinPoint joinPoint){
long start = System.currentTimeMillis();
try {
((ProceedingJoinPoint) joinPoint).proceed();
long end = System.currentTimeMillis();
if(log.isInfoEnabled()){
log.info("around " + joinPoint + "\tUse time : " + (end - start) + " ms!");//这里顺便记录下执行速度,可以作为监控
}
} catch (Throwable e) {
long end = System.currentTimeMillis();
if(log.isInfoEnabled()){
log.info("around " + joinPoint + "\tUse time : " + (end - start) + " ms with exception : " + e.getMessage());
}
}
}
//前置通知等可以没有JoinPoint参数
@Before("aspect()")
public void doBefore(JoinPoint joinPoint) {
System.out.println("==========执行前置通知===============");
if(log.isInfoEnabled()){
log.info("before " + joinPoint);
}
}
//配置后置通知,使用在方法aspect()上注册的切入点
@After("aspect()")
public void doAfter(JoinPoint joinPoint) {
System.out.println("===========执行后置通知==============");
if(log.isInfoEnabled()){
log.info("after " + joinPoint);
}
}
//配置后置返回通知,使用在方法aspect()上注册的切入点
@AfterReturning("aspect()")
public void afterReturn(JoinPoint joinPoint){
System.out.println("===========执行后置返回通知==============");
if(log.isInfoEnabled()){
log.info("afterReturn " + joinPoint);
}
}
//配置抛出异常后通知,使用在方法aspect()上注册的切入点
@AfterThrowing(pointcut="aspect()", throwing="ex")
public void afterThrow(JoinPoint joinPoint, Exception ex){
if(log.isInfoEnabled()){
log.info("afterThrow " + joinPoint + "\t" + ex.getMessage());
}
}
}
测试类
@Test
public void testAOP1(){
//启动Spring容器
ApplicationContext ctx = new ClassPathXmlApplicationContext(new String[]{"classpath:applicationContext-mvc.xml","classpath:applicationContext-dataSource.xml"});
UserService userService = (UserService) ctx.getBean("userService");
userService.addUser("zhangsan", "123456");
}
效果图:

OK!!简单的spring AOP实现了,在这基础上可以做下AOP的简单日志管理了。我的习惯是在后置通知里添加日志的逻辑代码。但这这种方式还不是最灵活的,下一篇做下spring AOP 的自定义注解实现日志管理。
本文内容总结:spring AOP的注解实例
原文链接:https://www.cnblogs.com/jianjianyang/p/4904859.html
以上是 spring AOP的注解实例 的全部内容, 来源链接: utcz.com/z/296895.html


