架构设计之Spring-Session分布式集群会话管理
本文内容纲要:
- 前言- 特点介绍
- 解决方案
- 功能实现
- spring-mvc.xml
- config.properties
- spring-redis.xml
- redis.properties
- web.xml
- 测试功能
- 注意,对比sessionId是一致的。
前言
通常在web开发中,会话管理是很重要的一部分,用于存储与用户相关的一些数据。对于JAVA开发者来说,项目中的session一般由Tomcat或者jetty容器来管理。
特点介绍
尽管使用特定的容器可以很好地实现会话管理,但是独立容器挂掉或者由于其他原因重启会导致用户信息丢失,并且无法支持分布式集群会话管理。
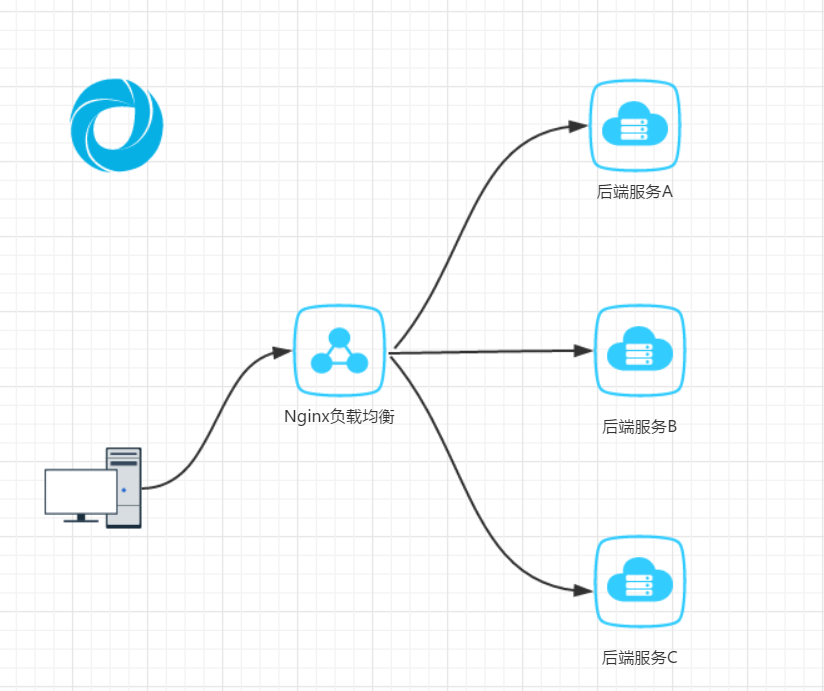
上图举例:

这是一个简单的负载均衡集群架构模型,后端三台Tomcat服务,假设每台服务都使用自己的会话管理,而集群策略是基于加权轮询的方式实现。试想一下,用户是不是永远无法登陆系统?
当然,你可能会想,我可以使用基于IP_hash的方式实现负载均衡嘛。但是如果地区分布相对单一,产生的hash值分布可能也不会太均匀,那就起不到负载均衡的作用了。
一般来说,有两种解决方案,session复制和session统一管理。对于session复制,简单的几台还是可以的,但是如果上百台甚至上千台就要考虑复制成本问题了。
对于统一session管理可以是关系型数据库,比如MySql(基本不用,考虑到效率问题);非关系型数据库 redis,memcache等等。
解决方案
- 基于Tomcat的会话插件实现tomcat-redis-session-manager 和tomcat-memcache-session-manager,会话统一由NoSql管理。对于项目本身来说,无须改动代码,只需要简单的配置Tomcat的server.xml就可以解决问题。但是插件太依赖于容器,并且对于Tomcat各个版本的支持不是特别的好
- 重写Tomcat的session管理,代码耦合度高,不利于维护。
- 使用开源的session管理框架,比如spring_session,既不需要修改Tomcat配置,又无须重写代码,只需要配置相应的参数即可。
功能实现
下面,主要是基于spring_session实现的分布式集群会话管理案例。
项目需要使用到spring_Mvc4.2.5,spring_session-1.2.2和redis-3.2.8(需要自行安装redis服务)。
配置相关JAR包(spring mvc相关jar包依赖自行配置):
<dependency> <groupId>org.springframework.session</groupId>
<artifactId>spring-session-data-redis</artifactId>
<version>1.2.2.RELEASE</version>
</dependency>
spring-mvc.xml
<?xml version="1.0" encoding="UTF-8"?><beans xmlns="http://www.springframework.org/schema/beans" xmlns:xsi="http://www.w3.org/2001/XMLSchema-instance"
xmlns:context="http://www.springframework.org/schema/context" xmlns:mvc="http://www.springframework.org/schema/mvc"
xsi:schemaLocation="http://www.springframework.org/schema/beans http://www.springframework.org/schema/beans/spring-beans-4.0.xsd
http://www.springframework.org/schema/context http://www.springframework.org/schema/context/spring-context-4.0.xsd
http://www.springframework.org/schema/mvc http://www.springframework.org/schema/mvc/spring-mvc-4.0.xsd">
<description>Spring MVC Configuration</description>
<!-- 加载配置属性文件 -->
<context:property-placeholder ignore-unresolvable="true" location="classpath:config.properties" />
<!-- 使用Annotation自动注册Bean,只扫描@Controller -->
<context:component-scan base-package="com.itstyle.web" use-default-filters="false"><!-- base-package 如果多个,用“,”分隔 -->
<context:include-filter type="annotation" expression="org.springframework.stereotype.Controller"/>
</context:component-scan>
<mvc:annotation-driven/>
<!--启动Spring MVC的注解功能,设置编码方式,防止乱码-->
<bean class="org.springframework.web.servlet.mvc.annotation.AnnotationMethodHandlerAdapter">
<property name="messageConverters">
<list>
<bean class = "org.springframework.http.converter.StringHttpMessageConverter">
<property name = "supportedMediaTypes">
<list>
<value>text/html;charset=UTF-8</value>
</list>
</property>
</bean>
</list>
</property>
</bean>
<!-- REST中根据URL后缀自动判定Content-Type及相应的View -->
<bean id="contentNegotiationManager" class="org.springframework.web.accept.ContentNegotiationManagerFactoryBean">
<property name="mediaTypes" >
<map>
<entry key="xml" value="application/xml"/>
<entry key="json" value="application/json"/>
</map>
</property>
<property name="ignoreAcceptHeader" value="true"/>
<property name="favorPathExtension" value="true"/>
</bean>
<!-- 定义视图文件解析 -->
<bean class="org.springframework.web.servlet.view.InternalResourceViewResolver">
<property name="prefix" value="${web.view.prefix}"/>
<property name="suffix" value="${web.view.suffix}"/>
</bean>
<!-- 对静态资源文件的访问, 将无法mapping到Controller的path交给default servlet handler处理 -->
<mvc:default-servlet-handler />
<!-- 静态资源映射 SpringMVC会自动给静态资源Response添加缓存头Cache-Control和Expires值 cache-period="31536000"-->
<mvc:resources mapping="/static/**" location="/static/" />
<!-- 定义无Controller的path<->view直接映射(首页或者登陆页) -->
<mvc:view-controller path="/" view-name="redirect:${web.view.login}"/>
</beans>
config.properties
#============================##===== System settings ======#
#============================#
#产品信息设置
productName=科帮网 srping session
copyrightYear=2017
version=V1.0.0
#分页配置
page.pageSize=10
#索引页路径
web.view.index=/index
#登陆页面
web.view.login=/login
#视图文件存放路径
web.view.prefix=/WEB-INF/views/
web.view.suffix=.jsp
#静态文件后缀
web.staticFile=.css,.js,.png,.jpg,.gif,.jpeg,.bmp,.ico,.swf,.psd,.htc,.htm,.html,.crx,.xpi,.exe,.ipa,.apk
spring-redis.xml
<?xml version="1.0" encoding="UTF-8"?><beans xmlns="http://www.springframework.org/schema/beans"
xmlns:xsi="http://www.w3.org/2001/XMLSchema-instance" xmlns:context="http://www.springframework.org/schema/context"
xmlns:aop="http://www.springframework.org/schema/aop" xmlns:tx="http://www.springframework.org/schema/tx"
xsi:schemaLocation="http://www.springframework.org/schema/beans http://www.springframework.org/schema/beans/spring-beans-3.0.xsd
http://www.springframework.org/schema/aop http://www.springframework.org/schema/aop/spring-aop-3.0.xsd
http://www.springframework.org/schema/tx http://www.springframework.org/schema/tx/spring-tx-3.0.xsd
http://www.springframework.org/schema/context http://www.springframework.org/schema/context/spring-context-3.0.xsd" default-autowire="byName" default-lazy-init="true">
<!-- 加载资源文件 其中包含变量信息,必须在Spring配置文件的最前面加载,即第一个加载-->
<context:property-placeholder location="classpath:redis.properties" />
<!-- redis -->
<bean id="jedisPoolConfig" class="redis.clients.jedis.JedisPoolConfig"/>
<bean id="jedisConnectionFactory"
class="org.springframework.data.redis.connection.jedis.JedisConnectionFactory">
<property name="hostName" value="${redis.host}" />
<property name="port" value="${redis.port}" />
<property name="password" value="${redis.password}" />
<property name="timeout" value="${redis.timeout}" />
<property name="poolConfig" ref="jedisPoolConfig" />
<property name="usePool" value="true" />
</bean>
<bean id="redisTemplate" class="org.springframework.data.redis.core.StringRedisTemplate">
<property name="connectionFactory" ref="jedisConnectionFactory" />
</bean>
<!-- 将session放入redis -->
<context:annotation-config/>
<bean id="redisHttpSessionConfiguration" class="org.springframework.session.data.redis.config.annotation.web.http.RedisHttpSessionConfiguration">
<property name="maxInactiveIntervalInSeconds" value="1800" />
</bean>
</beans>
redis.properties
#redis中心 redis.host=127.0.0.1
redis.port=6379
redis.password=123456
redis.maxIdle=100
redis.maxActive=300
redis.maxWait=1000
redis.testOnBorrow=true
redis.timeout=100000
web.xml
<?xml version="1.0" encoding="UTF-8"?><web-app id="WebApp_ID" version="2.4" xmlns="http://java.sun.com/xml/ns/j2ee" xmlns:xsi="http://www.w3.org/2001/XMLSchema-instance" xsi:schemaLocation="http://java.sun.com/xml/ns/j2ee http://java.sun.com/xml/ns/j2ee/web-app_2_4.xsd">
<display-name>spring_session</display-name>
<context-param>
<param-name>contextConfigLocation</param-name>
<param-value>classpath:spring-redis.xml</param-value>
</context-param>
<!-- spring session -->
<filter>
<filter-name>springSessionRepositoryFilter</filter-name>
<filter-class>org.springframework.web.filter.DelegatingFilterProxy</filter-class>
</filter>
<filter-mapping>
<filter-name>springSessionRepositoryFilter</filter-name>
<url-pattern>/*</url-pattern>
</filter-mapping>
<listener>
<listener-class>org.springframework.web.context.ContextLoaderListener</listener-class>
</listener>
<filter>
<filter-name>encodingFilter</filter-name>
<filter-class>org.springframework.web.filter.CharacterEncodingFilter</filter-class>
<init-param>
<param-name>encoding</param-name>
<param-value>UTF-8</param-value>
</init-param>
<init-param>
<param-name>forceEncoding</param-name>
<param-value>true</param-value>
</init-param>
</filter>
<filter-mapping>
<filter-name>encodingFilter</filter-name>
<url-pattern>/*</url-pattern>
</filter-mapping>
<servlet>
<servlet-name>springServlet</servlet-name>
<servlet-class>org.springframework.web.servlet.DispatcherServlet</servlet-class>
<init-param>
<param-name>contextConfigLocation</param-name>
<param-value>classpath*:/spring-mvc*.xml</param-value>
</init-param>
<load-on-startup>1</load-on-startup>
</servlet>
<servlet-mapping>
<servlet-name>springServlet</servlet-name>
<url-pattern>/</url-pattern>
</servlet-mapping>
<welcome-file-list>
<welcome-file>login</welcome-file>
</welcome-file-list>
</web-app>
测试功能
最后,启动项目访问http://localhost:8080/spring_session/login

登录redis服务,执行以下命令:
KEYS *
注意,对比sessionId是一致的。
网上很多同学,启动的时候找不到 springSessionRepositoryFilter,注意在spring-redis.xml加入context:annotation-config/ 配置即可。
参考:http://docs.spring.io/spring-session/docs/current/reference/html5/
原文:http://blog.52itstyle.com/archives/759/
本文内容总结:前言,特点介绍,解决方案,功能实现,spring-mvc.xml,config.properties,spring-redis.xml,redis.properties,web.xml,测试功能,注意,对比sessionId是一致的。,
原文链接:https://www.cnblogs.com/smallSevens/p/6763114.html
以上是 架构设计之Spring-Session分布式集群会话管理 的全部内容, 来源链接: utcz.com/z/296715.html


