Spring事件传播机制
本文内容纲要:
- 基于注解的事件监听@EventListener:- 异步事件:
- 事件传播机制:
- Spring 事件源码分析:
Spring是基于事件驱动模型的,事件驱动模型也就是我们常说的观察者,或者发布-订阅模型。理解观察者模式更有助于理解 Spring 事件机制,话不多说,我们先来看一下 Spring 的事件角色的类图
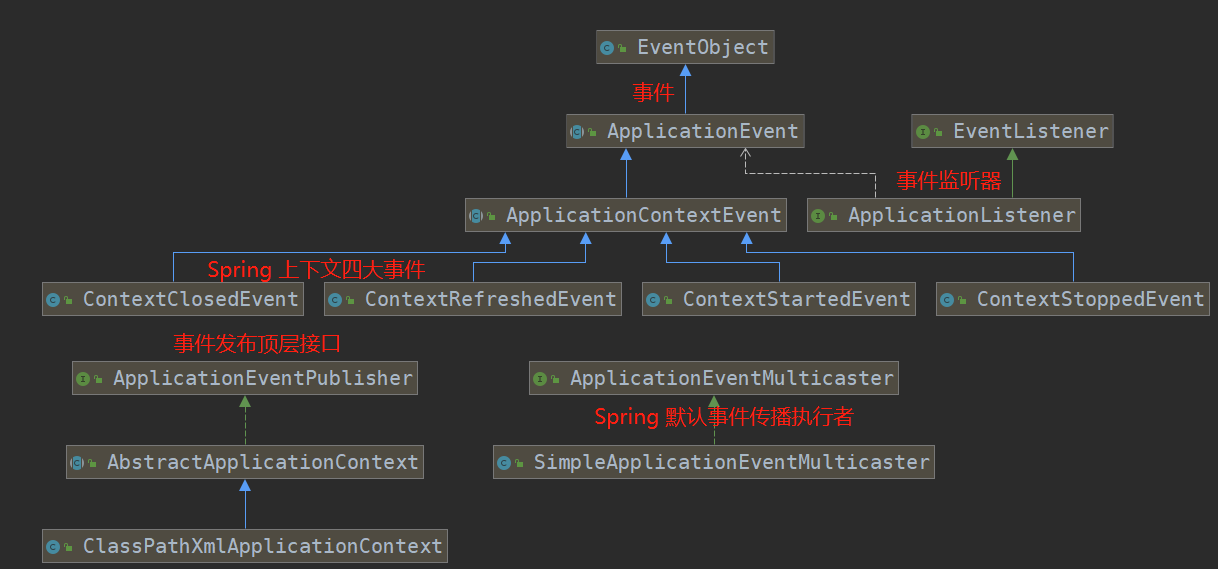
从此类图中我们可以得到以下信息:
- 事件源:如果我们需要实现事件传播的话,我们首先需要实现自己的事件类去实现 ApplicationEvent 接口。
- 监听者:需要定义自己的事件监听器类去实现 ApplicationListener
接口。 - 事件发布:需要有一个对象去发布该事件,从类图中我们可以了解到,应用上下文 ApplicationContext 就是一个天生的事件发布源。我们通常可以 事件ApplicationEventPublisherAware接口来注入上下文中的 ApplicationEventPublisher,既可以通过它发布事件
需要知道的是,在spring源码中 AbstractApplicationContext 持有了 ApplicationEventMulticaster引用,且通过他进行事件的发布,默认实现为 SimpleApplicationEventMulticaster。那么了解了这些,我们可以来简单实现一下我们的spring自定义事件:
1.定义一个类,及源事件:
public class Order { private String orderNo;
private String orderStatus;
private String goods;
private Date createTime;
//省略 get/set
}
//源事件
public class OrderCreateEvent extends ApplicationEvent {
private final Order order;
public OrderCreateEvent(Object source, Order order) {
super(source);
this.order = order;
}
public Order getOrder() {
return order;
}
}
2.定义事件监听器:
@Componentpublic class OrderCreateEventListener implements ApplicationListener<OrderCreateEvent> {
@Override
public void onApplicationEvent(OrderCreateEvent event) {
System.out.printf(this.getClass().getName() + " -- ApplicationListener 接口实现,订单号[%s]:,商品[%s]\n",
event.getOrder().getOrderNo(), event.getOrder().getGoods());
}
}
3.定义事件发服务:
@Servicepublic class OrderService implements ApplicationEventPublisherAware {
private ApplicationEventPublisher applicationEventPublisher;
/**
* 订单保存
*/
public void save(){
Order order = new Order();
order.setOrderNo("1");
order.setGoods("手机");
System.out.println("订单保存成功:" + order.toString());
//发布事件
applicationEventPublisher.publishEvent(new OrderCreateEvent(this,order));
}
@Override
public void setApplicationEventPublisher(ApplicationEventPublisher applicationEventPublisher) {
this.applicationEventPublisher = applicationEventPublisher;
}
}
4.编写测试类:
@RunWith(SpringRunner.class)@SpringBootTest(classes = SpringStudyApp.class)
public class SpringStudyTest {
@Autowired
OrderService orderService;
@Test
public void contextLoads() {
orderService.save();
}
}
简单的几步就实现了自定义的spring事件。
基于注解的事件监听@EventListener:
@Componentpublic class OrderCreateEventListenerAnnotation {
@EventListener
public void createOrderEvent(OrderCreateEvent event) {
System.out.println(this.getClass().getName() + "--订单创建事件,@EventListener注解实现,orderNo:" + event.getOrder().getOrderNo());
}
}
异步事件:
上面的监听事件都是同步触发的,如果想异步只需要两步:
- 启动类上添加 @EnableAsync注解,开启异步支持。
- 监听方法上添加 @Async注解
事件传播机制:
当我们监听一个事件处理完成时,还需要发布另一个事件,一般我们想到的是调用ApplicationEventPublisher#publishEvent发布事件方法,但Spring提供了另一种更加灵活的新的事件继续传播机制,监听方法返回一个事件,也就是方法的返回值就是一个事件对象
@Componentpublic class OrderListener {
@EventListener
public void orderListener(Order order){
System.out.println(this.getClass().getName() + " -- 监听一个订单");
}
//事件传播机制
// 当我们监听一个事件处理完成时,还需要发布另一个事件,一般我们想到的是调用ApplicationEventPublisher#publishEvent发布事件方法,
// 但Spring提供了另一种更加灵活的新的事件继续传播机制,监听方法返回一个事件,也就是方法的返回值就是一个事件对象。
@EventListener
public OrderCreateEvent orderReturnEvent(Order order){
System.out.println(this.getClass().getName() + " -- 监听一个订单,返回一个新的事件 OrderCreateEvent");
return new OrderCreateEvent(this,order);
}
}
这样子我们后续通过 applicationEventPublisher.publishEvent(order); 发布一个 Order 类型的参数的事件,他会被上面的 orderReturnEvent 方法监听到,然后最后返回一个 OrderCreateEvent 事件对象,继而触发该事件的监听。
基于事件驱动模型可以很方便的实现解耦,提高代码的可读性和可维护性,那么 Spring中是怎么进行初始化及使用的呢?我们来一探究竟。
Spring 事件源码分析:
我们知道 Spring 容器的初始化都会走到 AbstractApplicationContext 的 refresh() 方法:
@Overridepublic void refresh() throws BeansException, IllegalStateException {
synchronized (this.startupShutdownMonitor) {
// Prepare this context for refreshing.
prepareRefresh();
// Tell the subclass to refresh the internal bean factory.
ConfigurableListableBeanFactory beanFactory = obtainFreshBeanFactory();
// Prepare the bean factory for use in this context.
prepareBeanFactory(beanFactory);
try {
// Allows post-processing of the bean factory in context subclasses.
postProcessBeanFactory(beanFactory);
// Invoke factory processors registered as beans in the context.
invokeBeanFactoryPostProcessors(beanFactory);
// Register bean processors that intercept bean creation.
registerBeanPostProcessors(beanFactory);
// Initialize message source for this context.
initMessageSource();
// 关键来了,为此上下文初始化事件多播程序
// Initialize event multicaster for this context.
initApplicationEventMulticaster();
// 调用子类特殊的某些特殊的方法刷新容器
// Initialize other special beans in specific context subclasses.
onRefresh();
// 检查侦听器bean并注册它们。
// Check for listener beans and register them.
registerListeners();
// Instantiate all remaining (non-lazy-init) singletons.
finishBeanFactoryInitialization(beanFactory);
// Last step: publish corresponding event.
finishRefresh();
}
}
}
其他的方法我们在 IOC容器初始化 一文中已经介绍过了,这里直接来看 initApplicationEventMulticaster() 方法:
public static final String APPLICATION_EVENT_MULTICASTER_BEAN_NAME = "applicationEventMulticaster";protected void initApplicationEventMulticaster() {
// 获取上面初始化的 DefaultListableBeanFactory 容器
ConfigurableListableBeanFactory beanFactory = getBeanFactory();
if (beanFactory.containsLocalBean(APPLICATION_EVENT_MULTICASTER_BEAN_NAME)) {
// 如果容器里找到了这个类,那么直接赋值给成员变量
this.applicationEventMulticaster =
beanFactory.getBean(APPLICATION_EVENT_MULTICASTER_BEAN_NAME, ApplicationEventMulticaster.class);
if (logger.isDebugEnabled()) {
logger.debug("Using ApplicationEventMulticaster [" + this.applicationEventMulticaster + "]");
}
}
else {// 初始化一个 SimpleApplicationEventMulticaster
this.applicationEventMulticaster = new SimpleApplicationEventMulticaster(beanFactory);
beanFactory.registerSingleton(APPLICATION_EVENT_MULTICASTER_BEAN_NAME, this.applicationEventMulticaster);
if (logger.isDebugEnabled()) {
logger.debug("Unable to locate ApplicationEventMulticaster with name '" +
APPLICATION_EVENT_MULTICASTER_BEAN_NAME +
"': using default [" + this.applicationEventMulticaster + "]");
}
}
}
其实这个方法主要的作用是保证容器中又一个被实例化的ApplicationEventMulticaster 类型的Bean。紧接着等待子类特殊的刷新方法结束基本上整个容器也就初始化完成了。然后调用 registerListeners():
private final Set<ApplicationListener<?>> applicationListeners = new LinkedHashSet<>();//注册监听器
protected void registerListeners() {
// Register statically specified listeners first.
for (ApplicationListener<?> listener : getApplicationListeners()) {
// 遍历上面这个集合,将提前储备好的监听器添加到监听器容器中
getApplicationEventMulticaster().addApplicationListener(listener);
}
// 获得容器中类型是 ApplicationListener 的 beanName集合
// Do not initialize FactoryBeans here: We need to leave all regular beans
// uninitialized to let post-processors apply to them!
String[] listenerBeanNames = getBeanNamesForType(ApplicationListener.class, true, false);
for (String listenerBeanName : listenerBeanNames) {
getApplicationEventMulticaster().addApplicationListenerBean(listenerBeanName);
}
// 发布这个 earlyApplicationEvents 容器中的事件
// Publish early application events now that we finally have a multicaster...
Set<ApplicationEvent> earlyEventsToProcess = this.earlyApplicationEvents;
this.earlyApplicationEvents = null;
if (earlyEventsToProcess != null) {
for (ApplicationEvent earlyEvent : earlyEventsToProcess) {
// 委派上面初始化的 SimpleApplicationEventMulticaster 进行广播发布
getApplicationEventMulticaster().multicastEvent(earlyEvent);
}
}
}
紧接着来看 multicastEvent(ApplicationEvent event):
@Overridepublic void multicastEvent(ApplicationEvent event) {
multicastEvent(event, resolveDefaultEventType(event));
}
@Override
public void multicastEvent(final ApplicationEvent event, @Nullable ResolvableType eventType) {
// 再去通过event去获得一个ResolvableType
ResolvableType type = (eventType != null ? eventType : resolveDefaultEventType(event));
// 通过事件及类型进行获取事件监听器进行遍历
for (final ApplicationListener<?> listener : getApplicationListeners(event, type)) {
Executor executor = getTaskExecutor();
// 当 executor 不为空,这里走的是异步事件
if (executor != null) {
executor.execute(() -> invokeListener(listener, event));
}
// 同步事件
else {
invokeListener(listener, event);
}
}
}
从这里去调用 listener 的 onApplicationEvent 方法:
private void doInvokeListener(ApplicationListener listener, ApplicationEvent event) { try {
listener.onApplicationEvent(event);
}
//.....省略部分代码
}
像容器初始化完成,AbstractApplicationContext的 finishRefresh() 方法中
protected void finishRefresh() { // Clear context-level resource caches (such as ASM metadata from scanning).
clearResourceCaches();
// Initialize lifecycle processor for this context.
initLifecycleProcessor();
// Propagate refresh to lifecycle processor first.
getLifecycleProcessor().onRefresh();
// 发布容器刷新完成事件
// Publish the final event.
publishEvent(new ContextRefreshedEvent(this));
// Participate in LiveBeansView MBean, if active.
LiveBeansView.registerApplicationContext(this);
}
这里所调用的 publishEvent(new ContextRefreshedEvent(this)) 最终还是走 multicastEvent(ApplicationEvent event) 方法的。这就是Spring事件的基本处理流程。
本文内容总结:基于注解的事件监听@EventListener:,异步事件:,事件传播机制:,Spring 事件源码分析:,
原文链接:https://www.cnblogs.com/wuzhenzhao/p/12859876.html
以上是 Spring事件传播机制 的全部内容, 来源链接: utcz.com/z/296573.html

