Spring之三种依赖注入,给各种集合类型的属性注入值
本文内容纲要:Spring之三种依赖注入,给各种集合类型的属性注入值
一、第一种注入(set注入):
创建实体类,Teacher:
package org.ruangong.entity;public class Teacher {
private String name;
private int age;
public String getName() {
return name;
}
public void setName(String name) {
this.name = name;
}
public int getAge() {
return age;
}
public void setAge(int age) {
this.age = age;
}
}
创建实体类,Course:
package org.ruangong.entity;public class Course {
private String cname;
private int chour;
private Teacher teacher;
public String getCname() {
return cname;
}
public void setCname(String cname) {
this.cname = cname;
}
public int getChour() {
return chour;
}
public void setChour(int chour) {
this.chour = chour;
}
public Teacher getTeacher() {
return teacher;
}
public void setTeacher(Teacher teacher) {
this.teacher = teacher;
}
@Override
public String toString() {
return "Course [cname=" + cname + ", chour=" + chour + ", teacher=" + teacher.getName() + teacher.getAge()+"]";
}
}
在applicationContext.xml文件中添加bean标签。
<bean id="teacher" class="org.ruangong.entity.Teacher"> <property name="name" value="王建民"></property>
<property name="age" value="50"></property>
</bean>
<bean id="course" class="org.ruangong.entity.Course">
<property name="cname" value="java"></property>
<property name="chour" value="2"></property>
<property name="teacher" ref="teacher"></property>
</bean>
其中的ref=“”,对应对象值。将teacher对象注入到course对象中。
二、第二中注入(构造器注入):
在Teacher实体中添加构造方法。
public Teacher(String name, int age) { super();
this.name = name;
this.age = age;
}
在Course实体中添加构造方法:
public Course(String cname, int chour, Teacher teacher) { super();
this.cname = cname;
this.chour = chour;
this.teacher = teacher;
}
在之前的applicationContext.xml文件的id为teacher和course标签重新添加构造方法。
<bean id="teacher" class="org.ruangong.entity.Teacher"> <!-- 通过set注入 -->
<!-- <property name="name" value="王建民"></property>
<property name="age" value="50"></property> -->
<!-- 通过构造器注入 -->
<constructor-arg value="刘丹"></constructor-arg>
<constructor-arg value="48"></constructor-arg>
</bean>
<bean id="course" class="org.ruangong.entity.Course">
<!-- 通过set注入 -->
<!-- <property name="cname" value="java"></property>
<property name="chour" value="2"></property>
<property name="teacher" ref="teacher"></property> -->
<!-- 通过构造器注入 -->
<constructor-arg value="PHP"></constructor-arg>
<constructor-arg value="5"></constructor-arg>
<constructor-arg ref="teacher"></constructor-arg>
</bean>
或者可以在constructor标签的后面添加index="key",key值来控制属性顺序。
或者添加name="key",key来控制属性名。
三、第三种注入(P值注入)
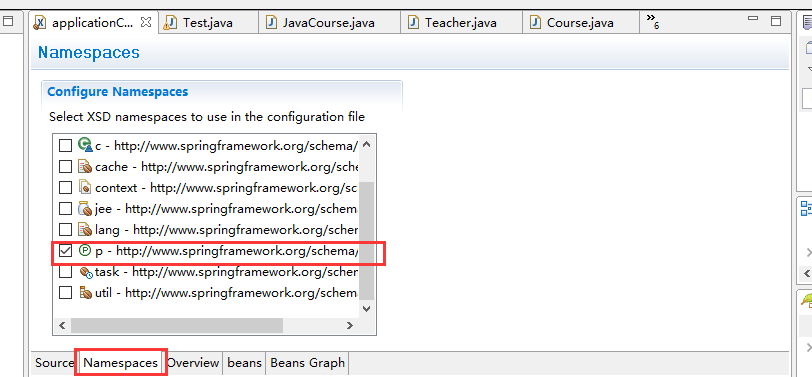
生成P的标签。
<bean id="teacher" class="org.ruangong.entity.Teacher" p:name="刘立嘉" p:age="60"> <!-- 通过set注入 -->
<!-- <property name="name" value="王建民"></property>
<property name="age" value="50"></property> -->
<!-- 通过构造器注入 -->
<!-- <constructor-arg value="刘丹"></constructor-arg>
<constructor-arg value="48"></constructor-arg> -->
</bean>
<bean id="course" class="org.ruangong.entity.Course" p:cname="统一建模" p:chour="6" p:teacher-ref="teacher">
<!-- 通过set注入 -->
<!-- <property name="cname" value="java"></property>
<property name="chour" value="2"></property>
<property name="teacher" ref="teacher"></property> -->
<!-- 通过构造器注入 -->
<!-- <constructor-arg value="PHP"></constructor-arg>
<constructor-arg value="5"></constructor-arg>
<constructor-arg ref="teacher"></constructor-arg> -->
</bean>
四、集合类型值注入:
创建集合实体,AllCollectionType:
package org.ruangong.entity;import java.util.Arrays;
import java.util.List;
import java.util.Map;
import java.util.Properties;
import java.util.Set;
public class AllCollectionType {
private List<String> list;
private String[] array;
private Map<String,String> map;
private Set<String> set;
private Properties props;
public List<String> getList() {
return list;
}
public void setList(List<String> list) {
this.list = list;
}
public String[] getArray() {
return array;
}
public void setArray(String[] array) {
this.array = array;
}
public Map<String, String> getMap() {
return map;
}
public void setMap(Map<String, String> map) {
this.map = map;
}
public Set<String> getSet() {
return set;
}
public void setSet(Set<String> set) {
this.set = set;
}
public Properties getProps() {
return props;
}
public void setProps(Properties props) {
this.props = props;
}
@Override
public String toString() {
return "AllCollectionType [list=" + list + ", array=" + Arrays.toString(array) + ", map=" + map + ", set=" + set
+ ", props=" + props + "]";
}
}
在applicationContext.xml文件中:
<bean id="collection" class="org.ruangong.entity.AllCollectionType"> <!-- 通过set方式赋值 -->
<property name="list">
<list>
<value>篮球</value>
<value>足球</value>
<value>乒乓球</value>
</list>
</property>
<property name="array">
<array>
<value>篮球_array</value>
<value>足球_array</value>
<value>乒乓球_array</value>
</array>
</property>
<property name="map">
<map>
<entry>
<key>
<value>
foot
</value>
</key>
<value>足球</value>
</entry>
<entry>
<key>
<value>
basket
</value>
</key>
<value>篮球球</value>
</entry>
<entry>
<key>
<value>
pingpang
</value>
</key>
<value>足球</value>
</entry>
</map>
</property>
<property name="set">
<set>
<value>篮球_set</value>
<value>足球_set</value>
<value>乒乓球_set</value>
</set>
</property>
<property name="props">
<props>
<prop key="foot4">足球</prop>
<prop key="basket4">篮球</prop>
<prop key="pp4">乒乓球</prop>
</props>
</property>
</bean>
test中进行测试:
public static void collectionDemo(){ ApplicationContext context = new ClassPathXmlApplicationContext("applicationContext.xml");
AllCollectionType type = (AllCollectionType)context.getBean("collection");
System.out.println(type);
}

本文内容总结:Spring之三种依赖注入,给各种集合类型的属性注入值
原文链接:https://www.cnblogs.com/jccjcc/p/13976728.html
以上是 Spring之三种依赖注入,给各种集合类型的属性注入值 的全部内容, 来源链接: utcz.com/z/296044.html


