APICloud 入门教程窗口篇
什么是窗口,窗口可以理解为一屏幕内容的一个基本载体,里面可以放导航,图片,视频,文字等组成一屏幕内容。
不同的窗口组成一个APP, 例如购物APP有【首页】,【购物车】,【我的】等不同的窗口。不同的窗口之间可以进行跳转。
api.openWin 打开一个window窗口。window窗口是全屏的,不可设置大小。
api.openFrame 打开一个frame窗口。frame 窗口可以设置大小。
openWin示例代码:
api.openWin({ name: 'firstpage', //窗口名称,自定义,和页面名称可不一致
url:'html/firstpage.html' //页面地址url
})
firstpage.html 页面代码:
<!DOCTYPE html><html lang="en">
<head>
<meta charset="UTF-8">
<meta name="viewport" content="width=device-width, initial-scale=1.0">
<title>Document</title>
<style>
body {
background-color: blue;
}
p {
color: #fff;
font-size: 20px;
margin-top: 60px;
}
</style>
</head>
<body>
<p>首页 firstpage</p>
<script>
apiready = function () {
api.openFrame({
name: 'back',
url: 'back.html',
rect: {
marginLeft: 0,
marginTop: 0, //相对父页面上外边距的距离,数字类型
h: 50
},
pageParam: {
name: 'test'
}
});
}
</script>
</body>
</html>
openFrame 示例代码:
api.openFrame({ name: 'back',
url: 'back.html',
rect: {
marginLeft: 0,
marginTop: 0, //相对父页面上外边距的距离,数字类型
h: 50
},
pageParam: {
name: 'test'
}
});
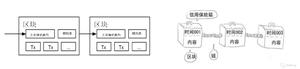
下面举一个例子,用window+frame 组合实现一个首页加一个返回按钮。如下图,“返回” 所在的back.html 是用openFrame 打开的一个frame窗口。下面蓝色全屏页面(fistpage.html)是openWin 打开的一个window窗口。
项目目录示例图:
有了基础的 openWin 和 openFrame ,我们就可以灵活运用,组合出多种多样的布局,满足实际的项目需求。
openWin 和 openFrame 各有30多个参数,这里不一一细讲了,具体可到官方文档查看学习。
https://docs.apicloud.com/Cli...
下面讲解高级布局窗口 tabLayout
api.openTabLayout
打开tabLayout布局
本方法继承了openWin方法的所有参数,同时在此基础上增加了navigationBar、tabBar等参数,来设置和使用原生的顶部导航栏和底部标签栏,可以通过closeWin方法来关闭页面。
如果在首页需要使用tabLayout,可以将相关参数配置在JSON文件中,再在config.xml中将content的值设置成该JSON文件的路径,例如:
// 创建一个app.json文件,放置在widget目录下{
"name": "root",
"tabBar": {
"frames": [{
"title": "页面一",
"name": "page1",
"url": "widget://html/page1.html"
}, {
"title": "页面二",
"name": "page2",
"url": "widget://html/page2.html"
}, {
"title": "页面三",
"name": "page3",
"url": "widget://html/page3.html"
}],
"list": [{
"text": "页面一",
"iconPath": "widget://image/tab_1.png",
"selectedIconPath": "widget://image/tab_1_hov.png"
}, {
"text": "页面二",
"iconPath": "widget://image/tab_2.png",
"selectedIconPath": "widget://image/tab_2_hov.png"
}, {
"text": "页面三",
"iconPath": "widget://image/tab_3.png",
"selectedIconPath": "widget://image/tab_3_hov.png"
}]
}
}
config.xml中将content的值设置成该JSON文件的路径:
实现一个示例效果如下 :
高级窗口的优势 ,代码量较少,可灵活配置顶部或底部按钮。
高级窗口需要了解的事件:
tabitembtn
监听tabLayout中tabBar项的点击事件。默认点击每一项时会切换到对应的页面,如果监听了此事件则页面不会自动切换过去,可以通过setTabBarAttr设置选中项
callback(ret, err)
ret:
描述:tabBar项点击事件的回调
内部字段:
{ index: //点击的项的索引,从0开始,数字类型
}
示例代码
api.addEventListener({ name:'tabitembtn'
},function(ret, err){
var index = ret.index + 1;
alert('点击了第'+index+'项');
});
可参看官方出的TabLayout示例代码和官方文档进行学习。下面是链接。
https://developer.yonyou.com/...
https://docs.apicloud.com/Cli...
以上是 APICloud 入门教程窗口篇 的全部内容, 来源链接: utcz.com/z/267778.html