ByteArrayOutputStream与InputStream互相转换方式
ByteArrayOutputStream与InputStream互相转换
InputStream 转为 ByteArrayOutputStream
public Reader(InputStream input) {
ByteArrayOutputStream baos = new ByteArrayOutputStream();
byte[] buffer = new byte[1024];
int len;
try {
while ((len = input.read(buffer)) > -1) {
baos.write(buffer, 0, len);
}
baos.flush();
} catch (IOException e) {
throw new Exception("Illegal flow.");
} finally {
try {
input.close();
} catch (IOException e) {
logger.error("file stream shutdown failed.");
}
}
this.baos = baos;
}
ByteArrayOutputStream 转为 InputStream
private InputStream streamTran(ByteArrayOutputStream in) {
return new ByteArrayInputStream(in.toByteArray());
}
Java字节数组流(ByteArrayInputStream和ByteArrayOutputStream)
1、FileInputStream、FileOutputStream、FileReader、FileWriter是存储在硬盘上的
硬盘上的资源java虚拟机是无权直接访问的,必须借助操作系统,java虚拟机借助完了之后要通知操作系统释放资源
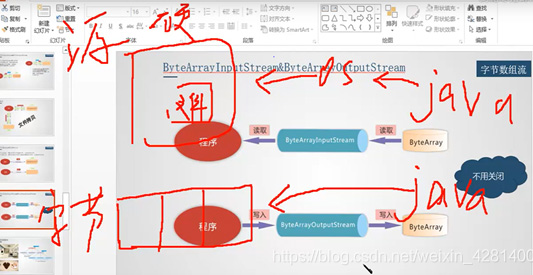
2、把源头换成电脑上的一块内存(字节数组),既然是一块内存那么java就可以直接访问,因为是java虚拟机的一块内存。不用关闭(释放)
3、所有的东西都可以转成字节数组(字符串转成字节数组、任何一个数据(包括12、包括3.14、包括一个一个的对象都可以转成字节数组))
转成字节数组有什么好处?
字节数组就为二进制了,方便网络上进行传输
4、文件可以无限制的往里面加内容,但是内存速度快、量小,所以内存(字节数组)不允许不建议量特别的大
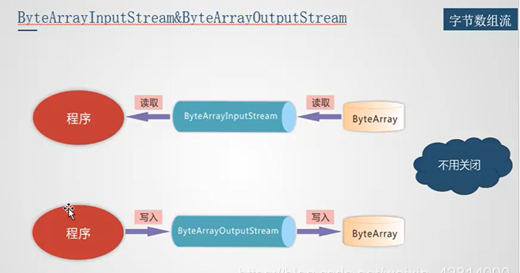
ByteArrayInputStream(byte[] buf) 参数为一个字节数组
创建一个 ByteArrayInputStream ,使其使用 buf作为其缓冲区数组
ByteArrayInputStream代码示例
/*
* ByteArrayInputStream(byte[] buf)
* 创建一个 ByteArrayInputStream ,使其使用 buf作为其缓冲区数组
*
* 四个步骤:字节数组输入流
* 1、创建源:字节数组 不要太大
* 2、选择流
* 3、操作
* 4、释放资源:可以不用处理
*/
public class IOTest07 {
public static void main(String[] args) {
// 1、创建源
byte[] src = "talk is cheap show me the code".getBytes();
// 2、选择流
InputStream is = null;
try {
is = new ByteArrayInputStream(src);
// 3、操作(分段读取)
byte[] flush = new byte[5];//缓冲容器
int len = -1;//接收长度
while((len=is.read(flush))!=-1) {
// 字节数组-->字符串(解码)
String str = new String(flush,0,len);
System.out.println(str);
}
} catch (IOException e) {
// TODO Auto-generated catch block
e.printStackTrace();
}finally {
// 4、 释放资源
try {
if (null != is) {
is.close();
}
} catch (IOException e) {
// TODO Auto-generated catch block
e.printStackTrace();
}
}
}
}
ByteArrayOutputStream代码示例
/*
* ByteArrayOutputStream()不需要指定(源)目的地()参数为空,不用传源头,写完之后 主动去数组里面拿 toByteArray()
*
* 字节数组输出流 ByteArrayOutputStream
* 1、创建源:内部维护(内部根据数据要多大给你多大)
* (内部根据数据要多大给你多大)当数据写入缓冲区时,缓冲区会自动增长。 数据可以使用toByteArray()和toString()
* 2、选择流:不关联源
* 3、操作(写出内容)
* 4、释放资源:可以不用
*
* 获取数据:toByteArray
*/
public class IOTest08 {
public static void main(String[] args) {
// 1、创建源:内部维护(内部根据数据要多大给你多大)
// ByteArrayOutputStream()不需要指定(源)目的地()参数为空
byte[] dest = null;
// 新增方法:父类没有的方法子类有
// 能够使用多态的两种:父类有的方法、子类没有(为延用)、父类有的方法子类也有(方法重写)
// 2、选择流 (因为要使用新增方法(父类没有的方法子类有),所以不能发生多态)
ByteArrayOutputStream baos = null;
try {
baos = new ByteArrayOutputStream();
// 3、操作(写出)
String msg = "show me the code";
byte[] datas = msg.getBytes();// 字符串-->字节数组(编码)
baos.write(datas, 0, datas.length);
baos.flush();
// 获取数据
dest = baos.toByteArray();
System.out.println(dest.length+"-->"+new String(dest,0,baos.size()));
} catch (IOException e) {
// TODO Auto-generated catch block
e.printStackTrace();
} finally {
try {
if (null != baos) {
baos.close();
}
} catch (Exception e) {
e.printStackTrace();
}
}
}
}
注意:
新增方法:父类没有的方法子类有
能够使用多态的两种:父类有的方法子类没有(为延用)、父类有的方法子类也有(方法重写,子类进行实现)
选择流 (因为要使用新增方法(父类没有的方法子类有),所以不能发生多态)
以上为个人经验,希望能给大家一个参考,也希望大家多多支持。
以上是 ByteArrayOutputStream与InputStream互相转换方式 的全部内容, 来源链接: utcz.com/p/251418.html